Let’s Talk About Migrate to Flow More Generally
Before we really dive into how you can use the Migrate to Flow tool to migrate Workflow Rules or Processes to Flow, we really should first talk about what the tool is, what it was designed for, and how Salesforce Admins can begin to use it effectively. In the simplest of terms, the Migrate to Flow is a migration tool that allows Salesforce Admins to migrate Workflow Rules and Processes into Flow. The tool allows users to do a 1-to-1 migration of existing automations into Flow, allowing them to be edited in Flow. Any selected automation for migration will be migrated as a Record-Triggered Flow (usually one that triggers on After-Save). I’ll talk a bit more about some of this in my review blog in the third week of this series, but it is worth noting that usage of the tool can lead to some challenges as it pertains to things such as naming conventions (the tool uses the default naming convention style for Flow).Considerations for the Migration of Workflow Rules Using Migrate to Flow
We’ll now pivot across to using the Migrate to Flow tool to migrate Workflow Rules into Flow. Before we get into that though, let’s first highlight some of the consideration points when it comes to using the tool. There are some things you can’t do with the tool. In the instances where you can’t migrate certain Workflow Rules, you will have to do a recreation rather than a straight migration. Below are the key consideration points for migration as highlighted by Salesforce in their help documentation:The Migrate to Flow Tool Supports Workflow Rules That Contain These Items
- Field-based criteria.
- Field updates.
- Email alerts.
- Outbound messages.
- Time-dependent workflow actions.
- Rule criteria formula that’s set to true (unless evaluation criteria is also set to created, and any time it’s edited to subsequently meet criteria).
- Equal to null.
- Not equal to null.
- Rule criteria formula.
Workflow Rules That Contain the Following Can’t Be Migrated
- Criteria with no defined workflow actions.
- Global variable fields.
- Fields on related records.
- Record Types.
- The does not contain, includes, excludes, or within operators.
- The greater than, greater or equal, less than, less or equal operators on picklist fields.
- Formulas that use Hour, Minute, Second, TimeNow, TimeValue, IsClone, or $RecordType.
- Tasks.
- Relative date values in date fields.
- Multiple currencies.
As you can see, there are a number of instances where you can’t migrate Workflow Rules to Flow because of limitations of the tool. This point and the 1-to-1 migration point are key points that will be elaboarated upon in the final post of this series, but I do want to flag these things up now so that you are fully aware of the limitations of the Migrate to Flow tool as we look at how it works.
Migrating Workflow Rules to Flow with Migrate to Flow
Now that the preamble has been written up and identified, let’s take a look at how the tool itself works. For the sake of ease, in both this post and the post next week we’ll migrate a piece of declarative automation that more or less does the same thing. Before I showcase the tool being used, I’ll go over the piece of declarative automation that I’ll build and what it’s function is. After I’ve done that, I’ll move on to showcase the migration tool. Please note that because of the showcase this week, some of the bits you’ll see this week may not be shown again next for the sake of ease, this is because the tool uses the same basic framework for the migration of both Workflow Rules and Processes. Now let’s talk about the automation that we’ll be migrating in this demo.
The Automation Being Migrated
The piece of automation that we will be migrating here is based on a common scenario. The scenario we’ll be working with here is the updating of an Opportunity’s Close Date if an Opportunity stage is set to Closed but the Close Date is in the past. For those who might now know this yet, when an Opportunity record is set to closed in Salesforce, the Close Date will be changed to the current day if the date is in the future, if it is in the past it will not be changed and therefore keep the Close Date stored at the commit request. The automation that we will migrate here will be one that changes the value of Close Date if the value on save is in the past. One thing to note with this scenario is that due to the limitations of the migration tool, I have had to create some additional fields in order to make this demo work. I will outline the newly created fields as I go along. So if you want to follow along yourself, please note that you will have to create these additional fields to make the Workflow Migration work as should be expected.
N.B. Please note that this explanation will apply to the automation we move into Flow from Process Builder in next week’s post.
Migrating the Workflow Rule to Flow
OK, so before we dive into the actual migration of the Workflow Rule, you must have the Workflow Rule you want to migrate already built. For the purposes of this post, I have built the Workflow Rule from scratch, you can see the workflow rule below.
The Workflow Rule Being Migrated
Below is the Workflow Rule that we will be migrating in this post:
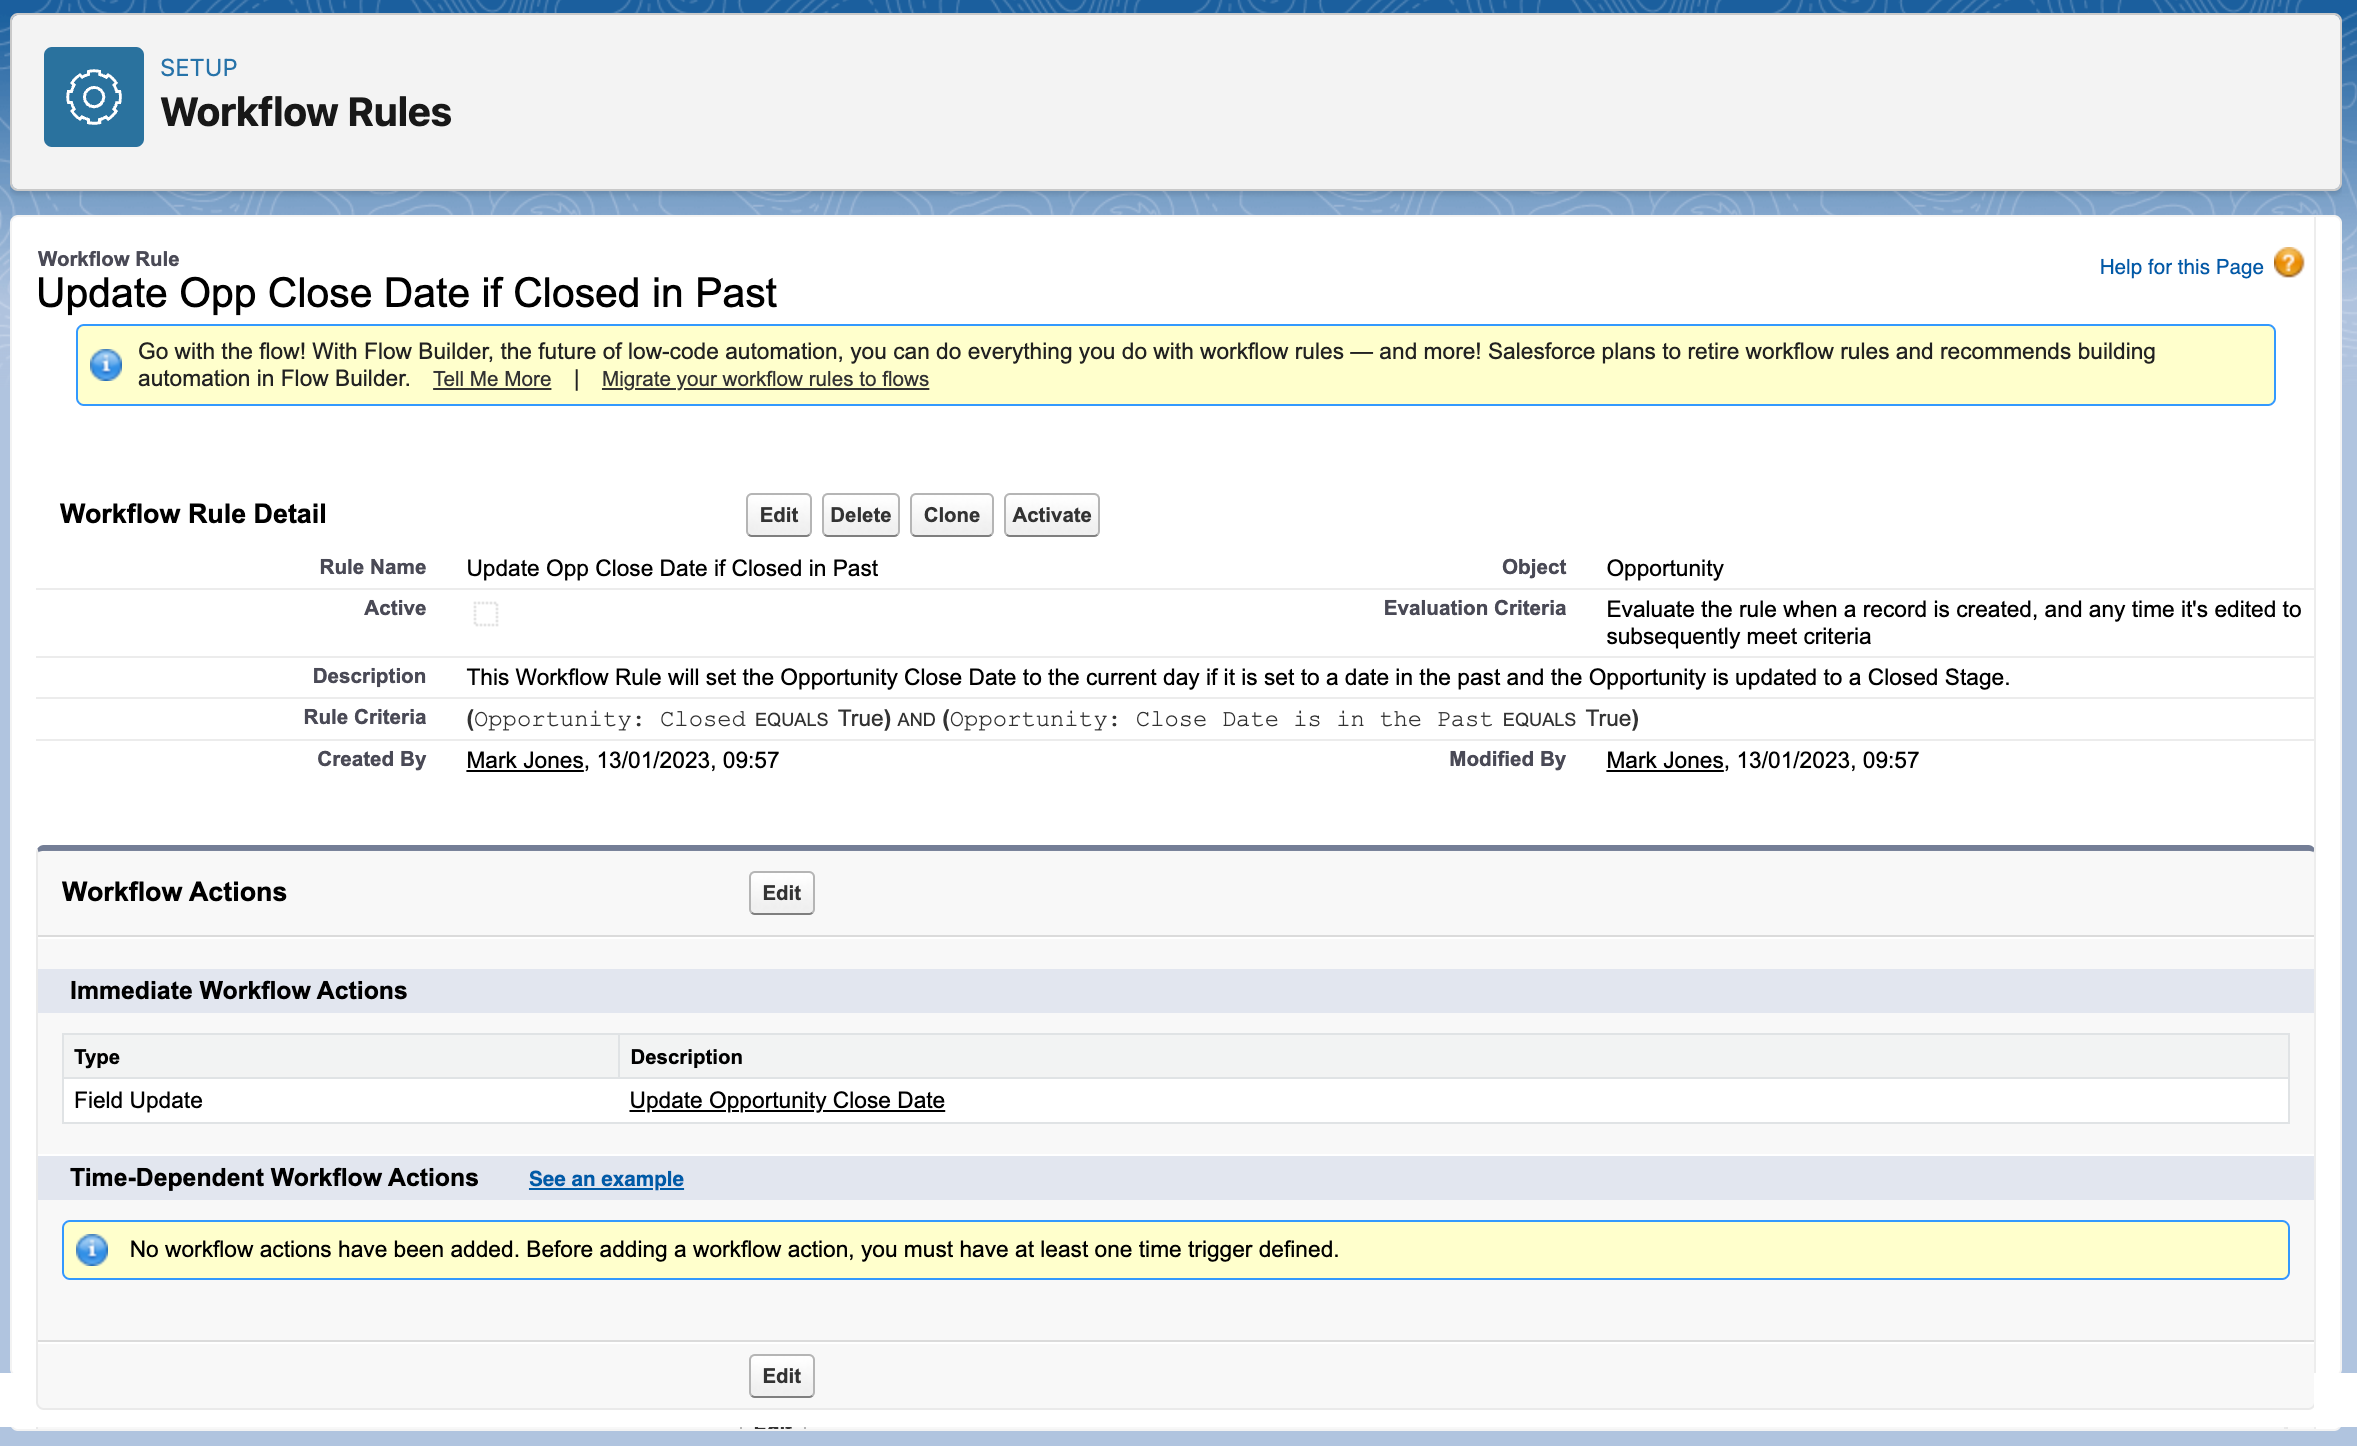
This screenshot above shows the Workflow Rule that is being migrated. This Workflow Rule has two points of entry criteria and a single field update. The two points of entry criteria are to check if the Opportunity is Closed and if the Close Date is less than today, and therefore the Close Date is in the past.
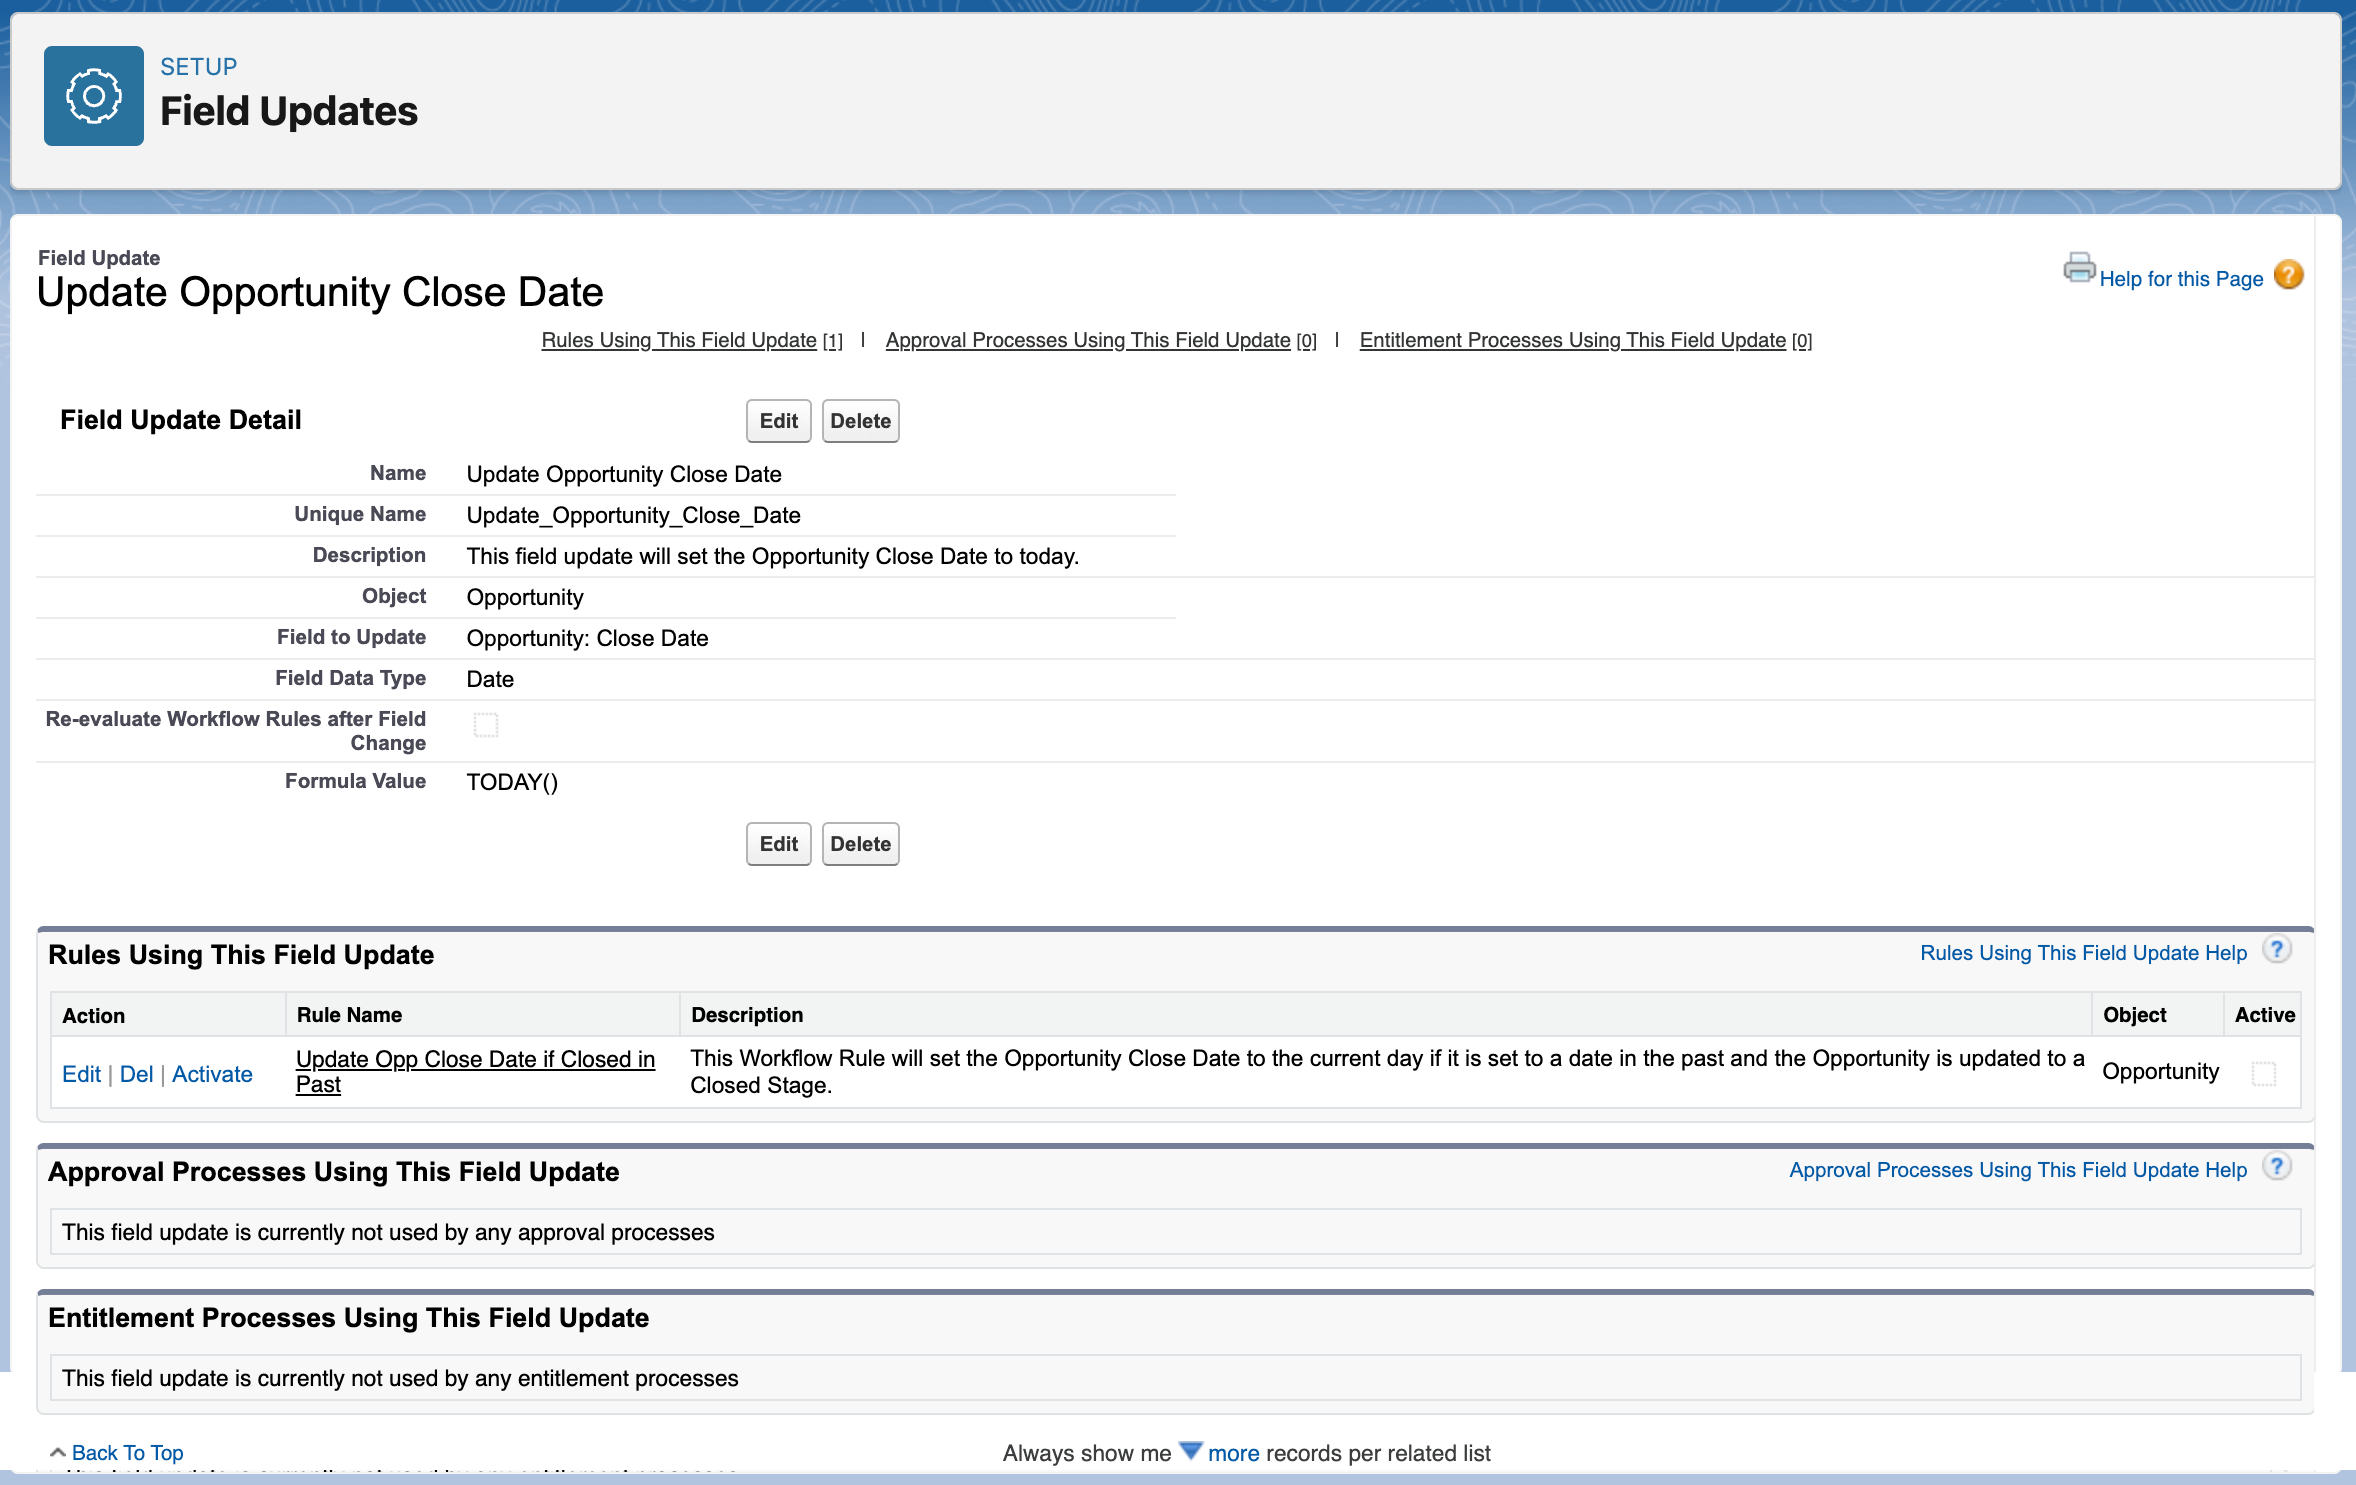
This screenshot above shows the field update that is carried out if the Opportunity is Closed and the Close Date is in the past. The field update is just a routine update to the Close Date field using a formula of TODAY() to assign the current date to the Opportunity record when the update is done.
That is all we need for this Workflow Rule in order to migrate it into a Flow, so let’s first now move on to the actual migration.
Running the Migration
Running the task of migrating a Workflow Rule to Flow using the Migrate to Flow is actually really simple. There aren’t too many tasks to carry in order to do the migration, the bulk of the work is done post-migration when using this simple tool in Salesforce.
The migration process in Salesforce can be broken down into three simple stages:
- Select the automation to migrate.
- Migrate the automation to Flow.
- Carry out any relevant post-migration updates.
We’ll get into it a little bit in this post, but there are several things to note when migrating a Workflow Rule into Flow. For now, we’ll simply be going over the first two stages of the migration process, starting with selecting the Workflow Rule to be migrated.
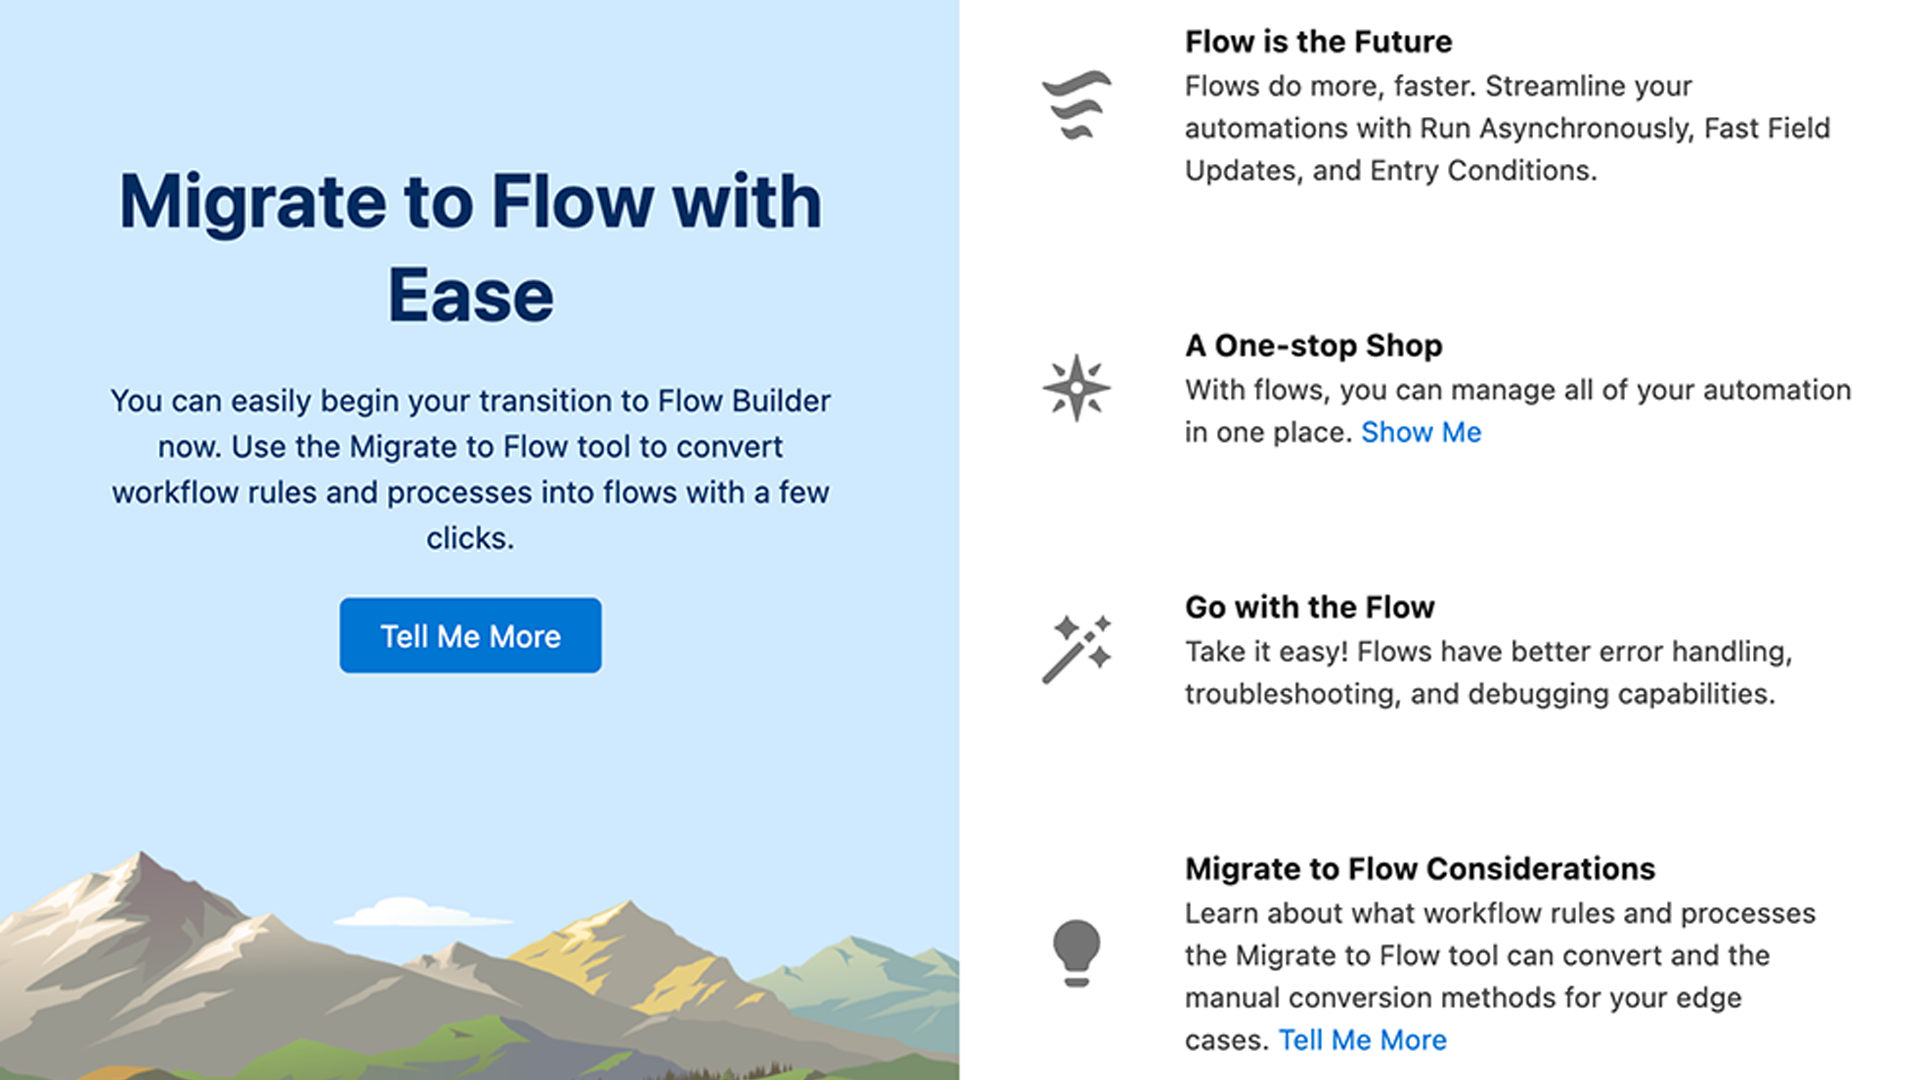
To run the migration tool, you’ll first need to go to Setup. Once you’re in Setup, simply type Migrate to Flow in Quick Find and you’ll see the Migrate to Flow appear in your menu. Click it, and you’ll enter into the page for the tool.
If it is your first time using the tool, you’ll see the screen on your left pop as a modal. This is a welcome screen to the tool. Here you will see some basic information promoting the tool and why you should use it. This should only appear the first time you navigate to the tool in Setup.
When you arrive in the tool, you should be greeted by a list view with a list of all of the Workflow Rules (and Process Builders) that you can now migrate to Flow. The view will will include the automation type, the related object and it’s status. To migrate, simply click Migrate to Flow.
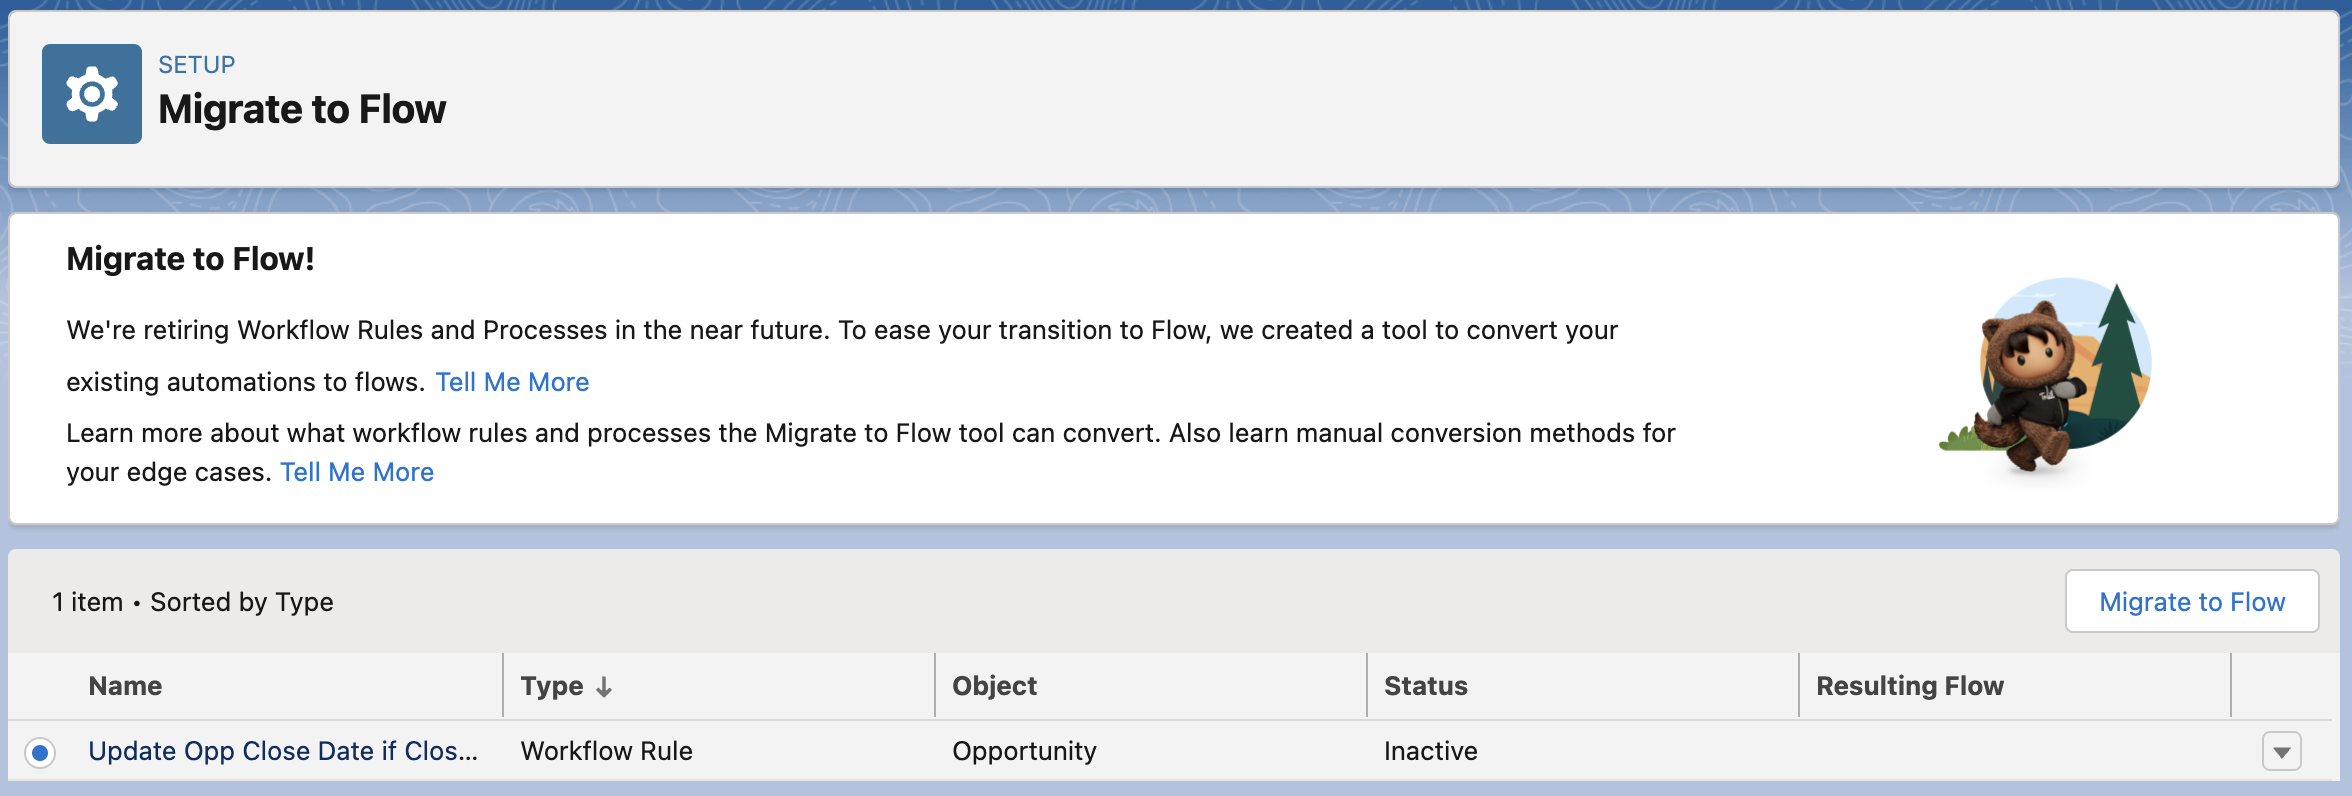
Once you have clicked the button to migrate the automation into Flow, the automatic creation of your Flow will begin. It is worth noting that once your migration has been completed, you will see the name of the Flow that was created in the Resulting Flow column in the list view highlighting the automations you can migrate. My personal recommendation here is to create a checklist of the Flows you want to migrate if using this tool, that way you can tick them off and have easy access to a list of your migrated automations. Making it easier to know which Workflow Rules and Process Builders have been migrated instead of relying on the list view. That recommendation may sound extremely simple, but it will honestly save you a major headache in the long run, trust me!
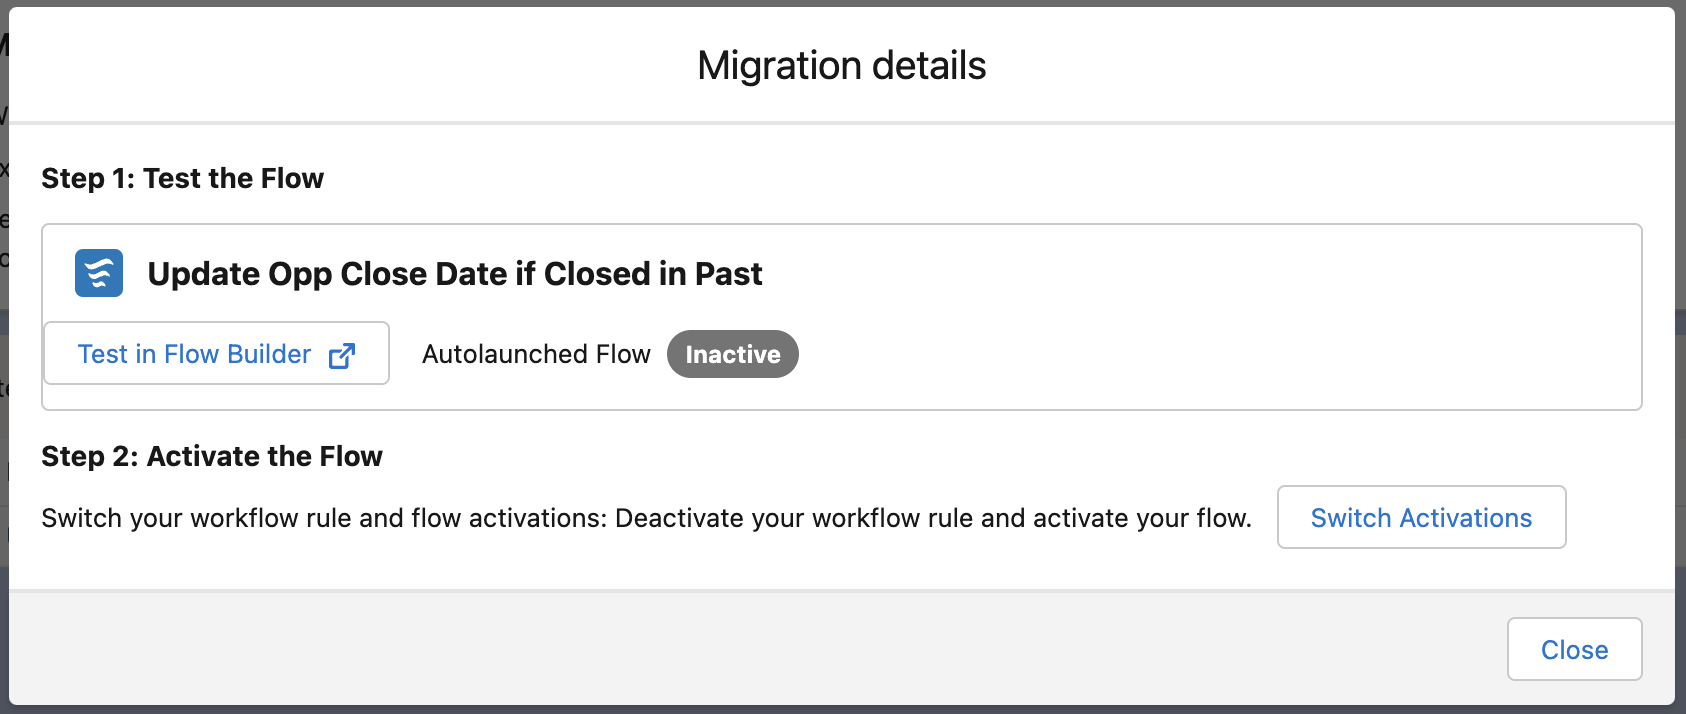
Launching the migration process will bring up a pop-up modal that shows the migration taking place. Once the migration is complete you will be taken to this modal showing you the name of the Flow, it’s active status (which should always be inactive), a button to test the Flow in Flow Builder and the option to Switch Activations. I would recommend keeping this open.
Keeping this modal open until your done will allow you to open your Flow in Flow Builder in another tab before switching around the activations. What happens when you click on Switch Activations is that Salesforce will activate your Flow and deactivate your Workflow Rule. You can migrate inactive Workflow Rules, so in some cases you won’t need to switch activations at all. Like I say, my recommendation would be to leave this modal open until after you’ve opened the Flow in Flow Builder and checked everything.
But that’s the migration done, let’s show you the resulting Record-Triggered Flow that was created shall we?
Here’s the Flow That Was Created By the Migration
In this section we’ll go over the Flow that was created in a little bit of detail so you can see how the tool creates your new Flow.
Don’t worry, we’ll be breaking this Flow down in detail. However, what you see here is the end result of the migration process in the canvas of Flow Builder. As you can see the resulting Flow is one that has some interesting properties in the Start Element, and a singular update element.
The resulting criteria for the start element for the Flow that was migrated is as follows:
- Object: Opportunity
- Trigger: A record is created or updated.
- Conditions: 2
- Optimise for: Actions and Related Records (After-Save Flow).
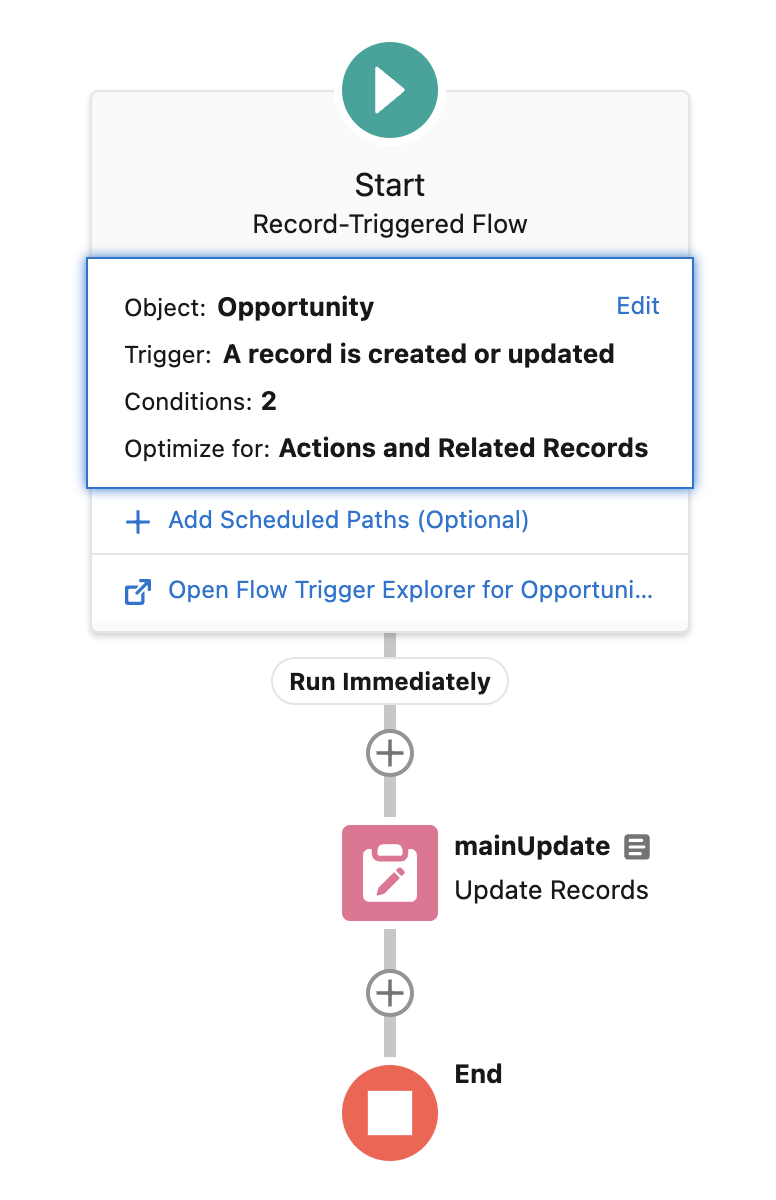
We’ll go over this more as we progress through the Flow, but already there are things that I would do slightly differently if I was to build this Flow myself from scratch. But for now, let’s go a little deeper into the Start Element and see how that was configured.
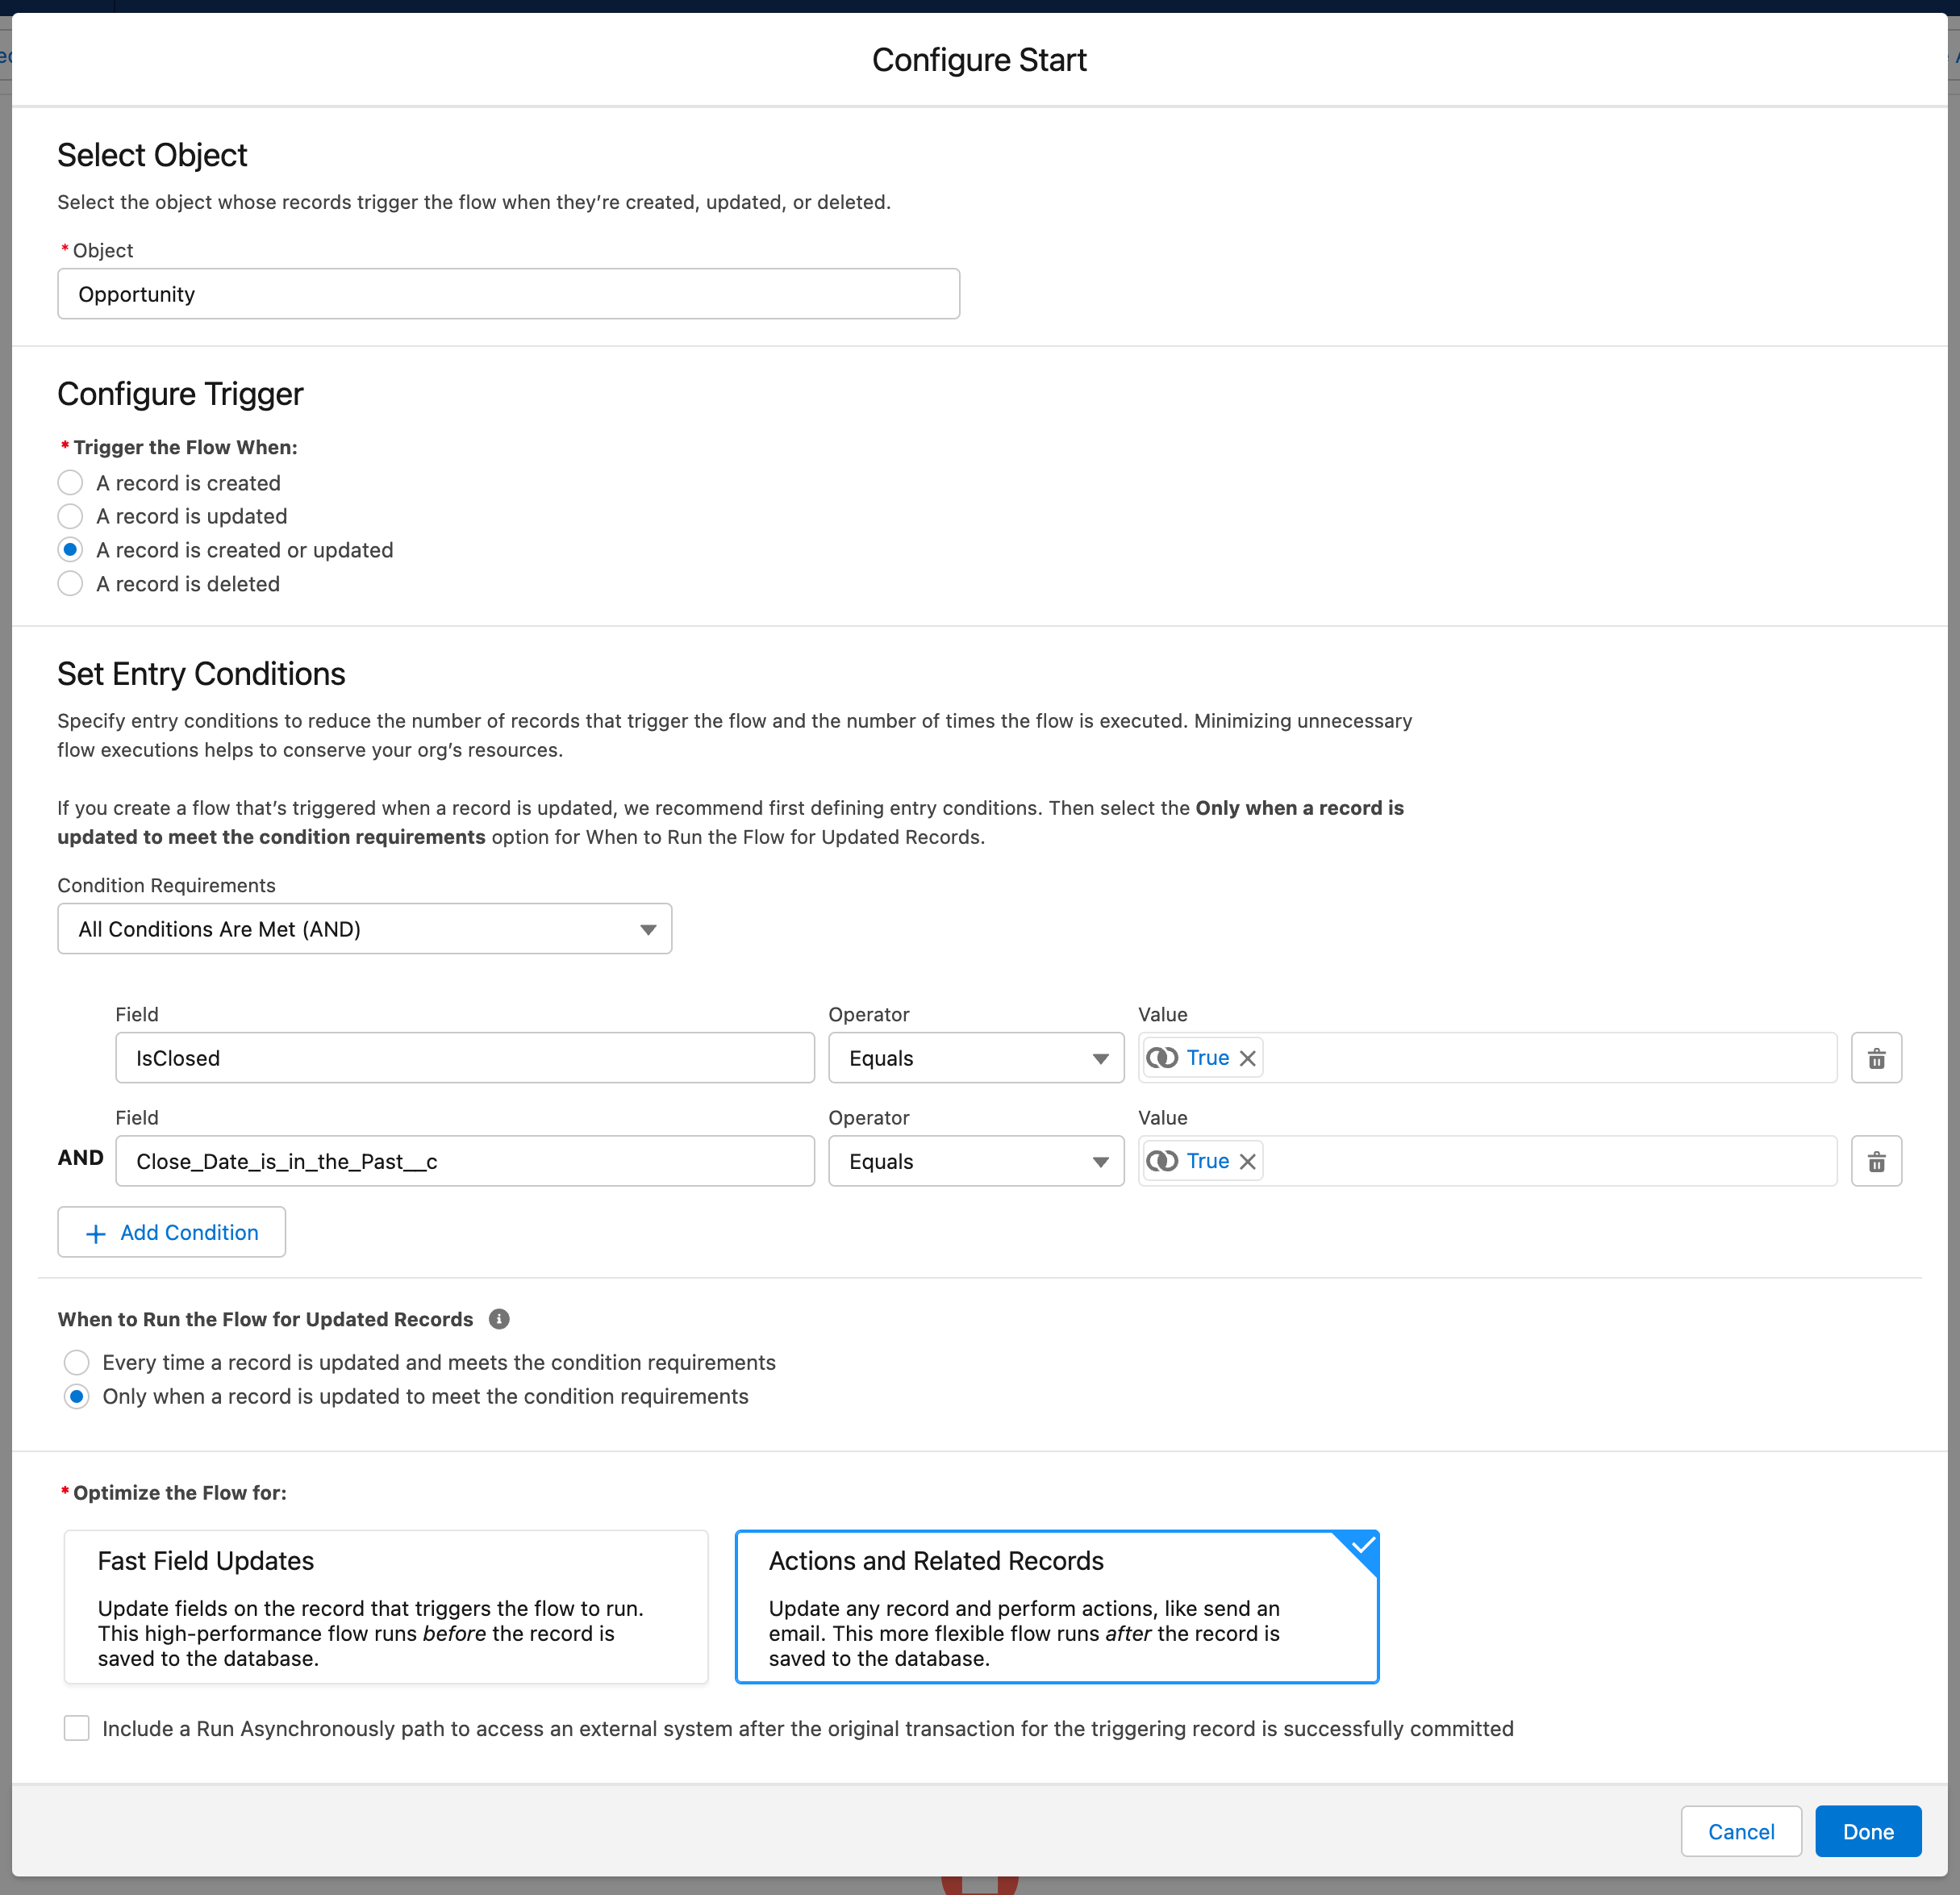
You can see the Start Element and how it was configured on the right. There isn’t anything to egregious here when as it pertains to how the migration configured this Flow, but there is a few things that I think are worth highlighting here.
Firstly, the trigger. This Flow is configured to fire when a record is created or updated. This isn’t a problem really, however considering the requirements of this particular Flow it is worth discussing whether the trigger should be an update only trigger or if create/update is the better option. That discussion is an important one, and it will ultimately depend on if you create Closed Opportunities or not. So while this isn’t a red flag, I would suggest it is maybe a yellow one.
Secondly, the thing that this Flow most certainly gets right is that this Flow is configured to only run when a record is updated to meet the condition requirements that were set.
This is definitely the right approach as this type of Flow should only run when a Opportunity is set to a Closed Stage. This type of Flow should only run in that instance and not any time the record is edited with it matching the entry criteria. If this Flow was set to run every time the record was updated and met the entry criteria it would be absolute chaos. So the migration gets it right here.
Finally, we have the point around the type of Flow this has created. The migration tool created this Flow as an After-Save Flow (optimised for Actions and Related Records). This was done because of the formula’s being used as entry criteria, so technically this is correct. However, if I was to build this out in an actual business case, I would be wanting to make this into a Before-Save Flow (Fast Field Updates) rather than an After-Save Flow. In my mind this type of requirement has no need to do anything outside of the record, therefore it would be best practice to create this as a Before-Save Flow. I’ll cover it shortly, but making this a Before-Save Flow would result in a need to change the entry criteria and require the addition of a decision element to check the Close Date.
But that’s the Start Element, let’s now take a look at the Update Element. After that I’ll show you the Advanced Settings of the Flow so that you have an idea how using the Migrate to Flow tool will have a potential impact on the trigger order of your existing Flows.
The update element this migration created is a little interesting as well. As you can see from the screenshot on the left, the element has the API name of mainUpdate, this API name does not match Salesforce’s default naming pattern in Flow. By default Flow uses a variation of Snake Case, whereas this is Camel Case.
Snake Case traditionally requires all characters to be lower case (this isn’t the case for Flow) and adds underscores between each word. Camel Case by comparison would expect the first word to all be lower case, and the first letter of each subsequent to be captialised. Camel Case also does not expect any spaces between any words included in a name.
As a result, if this element used the default Flow naming convention, it would be Main_Update.
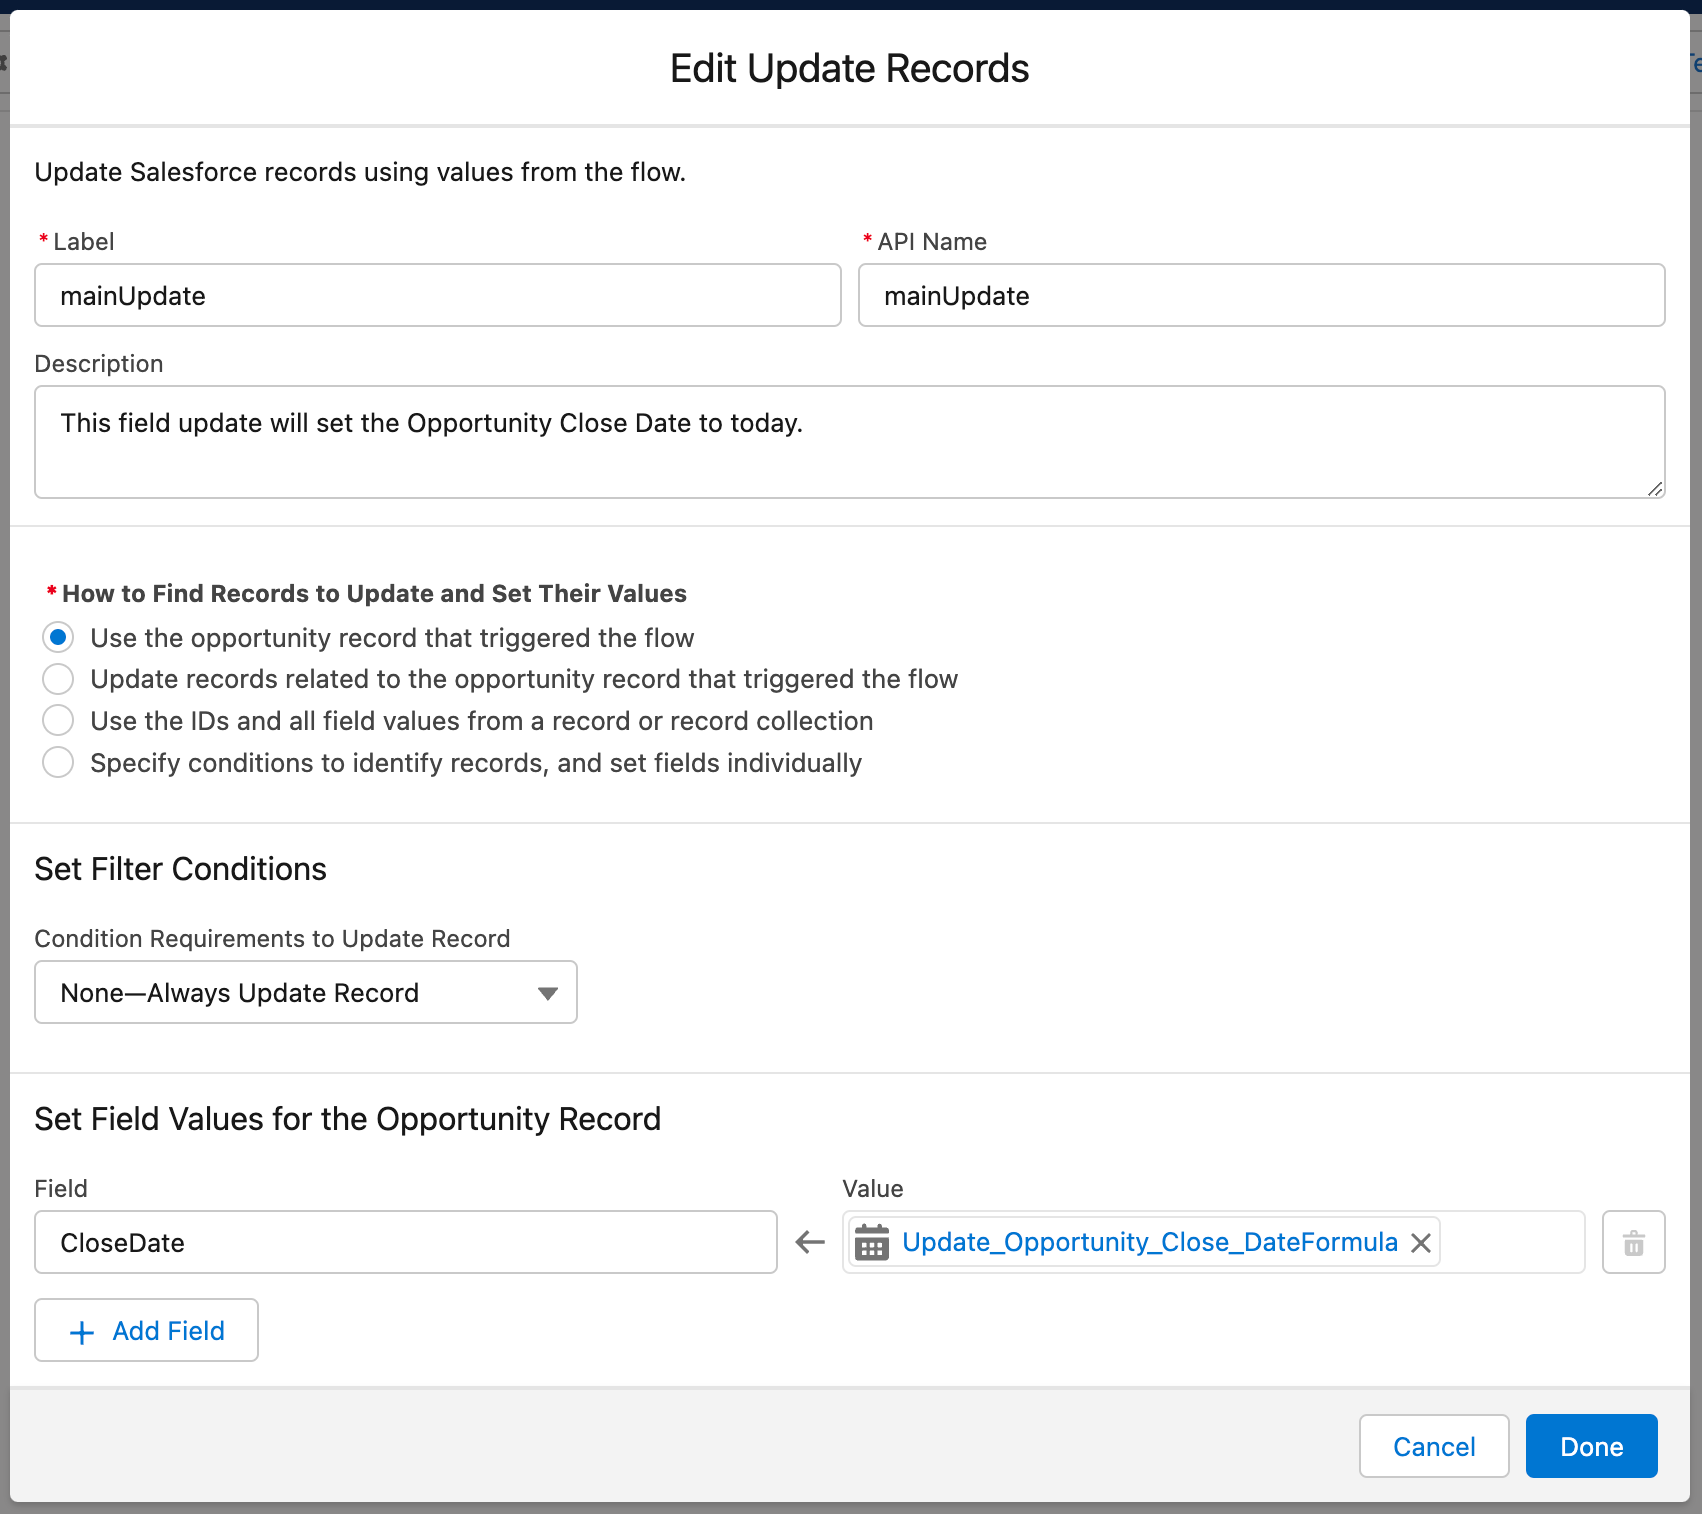
It might sound weird to spend as much time as I just did talking about the naming convention pattern. But honestly, this is one of my main gripes with the migration tool as a whole. I’ll talk about this in the third post of this short series in depth, but I really do not like how this tool handles the naming of Flows and elements as it mixes them. It is best practice to stick with one naming convention across all of your Flows and to be consistent with that pattern across the whole of your organisation. If you want to use Salesforce’s variation of Snake Case, stick with that, if you want to use Camel Case use that, but please don’t mix between patterns.
Now that I’m off my high-horse, let’s go through the rest of the element. You’ll notice that the description field is populated, this was migrated from the Workflow Rule, meaning if you add a description in your Workflow Rule’s field update (which is what this element is) it will copy that description. You’ll also notice that the update method was set to use the opportunity record that triggered the Flow. For the type of Flow that was built via the migration, this is absolutely fine. In fact, if I was to build out an update element for a Flow like this I would do it this way. If I was building this Flow out from scratch, I’d do it differently, but more on that later on.
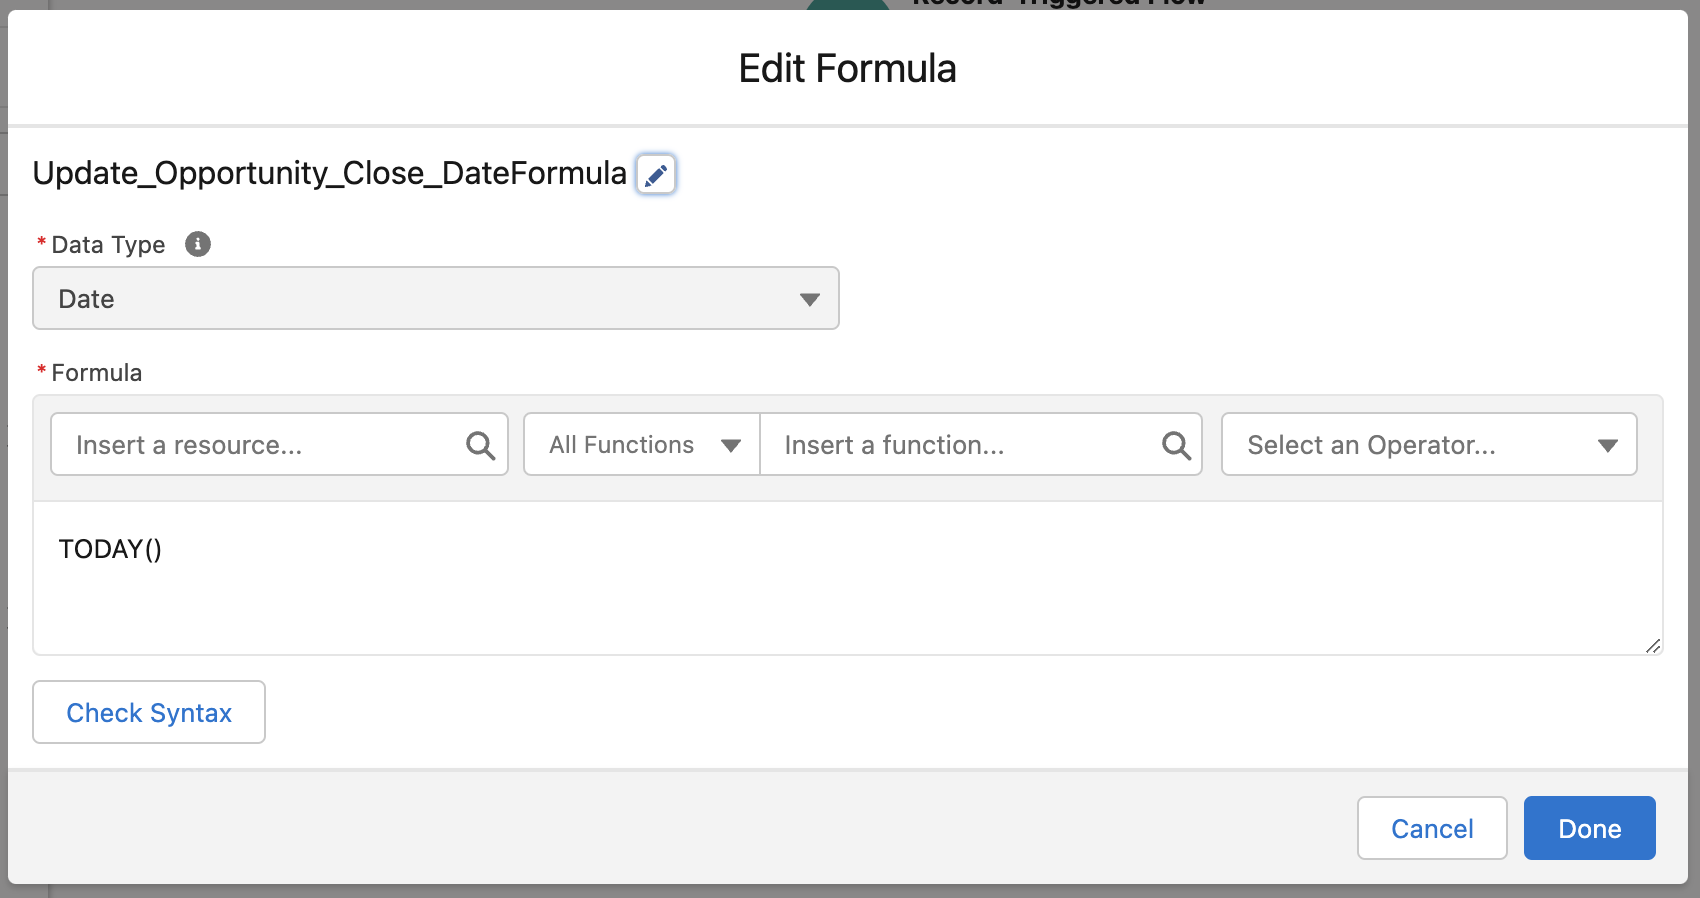
Finally, you’ll notice that the update element set the value of CloseDate by using a formula that was created during the migration process. The formula is on your left, and this was the TODAY() formula that existed in the Workflow Rule. This is technically correct, however, in practice you could handle the update by simply using the Current Date global variable that already exists in Flow Builder ({!$Flow.CurrentDate}). This would save time as you technically don’t need to build out a formula for this in Flow, although you can do so if you wish.
So that’s the Flow that will get built when migrating a Workflow Rule like the one that was built for this example. It’s not bad, but it’s also not the best either if I do say so myself (hopefully, that doesn’t sound too critical). Before I move on to highlight how I would build this Flow from scratch, let’s take a brief look at the advanced settings so you can get a flavour of what you’ll see.
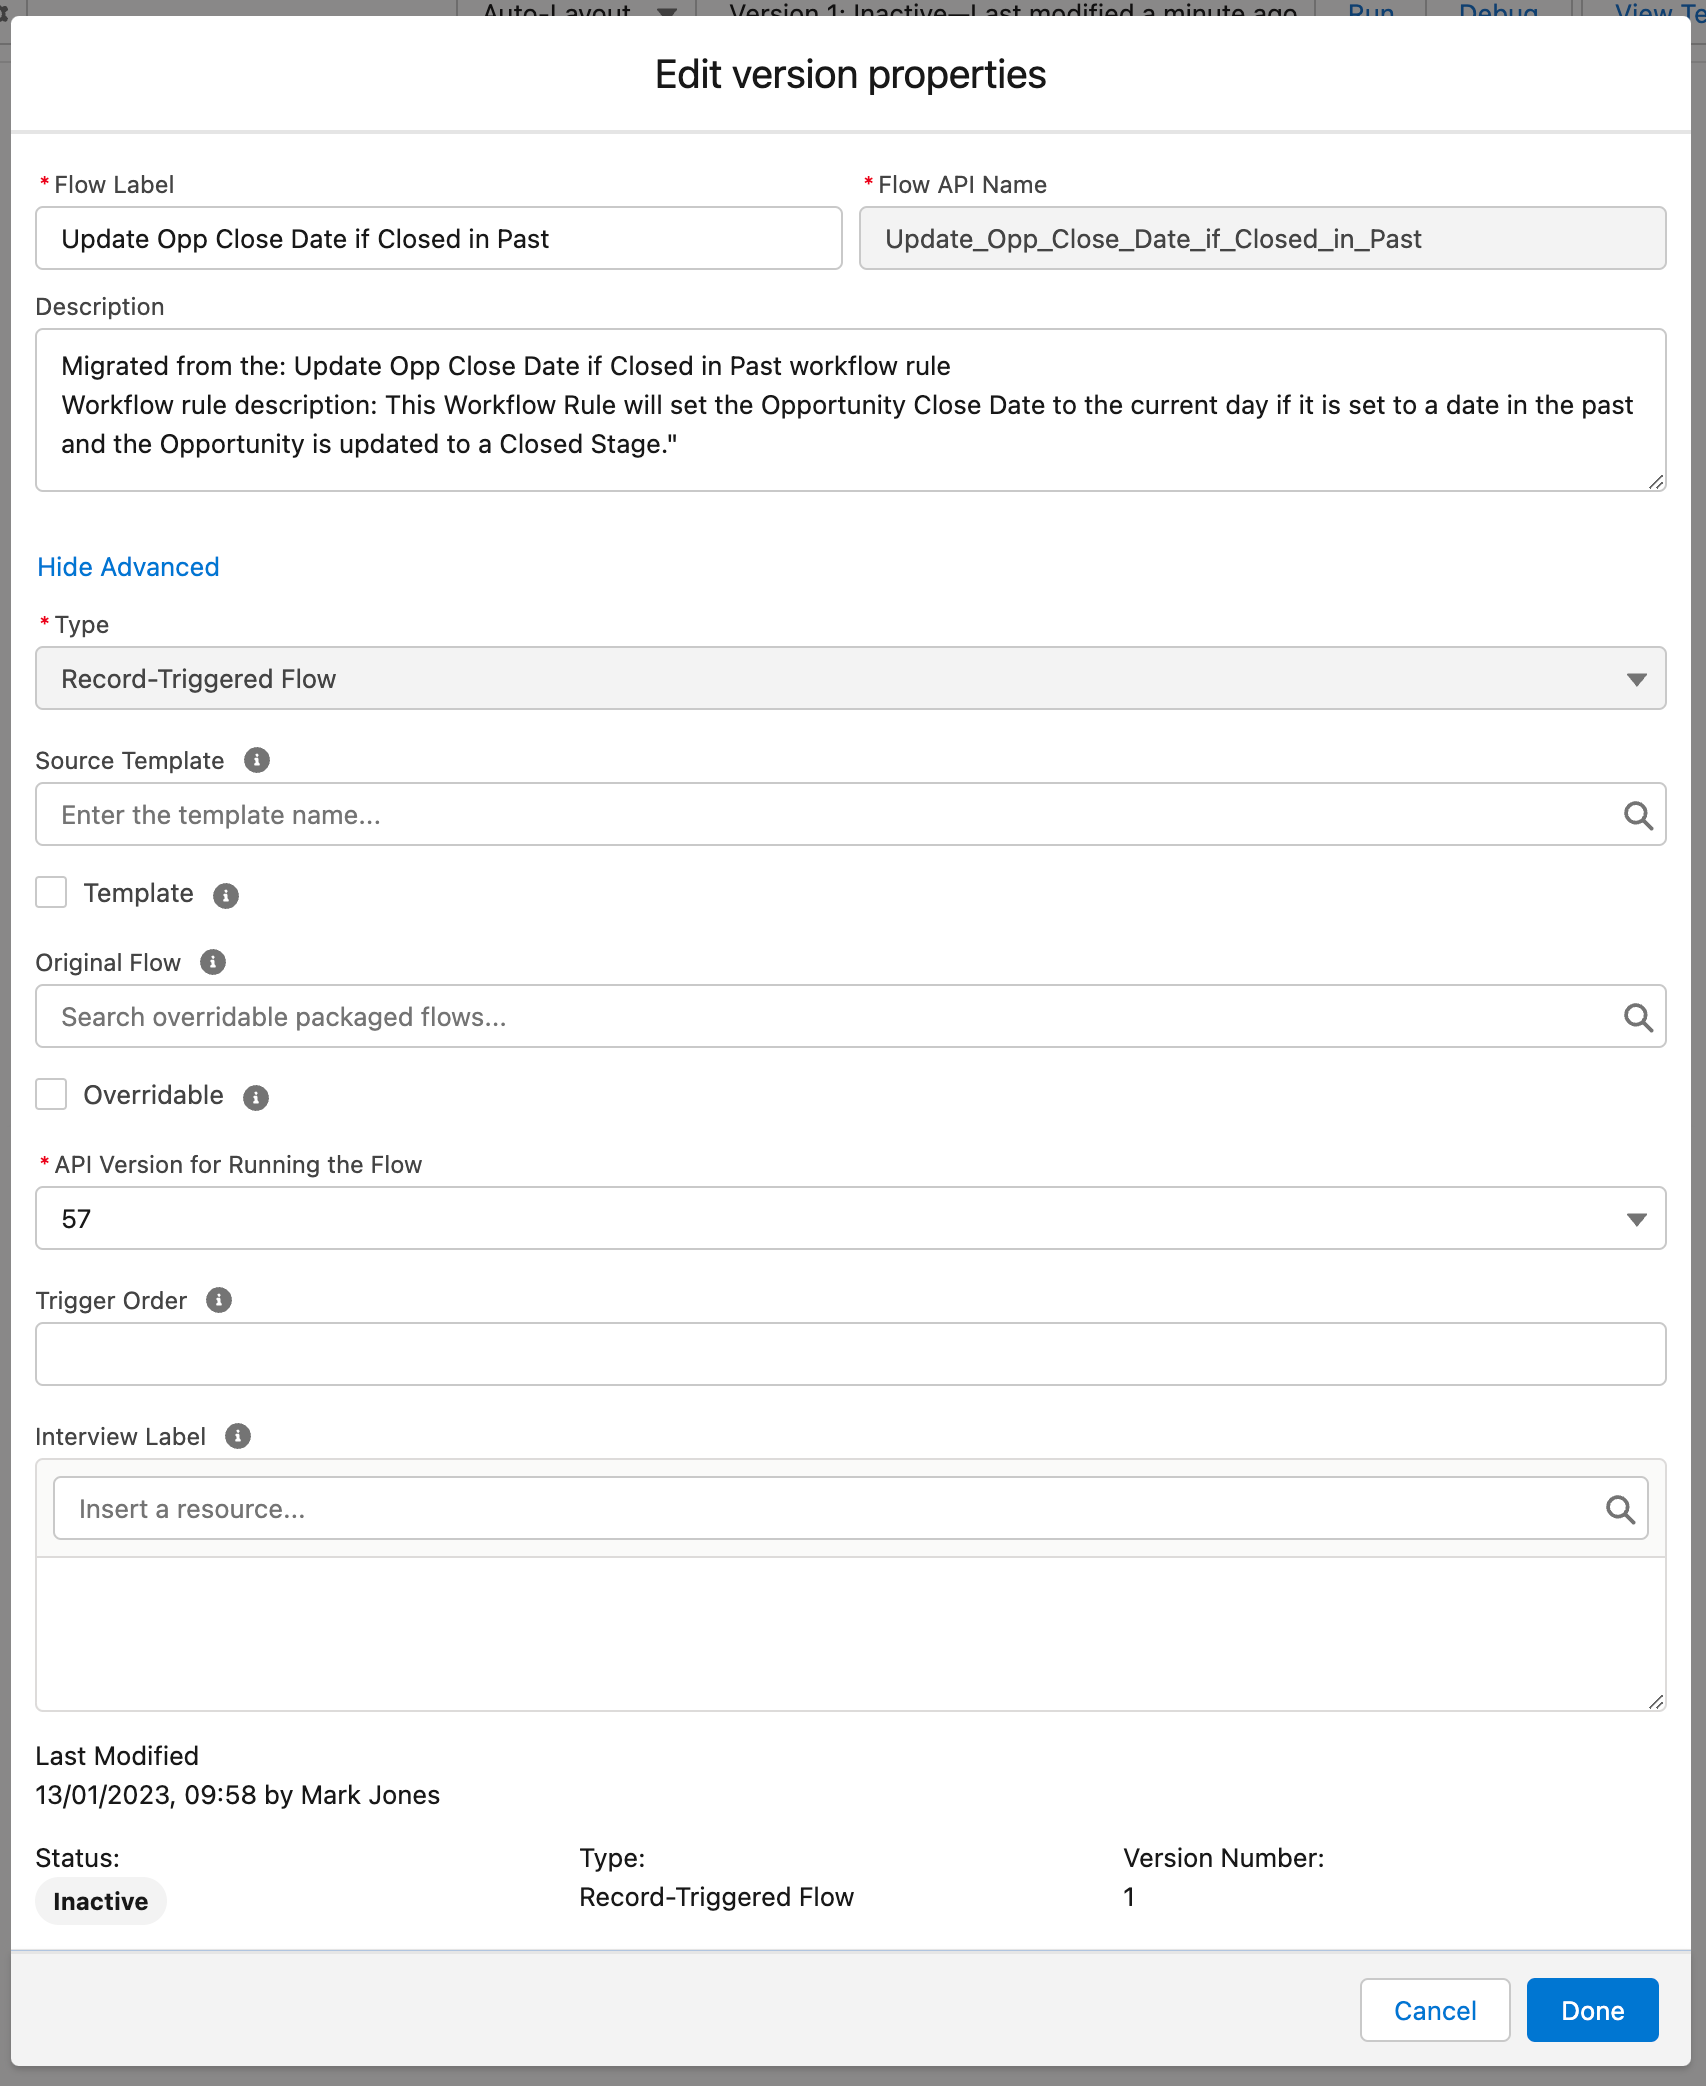
On your right is the advanced settings for this Flow, as well as the basic ones. You will see from this screenshot that this Flow is named using Salesforce’s default variation of the Snake Case naming pattern. The API name of your Flow cannot be renamed, if you want to change it you will have to do so by selecting Save As and making this into a new Flow entirely. You’ll also see that it uses the current API version as set by Salesforce, so bear that in mind if you need to use an older API version instead of the current one in usage.
You might also have noticed that if your Workflow Rule had a description, that is taken from the Workflow Rule and added to the newly created Flow. This is really helpful when it comes to the documentation of your Flow.
Finally, you’ll notice that this Flow doesn’t come with a Trigger Order number. So if you ordering your Flows in your object, you will need to add that before activating your Flow. If you don’t this Flow will run when your unordered Flows run for that object.
How Would I Have Built This Flow?
Now that we have seen the migration tool in practice and seen the Flow that it created as a result. Let’s now pivot before we close this post, and show how I would build this Flow if I was to build it from scratch. I’m sure you’ll see from the example I show here, the differences I would employ to make this kind of Flow perform at it’s most optimal level. So let’s take a look at it shall we?
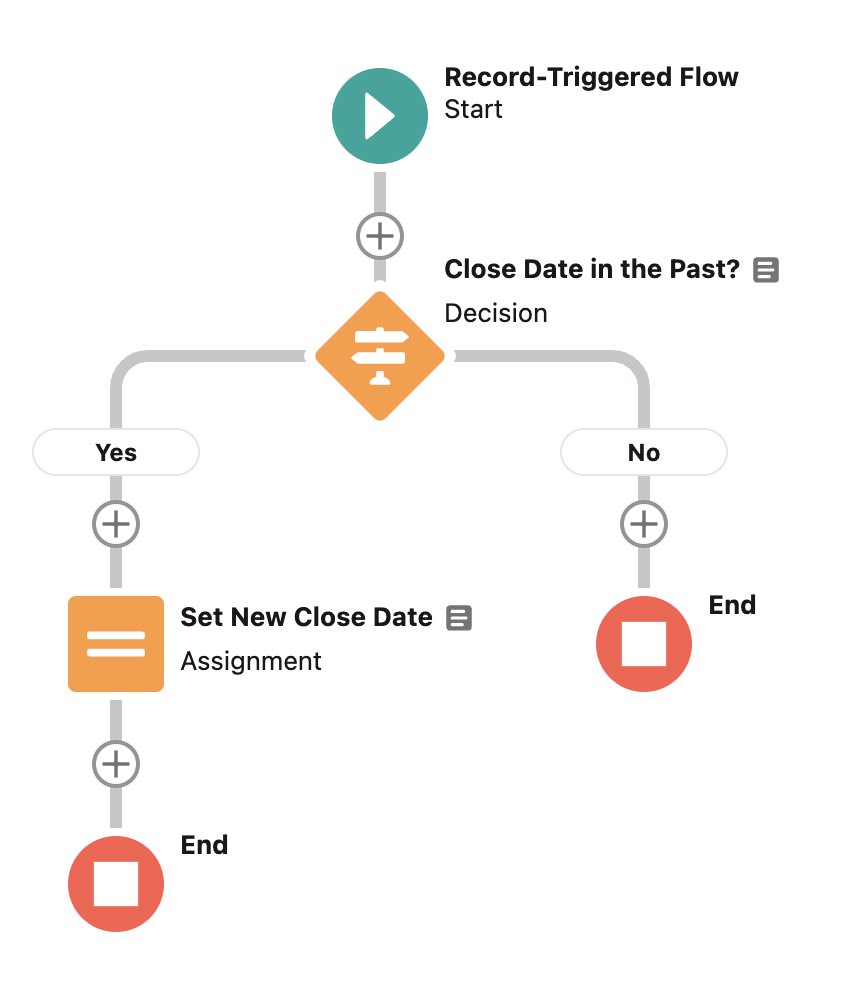
On the left is the result of how I would build out this kind of Flow in most cases. Generally speaking, I would make this a Before-Save Flow, using two elements to achieve the requirement. The first element would be a Decision Element used to check the value of the Close Date of the Opportunity record, this is because of the fact that we can’t use relative date formats in entry criteria outside of using a Formula as the entry criteria. I don’t have any objection to using formulas as entry criteria, but in full transparency I haven’t fully jumped on board with this concept yet, so I still tend to go down the more traditional Decision Element route.
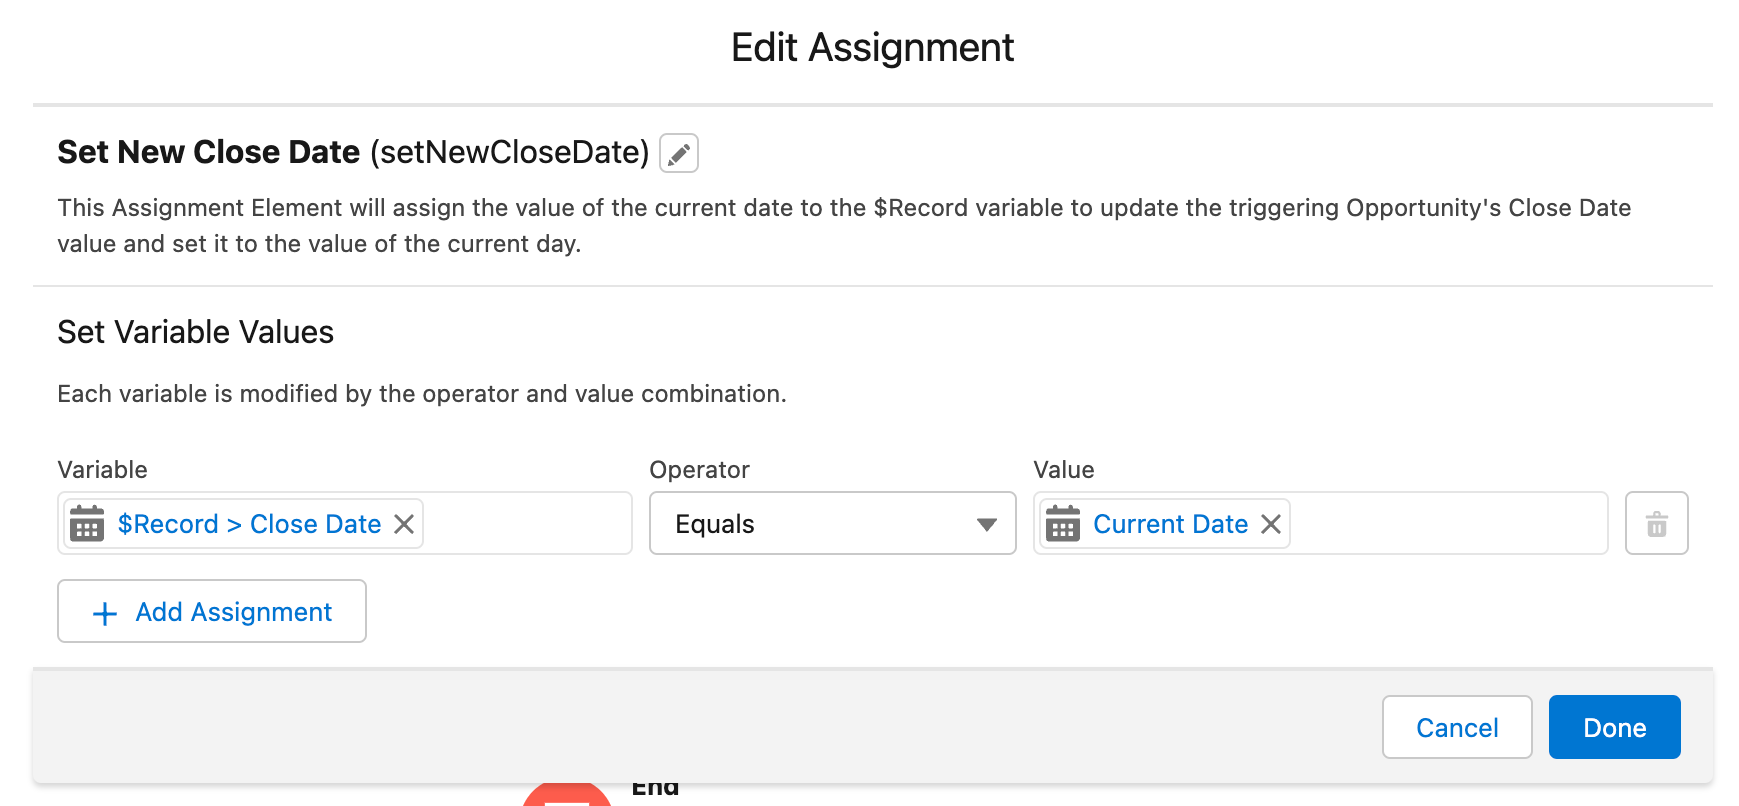
The second element is an Assignment Element. This element is used to assign the value of the Current Date to the Close Date value on the $Record variable for the triggering Opportunity record. With this being a Before-Save Flow, an update is not required as an Assignment will achieve the same result at the end of the day.
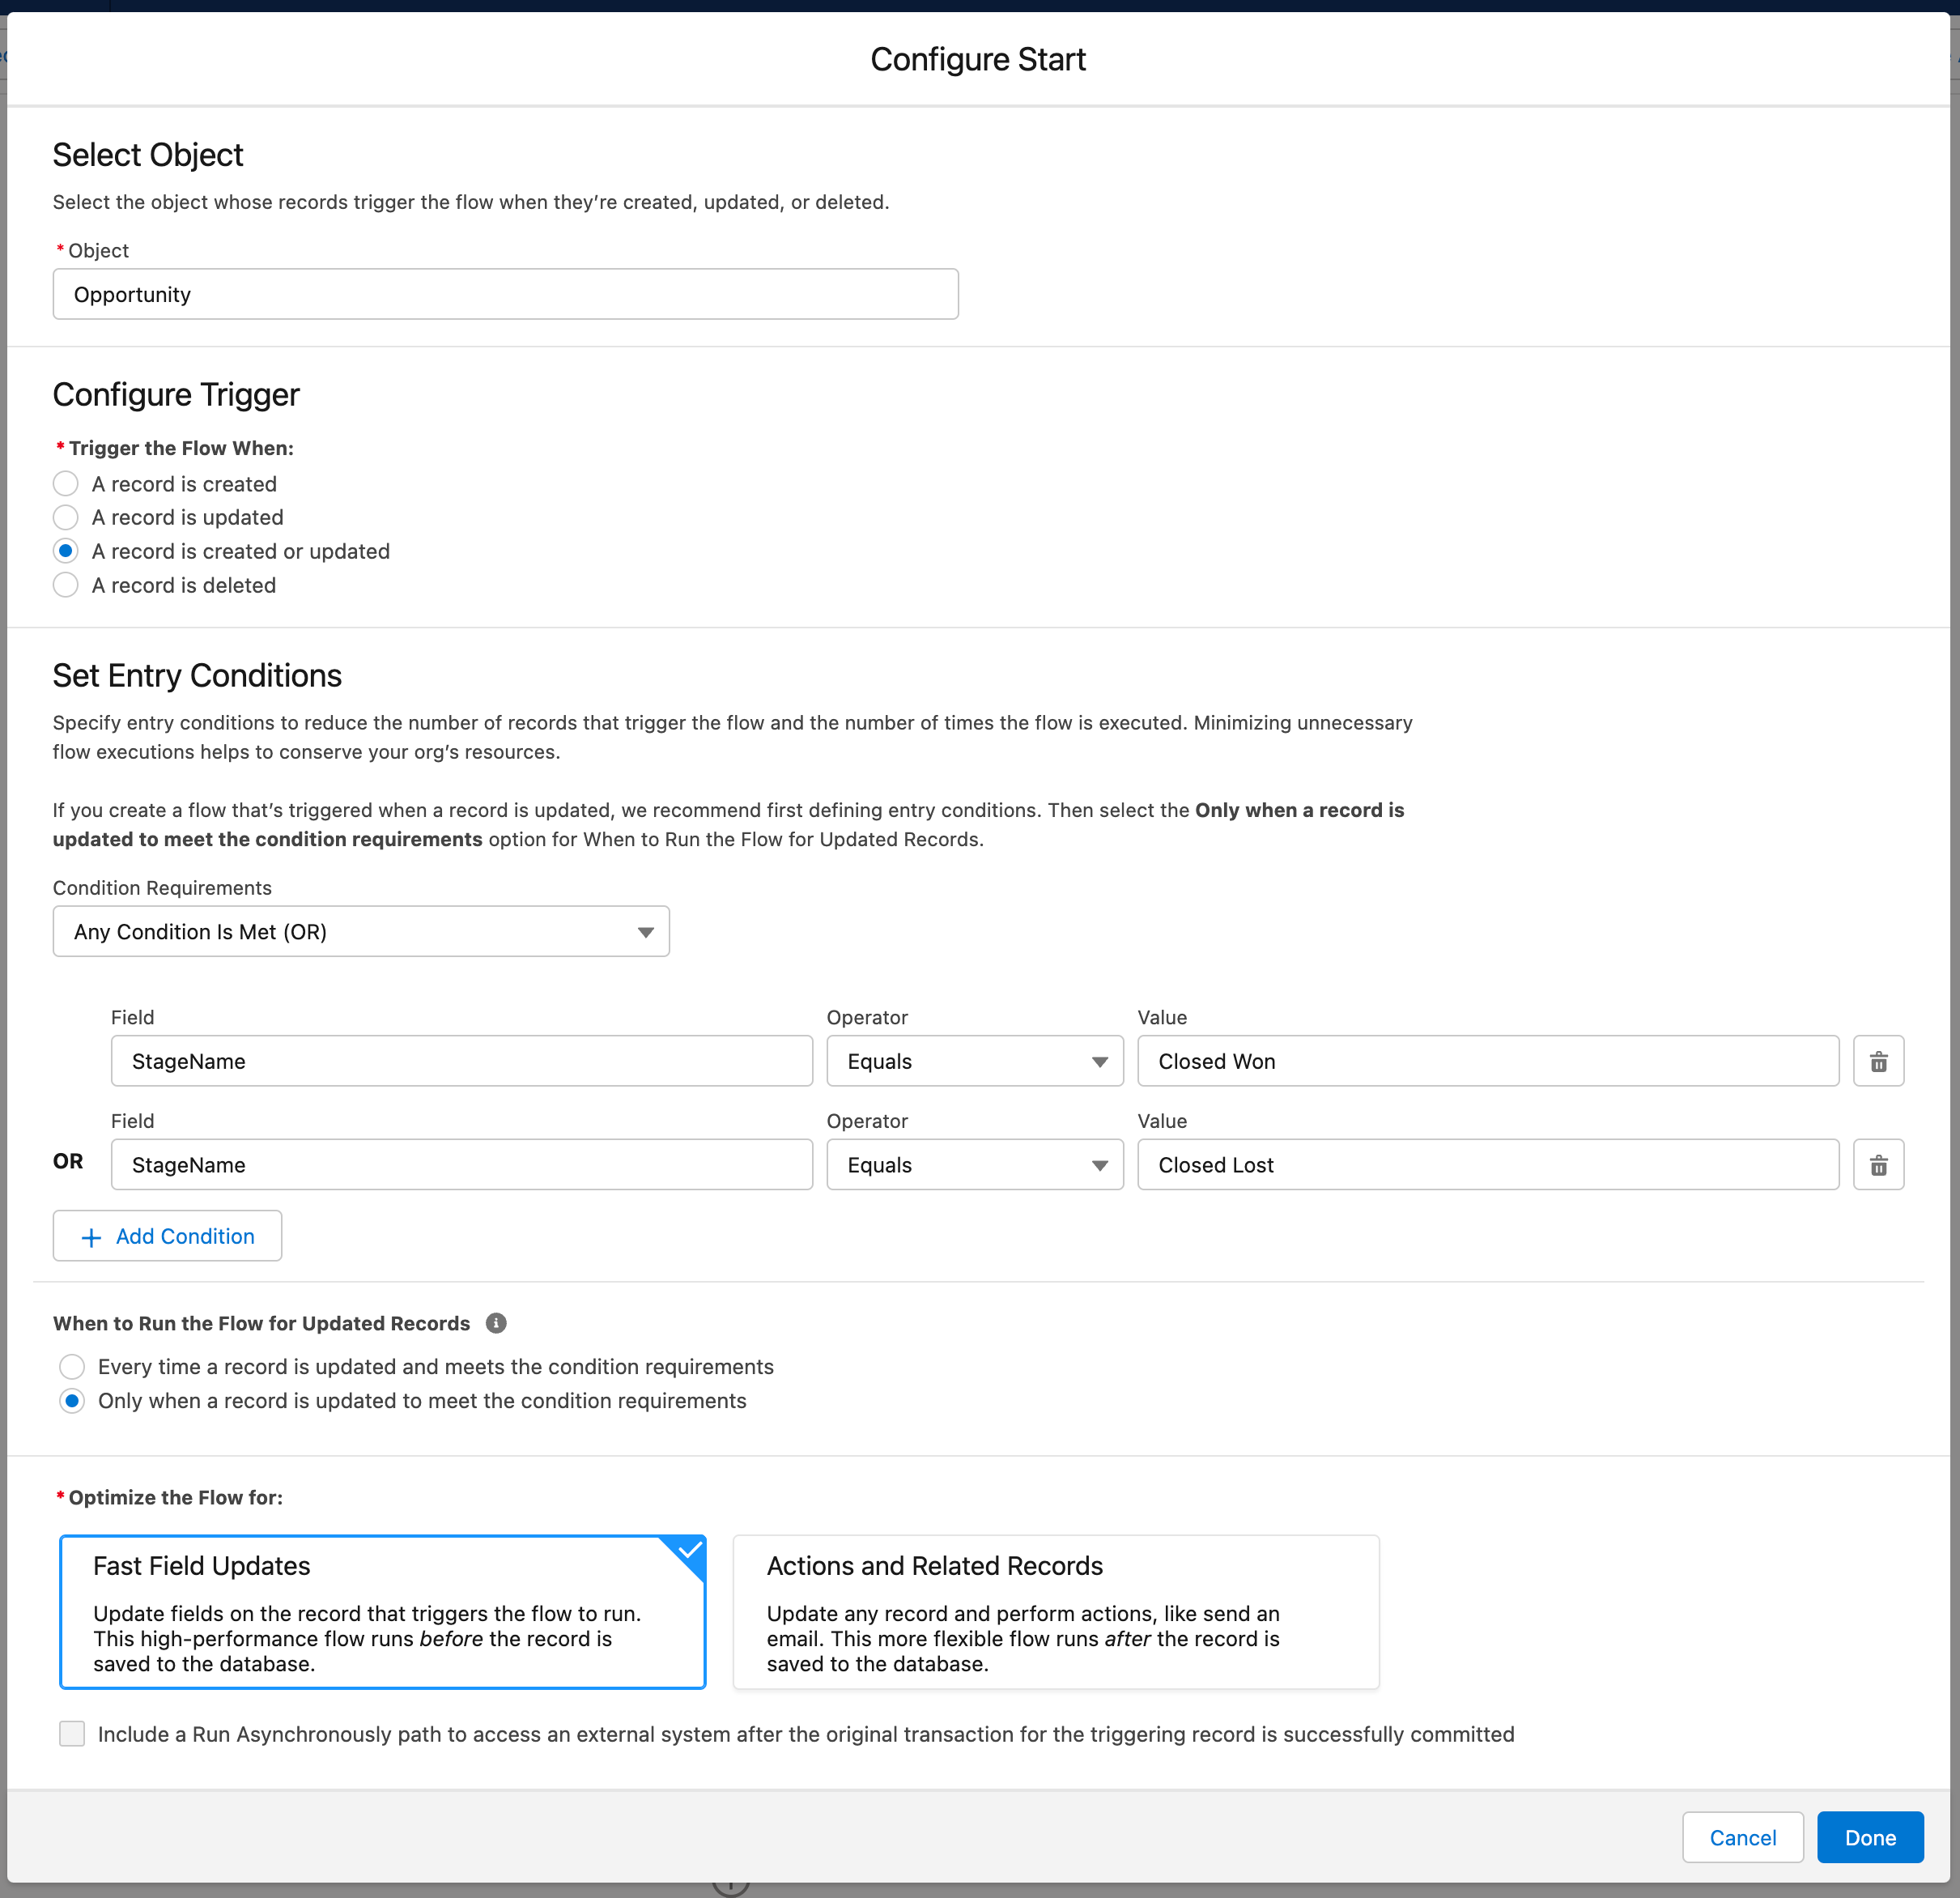
The Start Element for this Flow has a slightly different configuration to the Flow that was created by the Migrate to Flow tool. The main difference here is that I have used a different set of entry criteria and have set this up as a Before-Save Flow. Outside of that, the Start Element is very much the same as the Flow that was created during the migration to Flow process before.
For reference, the entry criteria for this Flow is an (OR) condition filter based on the values of the StageName field in the triggering Opportunity.
The filter criterias for this Flow is:
StageName equals Closed Won OR StageName equals Closed Lost
This criteria picks up on the values of the Stage picklist instead of a formula.
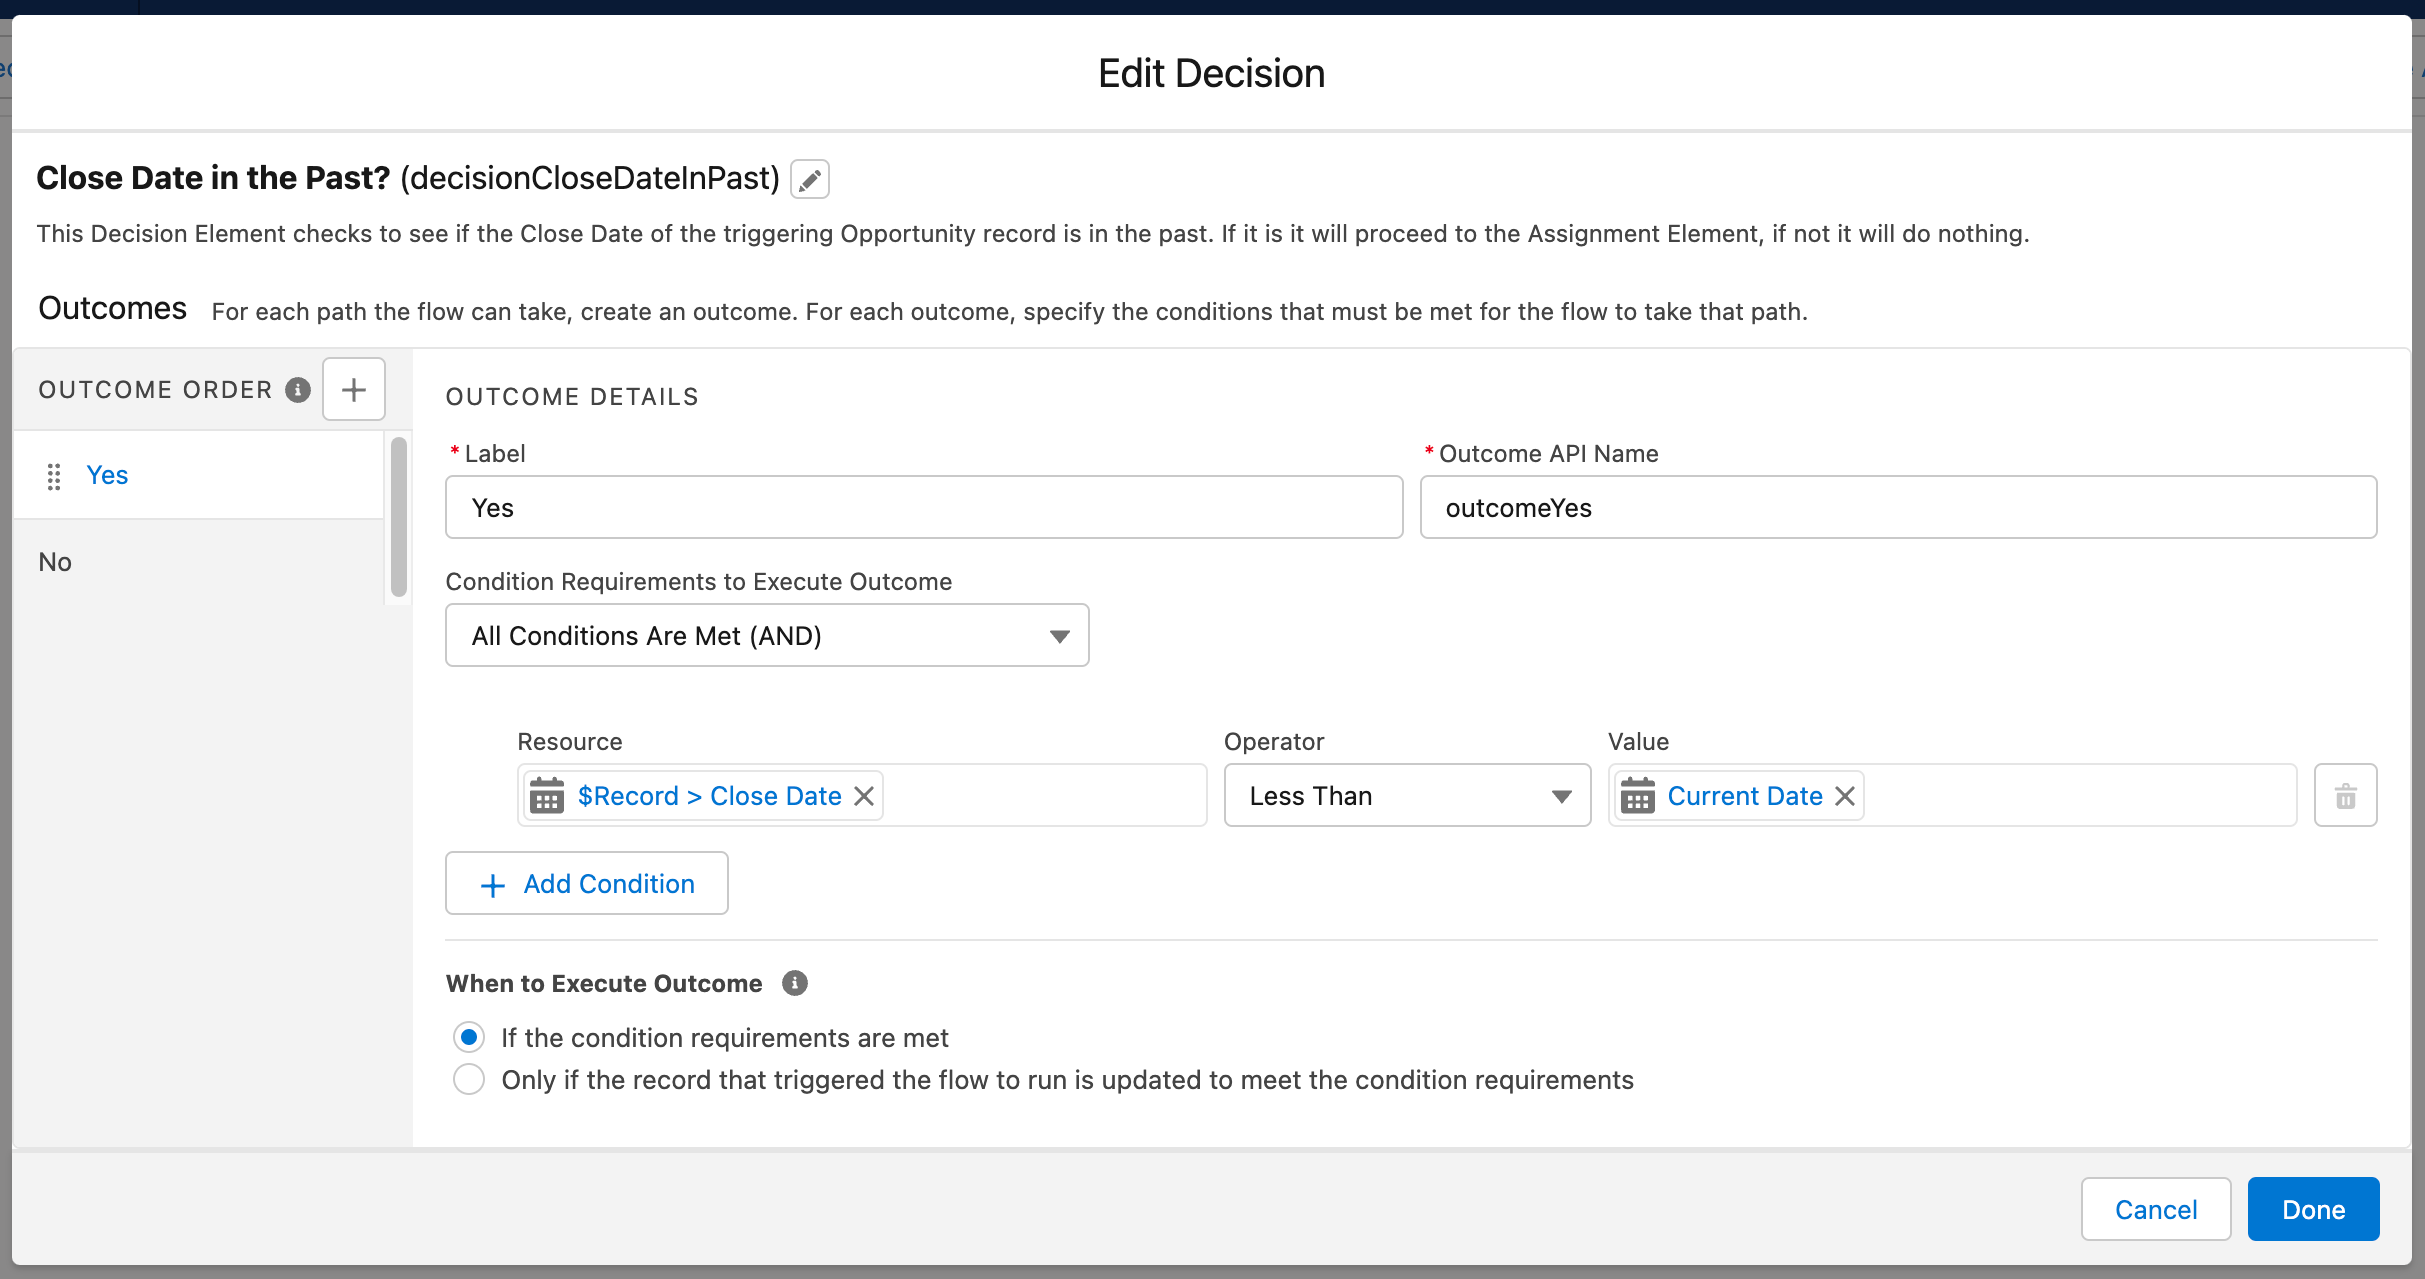
Next up is our Decision Element. As noted before this simply is used to check that the value of the Close Date field is less than the value of the current day. This check uses the Flow Global Variable for the Current Date as the checked value ({!$Flow.CurrentDate}).
Under the hood this Decision will run as a Boolean calculation to determine whether the requested parameter is True or False. If True, it moves to the next stage, if False, the Flow ends.
The third and final stage of this Flow if it meets the decision requirements is to update the Close Date value of the triggering Opportunity record to that of the value of the Current Date. Again this uses the Flow Global Variable for Current Date to carry out the update.
The update here would be equal to:
$Record.CloseDate equals {!$Flow.CurrentDate}.
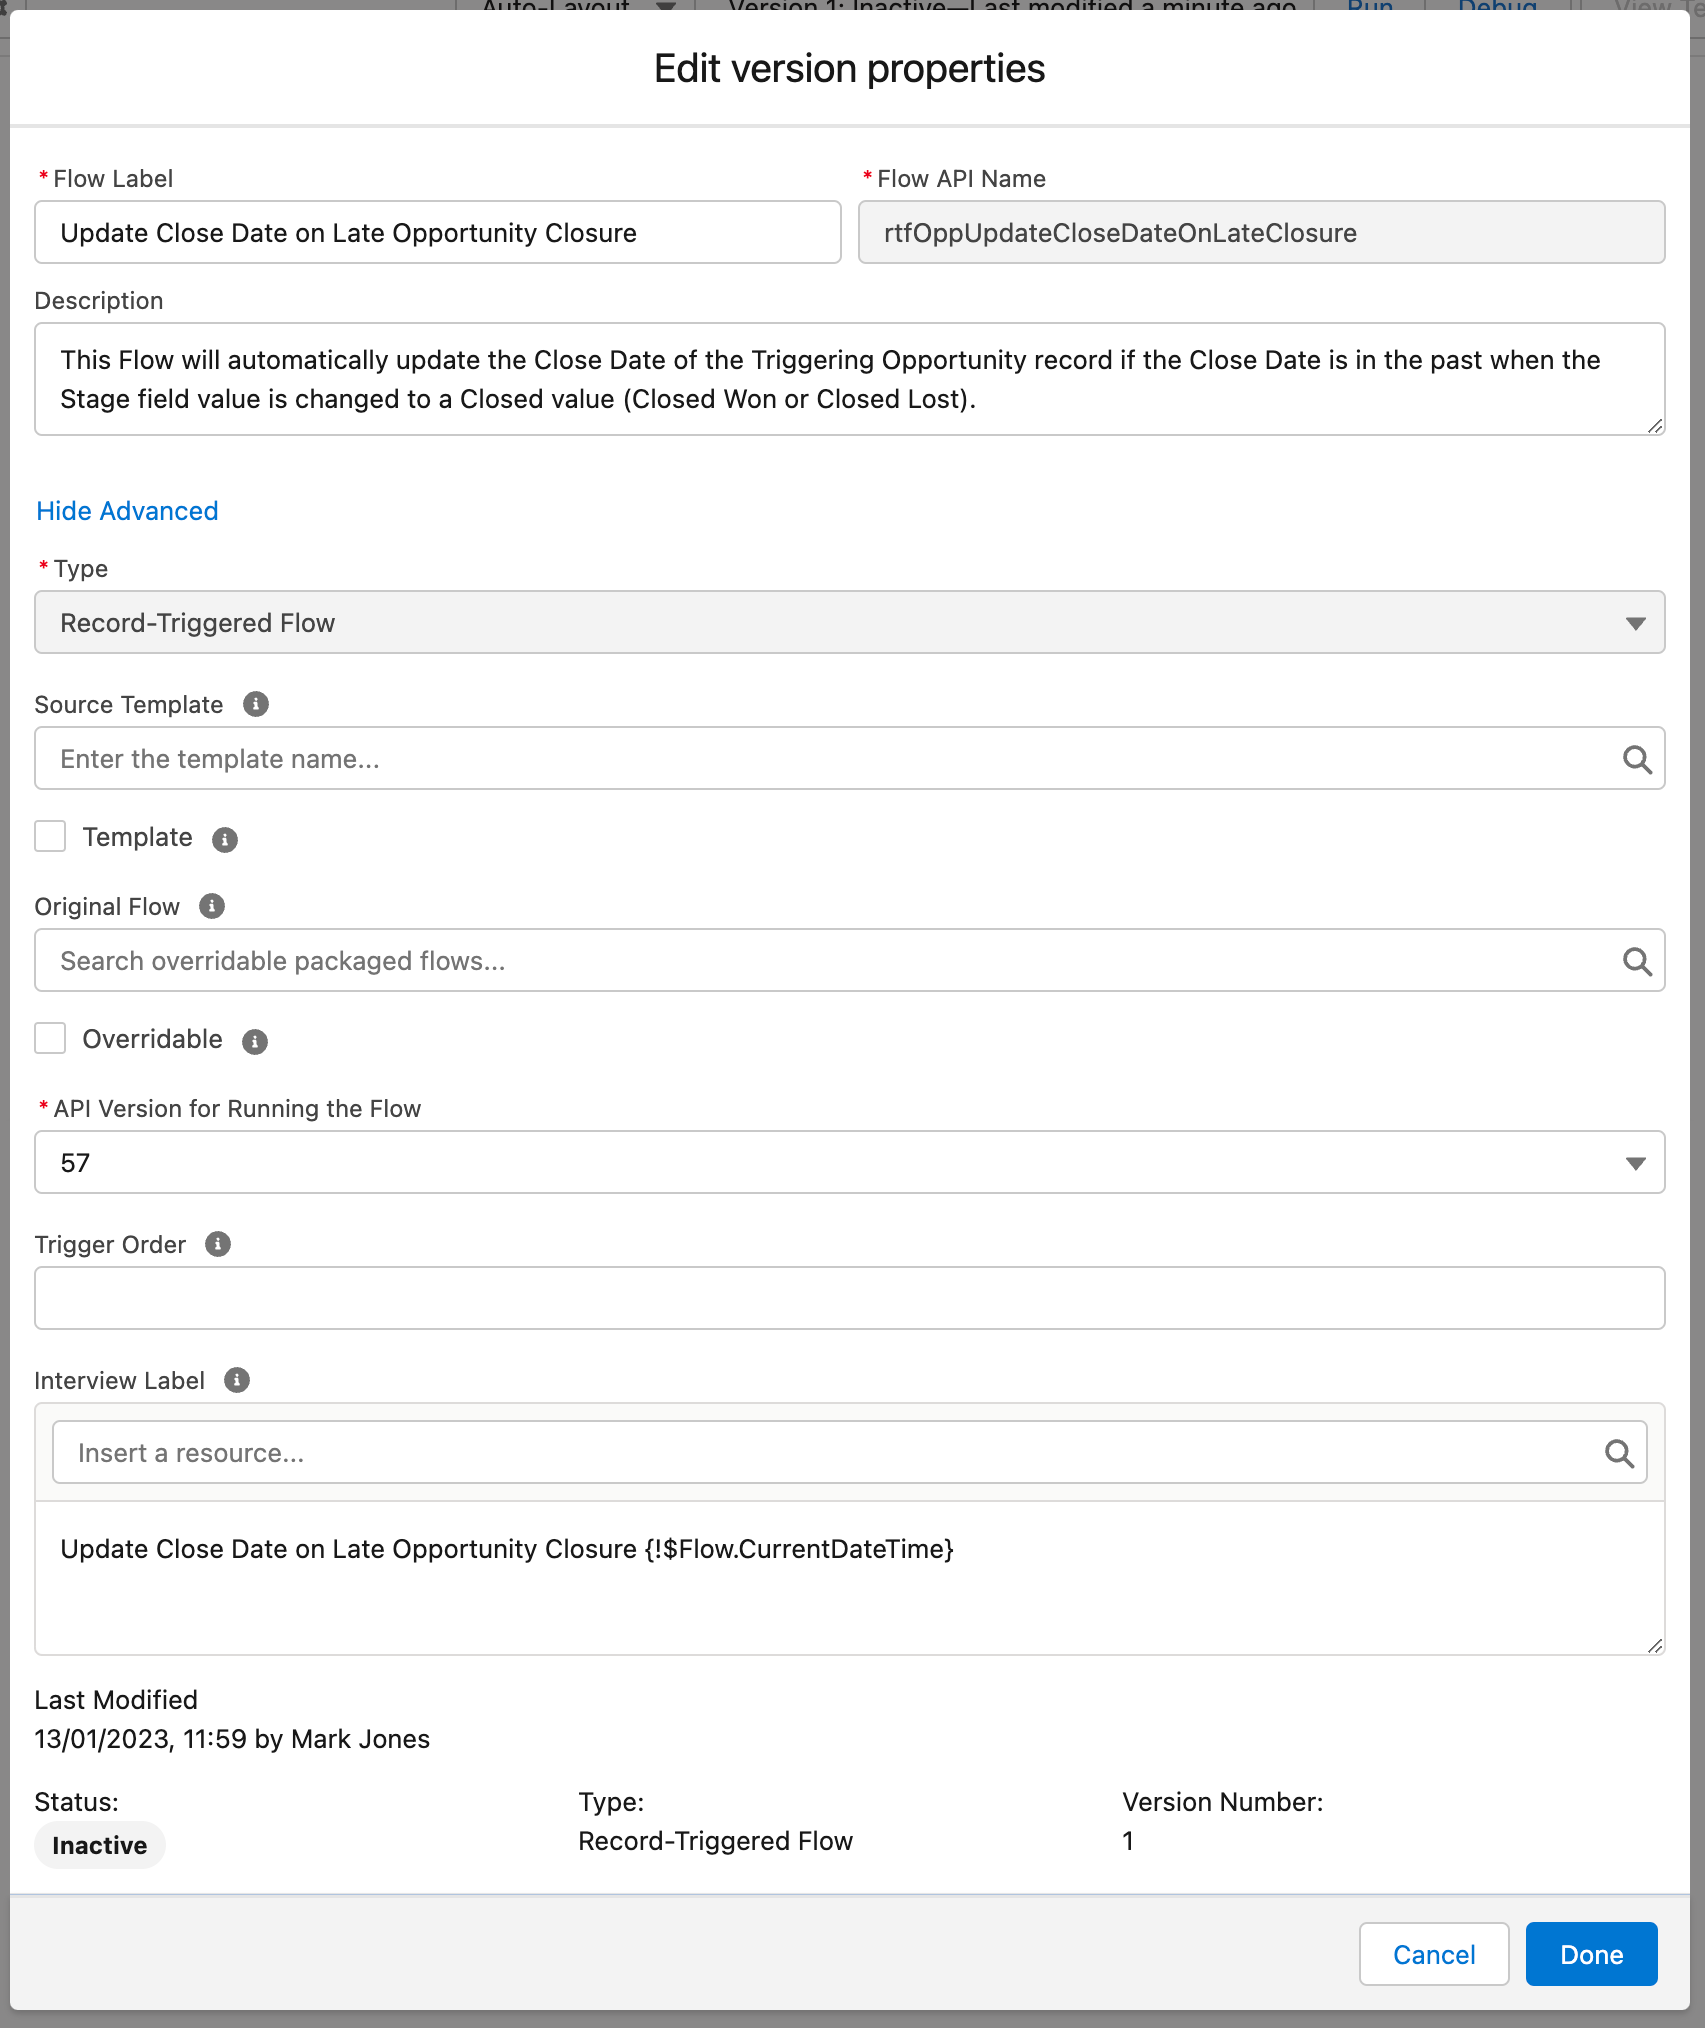
There isn’t really much of a need to show it here, but just for the purposes of clarity, here are the settings for this Flow. You can see the name that I built, the API name for the Flow (I used Camel Case here, I did the same for all of the elements inside this Flow as well), the main description for the Flow and all of the other settings included for this Flow overall.
Like with the migrated Flow, I didn’t include a Trigger Order. This Flow isn’t active in this org, so it’s not essential to have that. But it is a good idea to add in a Trigger Order when working with multiple Record-Triggered Flows on the same object. That way you can more or less control when Flows will run and create a means of avoiding the russian roulette that comes about from not knowing when any of your Flows are going to run, and the impact that can have on the data in your org as a result.
This Flow is also running on API 57 which will be the new default API version for Flows as of the Spring ’23 seasonal release that is rolling out across orgs over the next couple of months.
Closing Remarks
So that’s the end of this post. Here I’ve provided a bit of an overview of the Migrate to Flow tool, particularly how to migrate your existing Workflow Rules into Flow using the tool. The next post in this series will focus on the same process, but instead of looking at migrating Workflow Rules into Flow, we’ll be looking at migrating automation from Process Builder into Flow. The series will wrap up with a post giving my overall thoughts on the tool and my recommendations for migrating automation into Flow overall.
I would love to hear your thoughts and experiences using the tool in the comments below, or online on social media when I share this post. If you have any future topics you would like me to cover, let me know as well and I can look into them and have a think about whether or not I can add them to the schedule. The posting schedule is more or less set up until the end of February, so I will be planning out posts for March onwards over the next several weeks. My overall aim currently with the blog is to release one post per week, this will be slightly during busier periods such as release season as I will also cover Flow’s Release Webinars.
All that being said, thank for you checking my blog, let me know if you have thoughts or questions on the topic at hand. I hope to engage with you sometime again soon via the blog or an event if we happen to be there at the same time. All the best, Mark.
Resources
We have three resources to link to this awesome post … all of the resources provided for this post focus on principles around migrating existing declarative automation into Flow. All of these resources offer some really good insight into the principles behind automation migration. When reading though, please do bear in mind that there are many different views on this subject, so some of the points raised may not fall in line with official recommendations from Salesforce (so please do bear that in mind).
Although not listed in the resources section itself, there is a new episode of Automate This airing on 18 January focused entirely on this topic. If you want to check that out, click here. Why not set a reminder for when the video airs and watch it live.
Salesforce Workflow Migration: How Do You Actually Do It?
Automation Champion has released their own review of the Migrate to Flow Tool. That review can be found in this post from Pablo Gonzalez. This post also gives a bit of an overview to other automation migration alternatives, HappySoup and Salto. This post not only provides you with some very good consideration points, but some insight on other alternatives.
10 Best Practices to Migrate to Salesforce Flow
This video from Salesforce Ben provides Admins with some pretty good tips to help them prepare to migrate their existing declarative automation to Flow. The tips are fairly solid, but like with many best practice tips from the community please be aware that some of these recommendations may not match with official Salesforce recommendations.
Automate This: Migrate Workflow Rules and Processes to Flow
In this episode of Automate This, Jen Lee and Aleksandra Radovanovic talk about migrating Workflow Rules and Processes to Flow. If you want some good quality tips to get you started on the journey of migrating existing declarative automation into Flow, then give this video a watch. You will gain a great deal of high-quality insight from it, it’s totally worth the watch.
