Welcome back to our short mini-series on the Migrate to Flow tool released by Salesforce to help Admins migrate their existing declarative automation into Flow. Last week we highlighted how you can use the tool to migrate your Workflow Rules into Flow (if you missed that post, you can check it out here). This week we’ll be doing the same, but focusing on processes you have built using Process Builder. In this post I will go over the process we’ll be migrating into Flow, and we’ll cover how you do the migration itself.
For the purposes of transparency, the process that we will be migrating in this post will be based on the same use case as the WFR we migrated in last week’s post, but to highlight the differences between what you can do when migrating PB’s in comparison to WFR’s, the process I build out for this migration will be a little more extensive than last week’s example. You’ll see why shortly.
Before we dive in to how the migration fuctions, we’ll cover the process being migrated, then we’ll dive into the migration.
N.B. I will routinely refer to processes built in Process Builder as PB’s and Workflow Rules as WFR’s in this post.
Migrating Processes into Flow Using the Migrate to Flow Tool
Now that preamble is done with, let’s pivot across to the migration of processes built in Process Builder to Flow. There are some consideration points that are worth bearing in mind when you begin the migration process. So we’ll cover those points now.
Points to Note When Migrating Processes to Flow
The ability to migrate PB’s to Flow is new as of the Spring ’23 release, so please bear in mind that these points may change over the coming months as the functionality is fleshed out and tested. Right now, the functionality is in an open Beta, meaning that those who use the conversion process are essentially Salesforce’s guinea pigs. So our usage of the tool and feedback will go a long way in making this tool more effective for the Admin community around us. That being said, there are a couple of things I want to go over.
The first thing I want to highlight is in brief how the migration works. You’ll see this in more detail when I show the PB that I built out and migrated for this post. However, it is worth nothing that this build of the PB Migrate to Flow functionality focuses on the migration of decision nodes. As you will know, in Process Builder you start out by setting the object, then you build out decision nodes, before ultimately moving out to creating your immediate and scheduled actions. The Migrate to Flow tool, knows this well, and with this in mind, it migrates each decision node (along with it’s entry requirements) as a decision element. In my practice run with the tool, it did not create any entry requirements, rather it set the Flow trigger criteria to run every time the record was created or updated. In your use case, this may or not be a deal-breaker, however this approach isn’t generally the best method for building out your Record-Triggered Flows. Thankfully this can be tweaked before saving and activating your Flow via Flow Builder.
The second thing I want to highlight (which again, we’ll cover in more detail shortly), is the way in which the naming conventions are handled. The naming patterns for migrated elements is all over the map … and in my view it is much worse than it is with the migration of Workflow Rules. Here the naming patterns of what gets migrated uses a weird hybrid of Salesforce’s variation on Snake Case and Camel Case, it also refers to elements as myRule … so the end result of a migrated element will be something like myRule_1_A1. I don’t know about you, but I honestly think this is terrible, it doesn’t tell you anything about the element at all. And in my view, an element’s API should give you an idea of what that element is meant to be doing … that’s good documentation. You’ll hear more of my ranting on the naming patterns side of things with the Migrate to Flow next week in our final post. But for now, all I will see is that the naming patterns used for migrating PB’s to Flow isn’t great, in fact I think it’s pretty terrible (sorry).
N.B. Just to note, if you open up your PB in Flow Builder you will be able to see that the names created in the Flow you migrated from Process Builder hold almost identical names to the elements that were created in the migration … granted, they do get changed slightly.
The Automation Being Migrated
The piece of migration we’ll be migrating from Process Builder into Flow for the purposes of this post is again relatively simple on the surface. The PB I built was compiled in such a way as to show how you migrate a PB with multiple decision nodes into Flow with ease. So while I would build this out differently if I was to build this as a net new Flow, the PB that was built should show you how the Migrate to Flow tool would handle many instances of PB’s being migrated into Flow via the tool. The aim was clarity and ease.
To summarise, the PB migrated was designed to go through the following steps:
- Evaluate if an Opportunity’s Stage had been changed to any non-closed stage.
- If yes, the Next Step will be updated to show that the aim is to progress to the next stage of the cycle.
- If no, go to the next evaluation node.
- Evaluate if an Opportunity’s Stage had been changed to a Closed stage (Closed Won or Closed Lost).
- If yes, change the Close Date field value to be the value of the current day (using the TODAY() function).
- If no, end the process and do nothing further.
Below, you will see the PB that we will be migrating to Flow as part of this blog post.
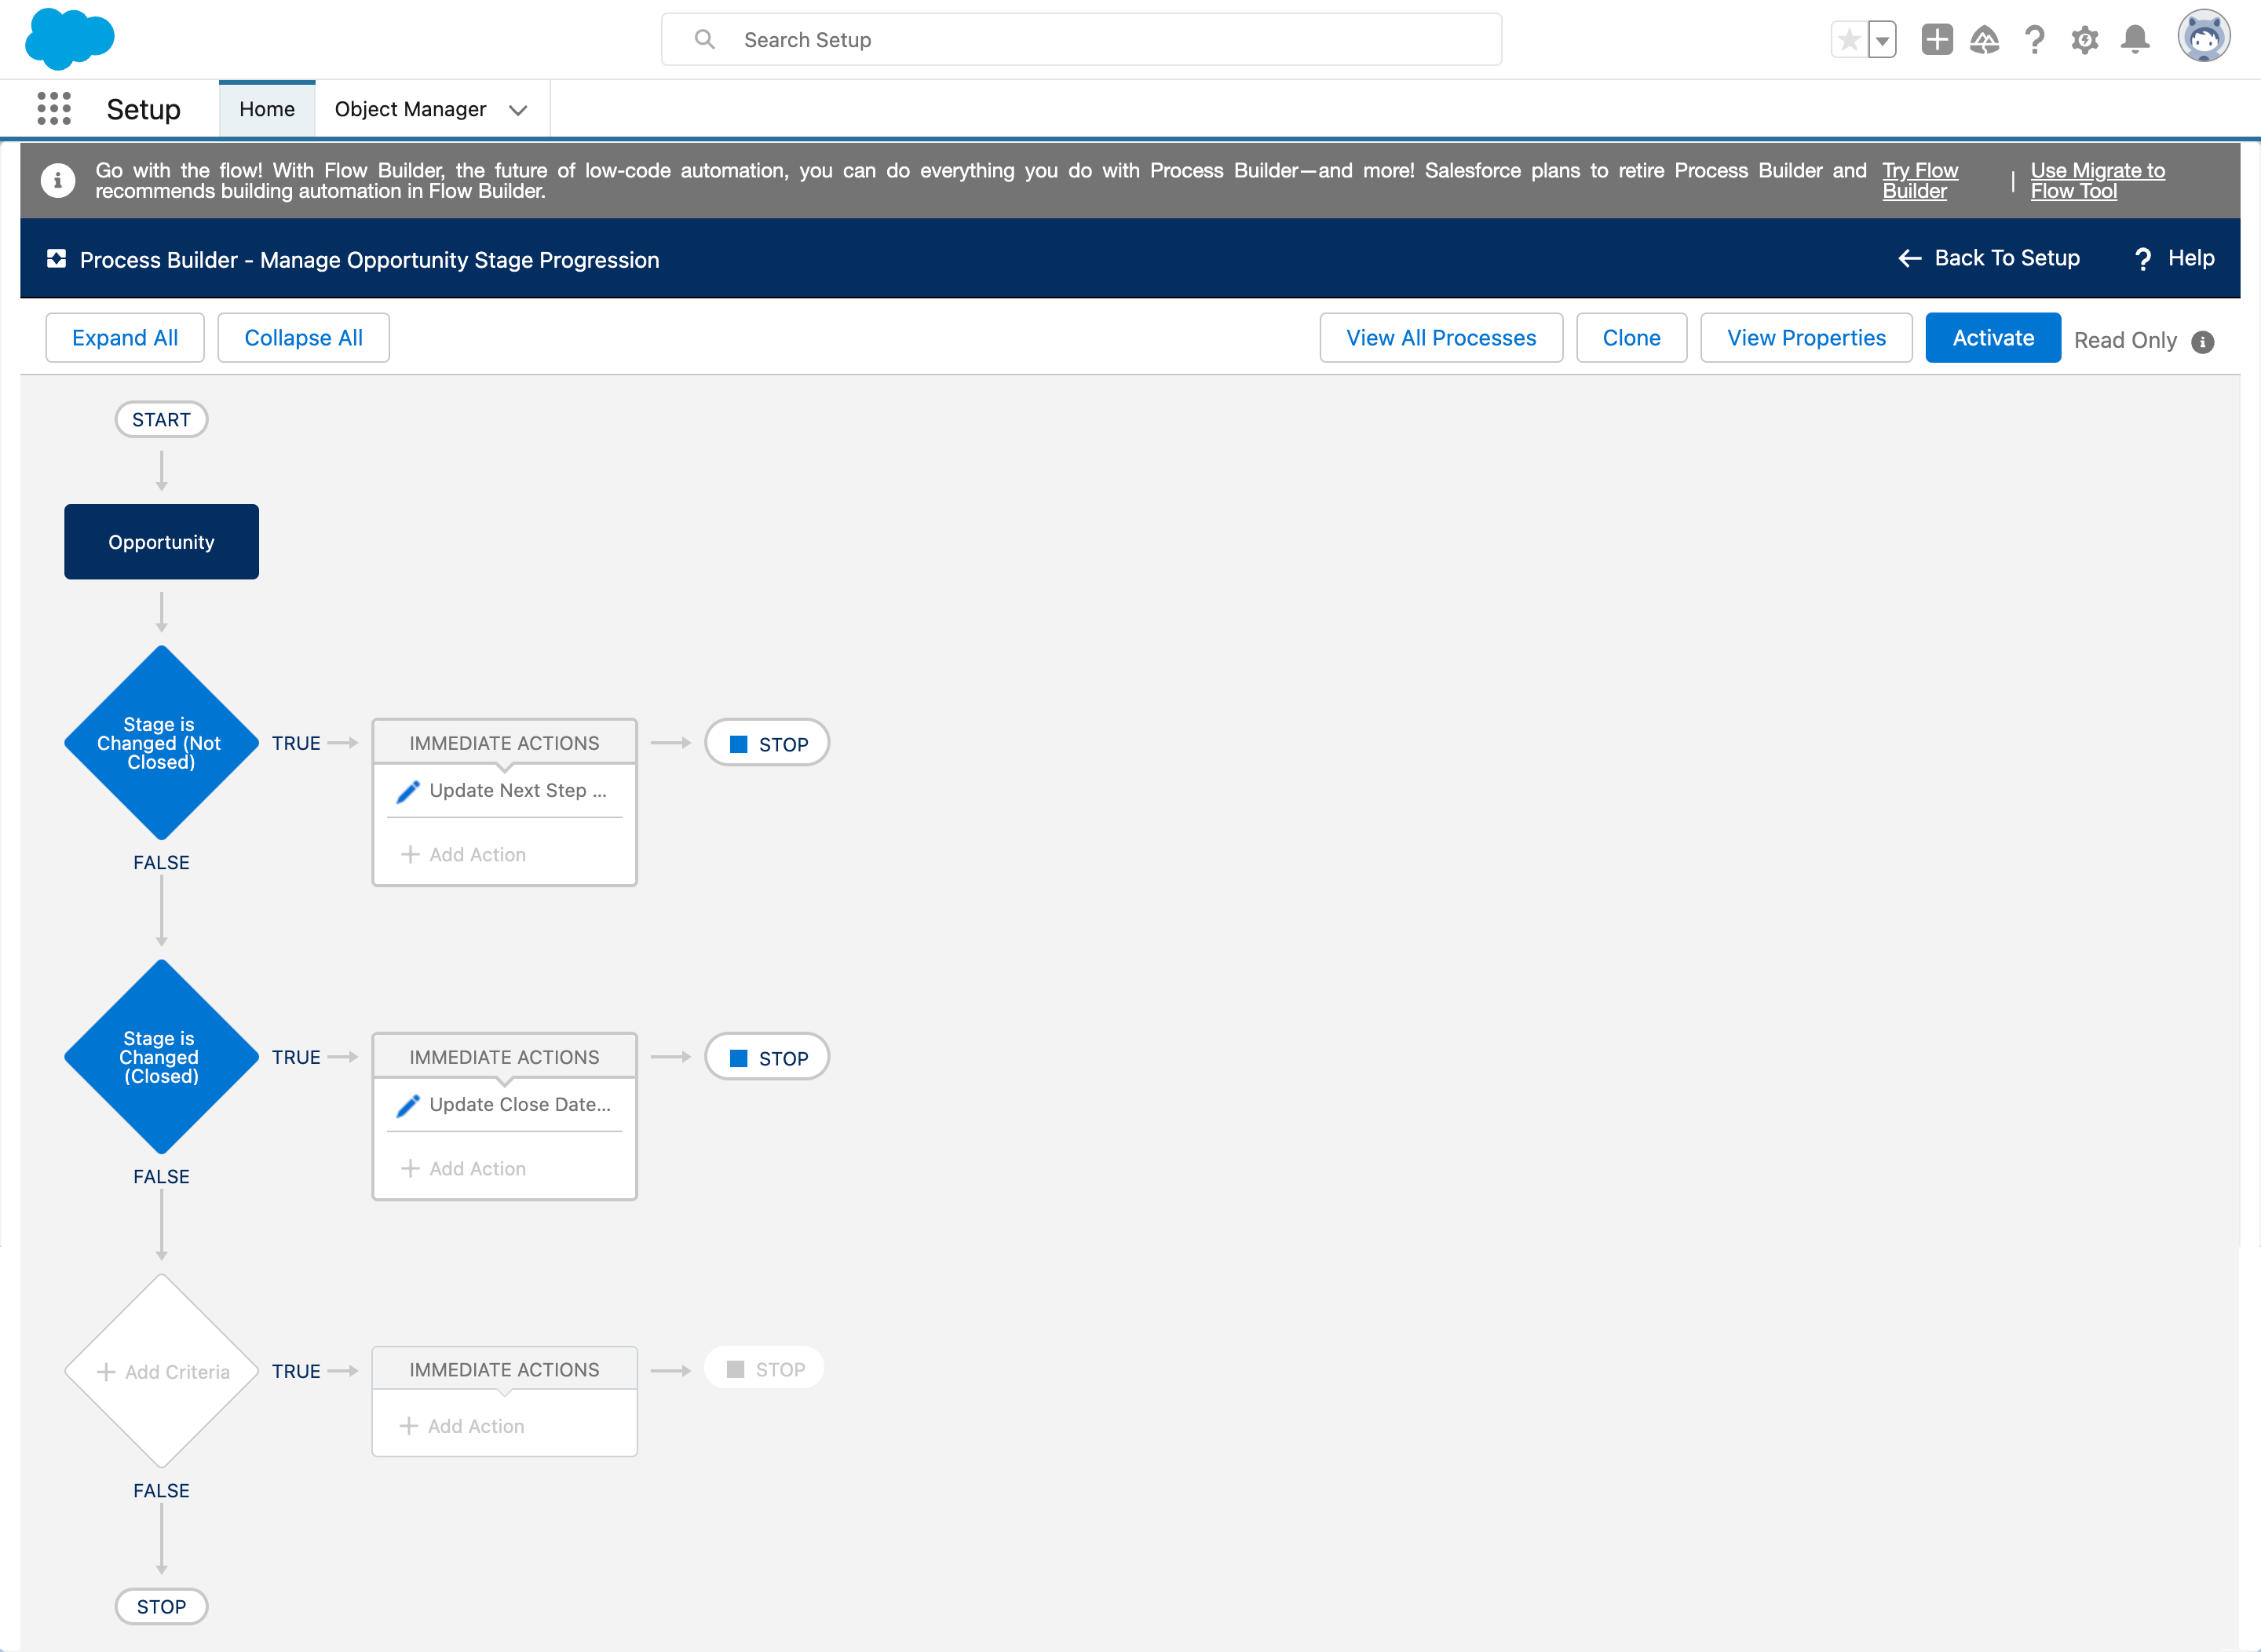
As you can see, the process is a fairly simple process working through to forms of evaluation criteria. For the purposes of transparency, I did create a formula on the Opportunity object for this to populate what the next expected Stage of the Opp would be. If you want to follow along with this demo, then you will need to create a similar formula to meet this requirment. In all honesty I could (and normally would) just create this formula inside of the Flow I built as it isn’t really something needed for this task. That being said, it could potentially be a beneficial field in some reporting use cases, so you might want to consider including it anyway.
So, just to keep you aware (as I won’t be covering it too much), here is the formula I wrote to calculate the next expected Stage:
IF(ISPICKVAL(StageName, “Prospecting”), “Qualification”,
IF(ISPICKVAL(StageName, “Qualification”), “Needs Analysis”,
IF(ISPICKVAL(StageName, “Needs Analysis”), “Value Proposition”,
IF(ISPICKVAL(StageName, “Value Proposition”), “Id. Decision Makers”,
IF(ISPICKVAL(StageName, “Id. Decision Makers”), “Perception Analysis”,
IF(ISPICKVAL(StageName, “Perception Analysis”), “Proposal/Price Quote”,
IF(ISPICKVAL(StageName, “Proposal/Price Quote”), “Negotitation/Review”,
IF(ISPICKVAL(StageName, “Neogitation/Review”), “Closed Won/Lost”,
IF(IsClosed = True, “N/A”, “”)))))))))
Now, let’s move on to cover the actual migration process for converting this PB into a Flow using the Migrate to Flow tool.
Running the Migration
Like with migration of Workflow Rules to Flow, running the task of migrating a Process built it Process Builder to Flow using the Migrate to Flow is quite really simple. We essentially have to carry out the same tasks as we do with Workflow Rule migration.
The migration process in Salesforce can once again be broken down into these three simple stages:
- Select the automation to migrate.
- Migrate the automation to Flow.
- Carry out any relevant post-migration updates.
We’ll now go over the migration process and show the end result, that being the Flow that was created. We’ll talk about the Flow in detail before moving on to show how I would build out this Flow if I was tasked with building it out and implementing it.
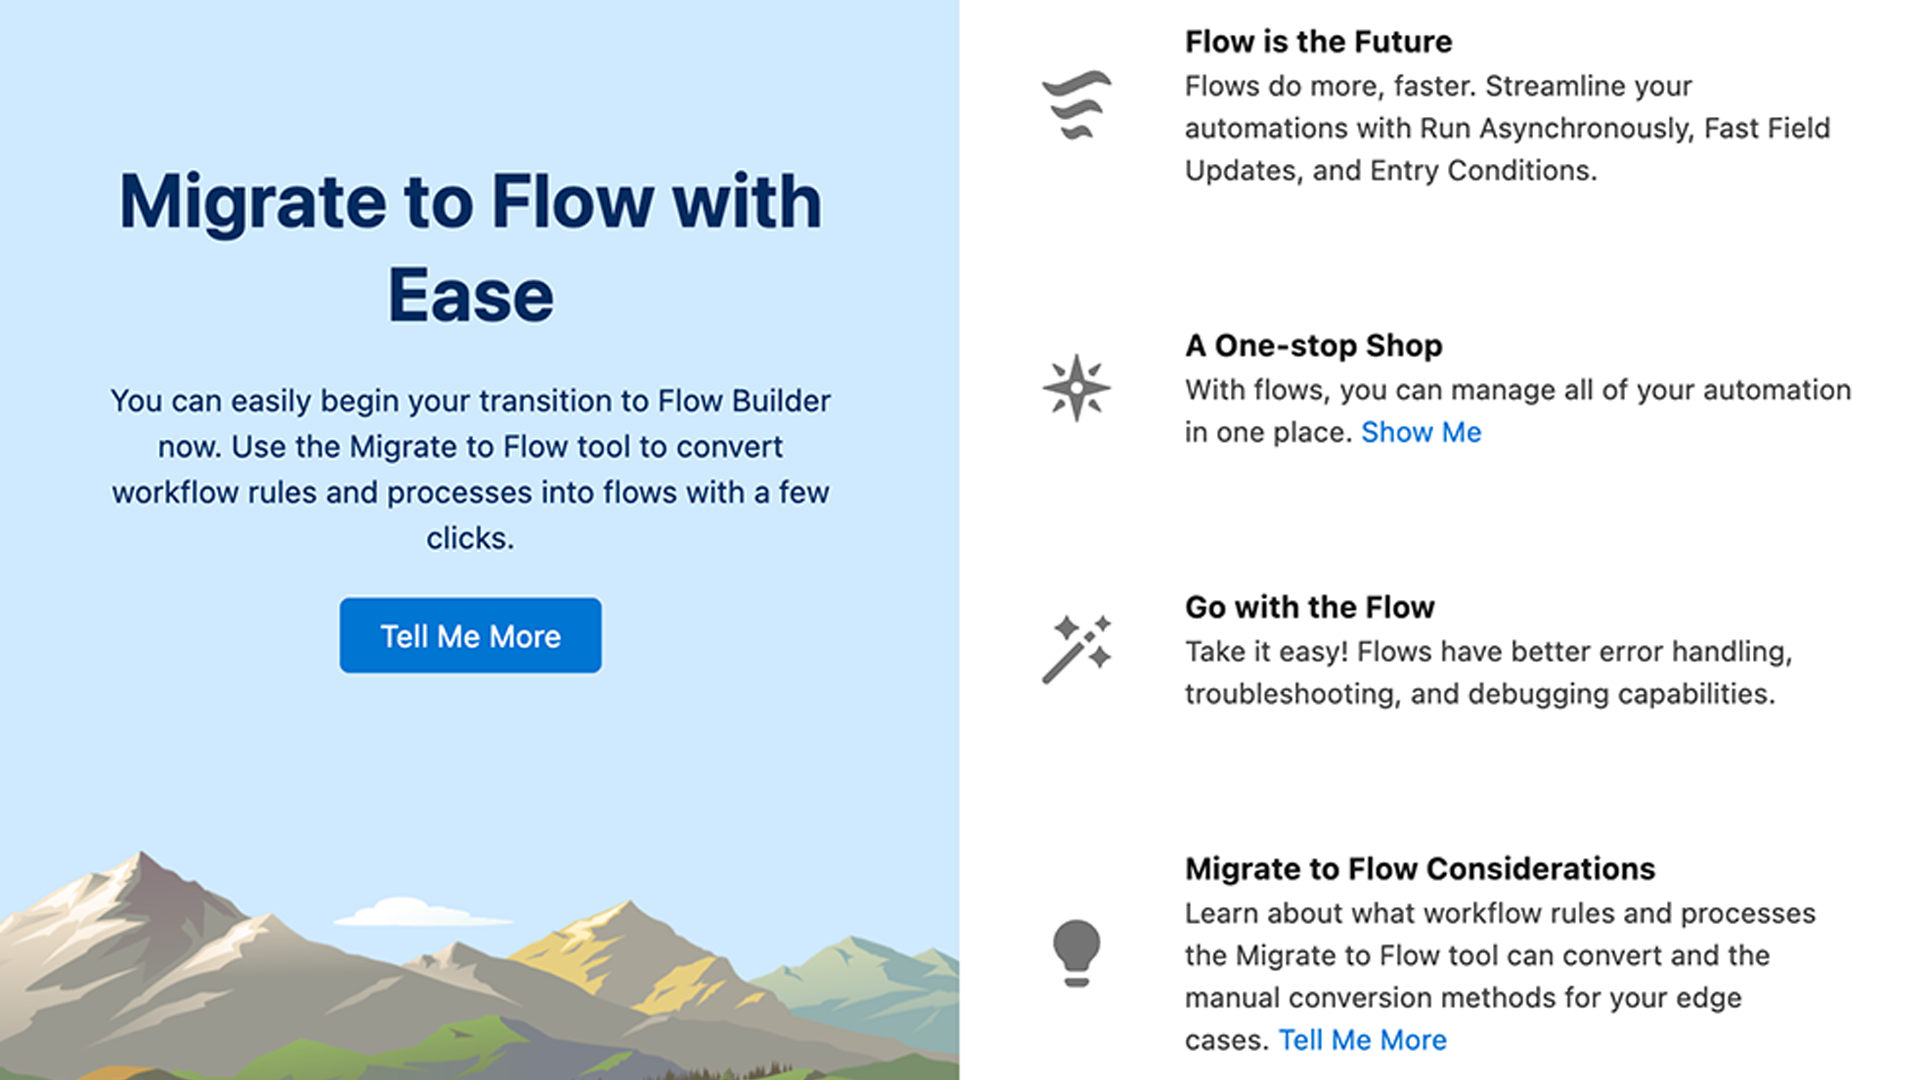
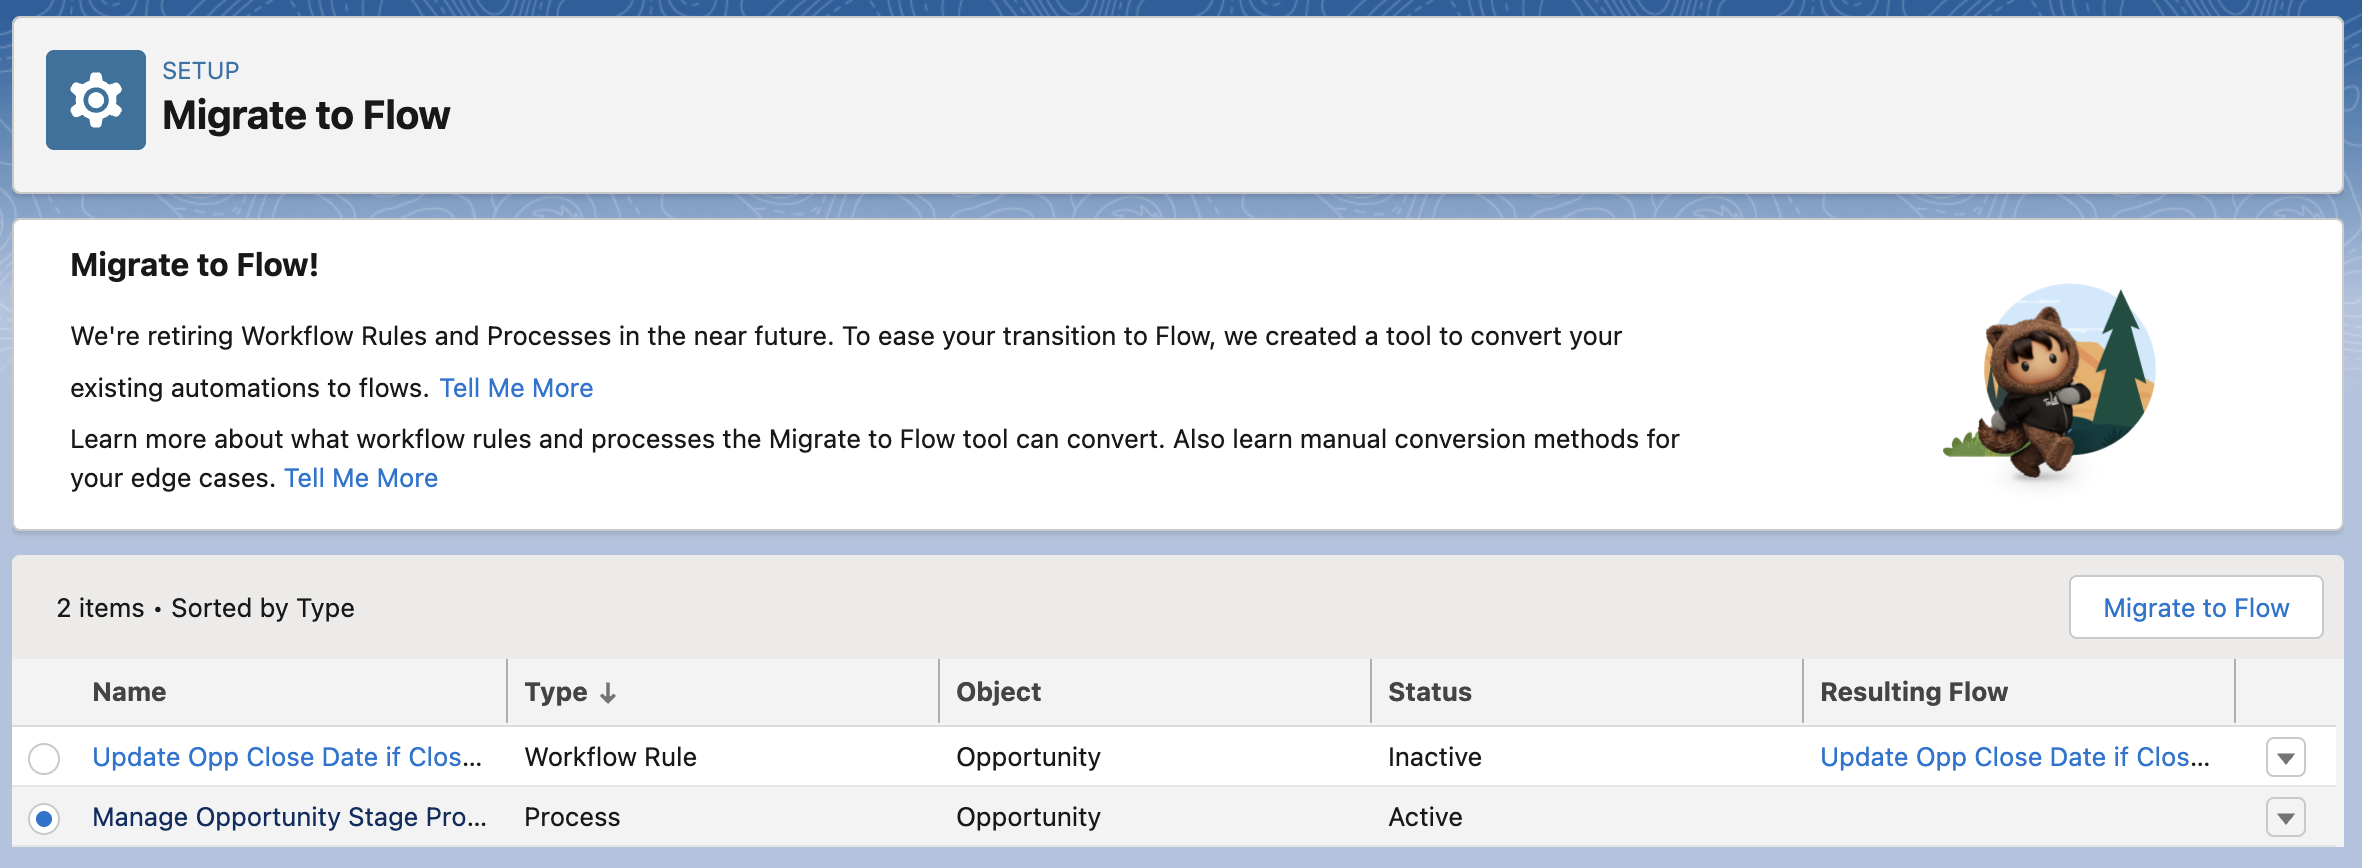
To run the migration tool, you’ll first need to go to Setup. Once you’re in Setup, simply type Migrate to Flow in Quick Find and you’ll see the Migrate to Flow appear in your menu. Click it, and you’ll enter into the page for the tool.
If it is your first time using the tool, you’ll see the screen on your left pop as a modal. This is a welcome screen to the tool. Here you will see some basic information promoting the tool and why you should use it. This should only appear the first time you navigate to the tool in Setup.
When you arrive in the tool, you should be greeted by a list view with a list of all of the Processes from Process Builder (and Workflow Rules) that you can migrate to Flow. The view will will include the automation type, the related object and it’s status. To migrate, simply click Migrate to Flow.
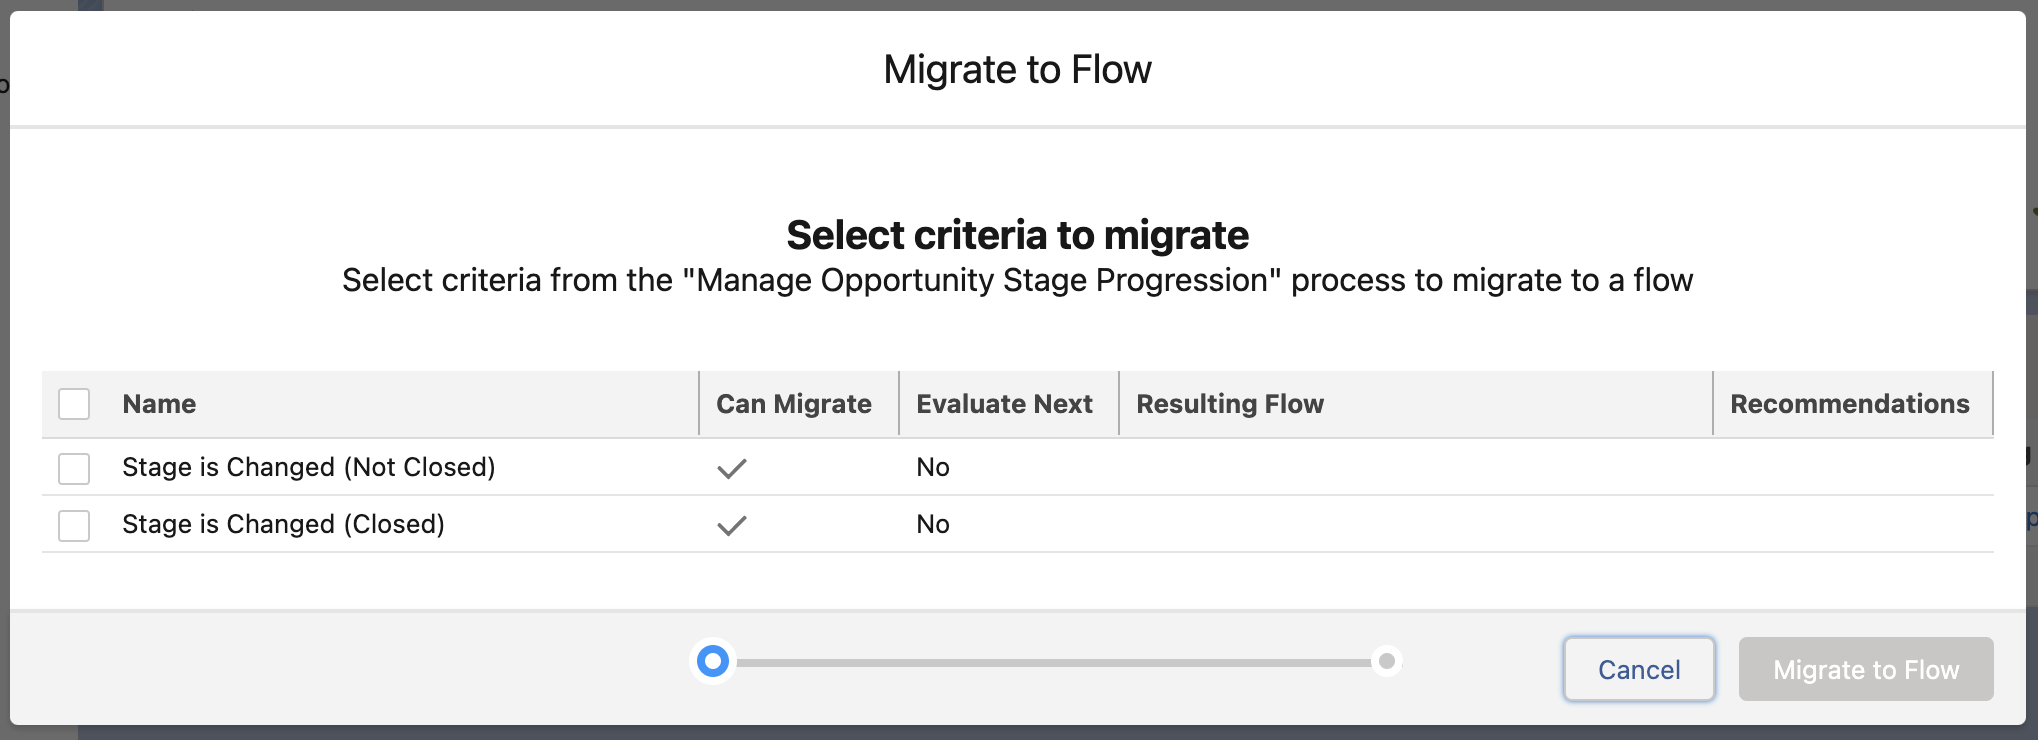
If you select to migrate a Process into Flow (as we are here), you will be given an additional step that isn’t present in the WFR migration options. That additional step being a selection screen allowing you to pick which decision nodes you want to migrate into your new Flow. To continue with the process, simply select the nodes to migrate and click Migrate to Flow.
Once you have clicked the button to migrate the automation into Flow, the automatic creation of your Flow will begin. It is worth noting that once your migration has been completed, you will see the name of the Flow that was created in the Resulting Flow column in the list view highlighting the automations you can migrate. My recommendation here is to create a checklist of the Flows you want to migrate if using this tool, that way you can tick them off and have easy access to a list of your migrated automations. Making it easier to know which Workflow Rules and Process Builders have been migrated instead of relying on the list view. That recommendation may sound extremely simple, but it will honestly save you a major headache in the long run, trust me!
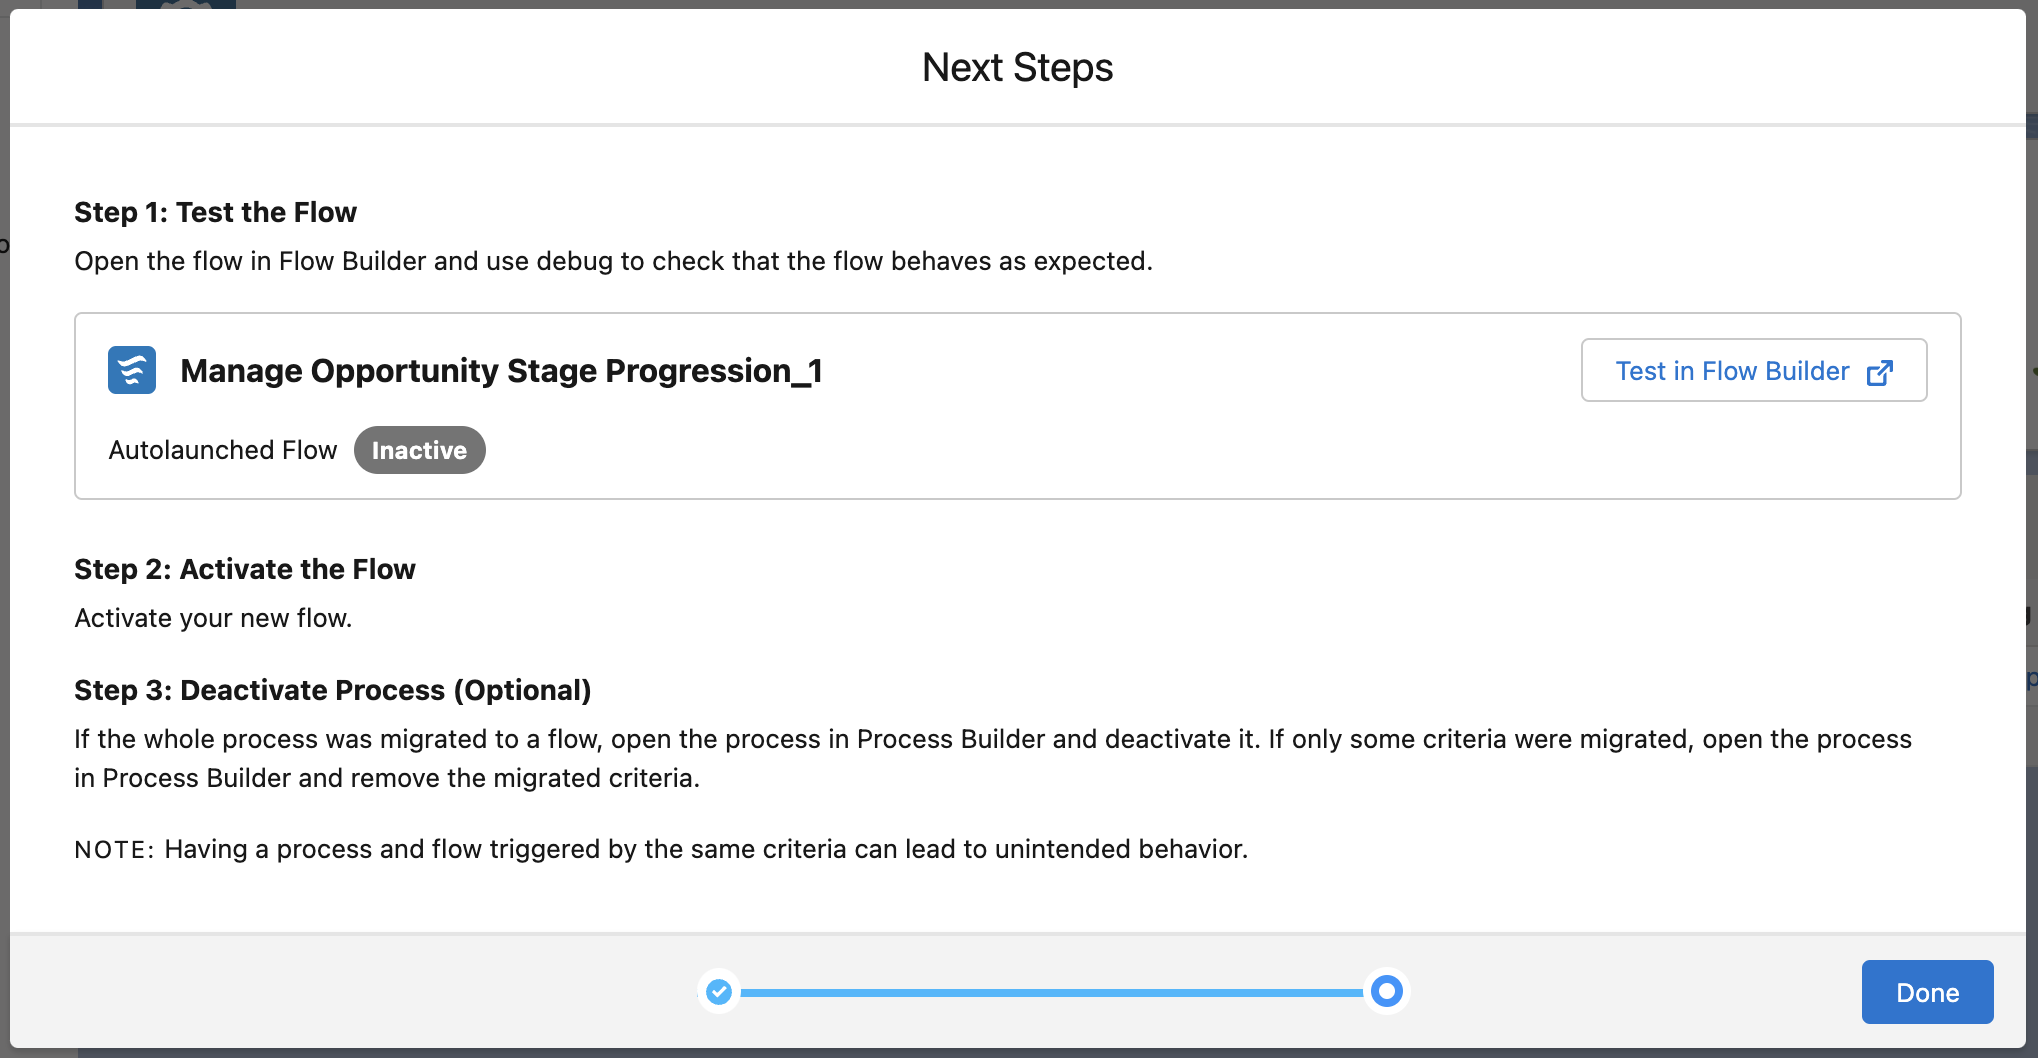
Upon the completion of your migration, you will be greeted by a screen informing you that the migration you ran has been successful. If the migration is not successful for any reason, the migration will fail and you will be informed as to why it failed. In the case of a migration that has succeeded you will be able to open the newly created Flow in Flow Builder. You will also be advised to deactivate the Process via PB. At the time of writing activations for newly migrated processes cannot be switched unlike with WFRs.
My recommendation here would be to deactivate the PB that was migrated to Flow. This really should be a common sense thing to do, as having both a PB and a Flow active and carrying out the same task will undoubtedly cause issues with your automation in Salesforce. So please do deactivate your migrated PB’s before you go and activate your newly migrated Flow that you’re reviewing.
But now that we have successfully migrated the PB into Flow Builder, let’s take a look at the Flow that was created as a result.
Here’s the Flow That Was Created by the Migration
In this section, we’ll go over the Flow that was created as a result of the migration process. We’ll do this in a good amount of detail. We’ll start by reviewing the Flow canvas, we’ll then look at the Start Element configuration before reviewing each of the elements.
On the left, you will see the Flow canvas of the newly created Flow. You will no doubt notice that the Flow is broken down into two subsequent Decision elements, with each Decision carrying out an Update element if the outcome criteria holds a true result.
Please be aware that when I say that the outcome result bears a true result, I do not mean that the set condition requirements hold a boolean value.
In layman’s terms, how decision criteria works is that you set your filter condition requirements in the outcome, and Flow will evaluate if your condition requirements are met.
An idea for how this works would be like this in formula form:
IF(Conditions Met = TRUE, Do A, Do B).
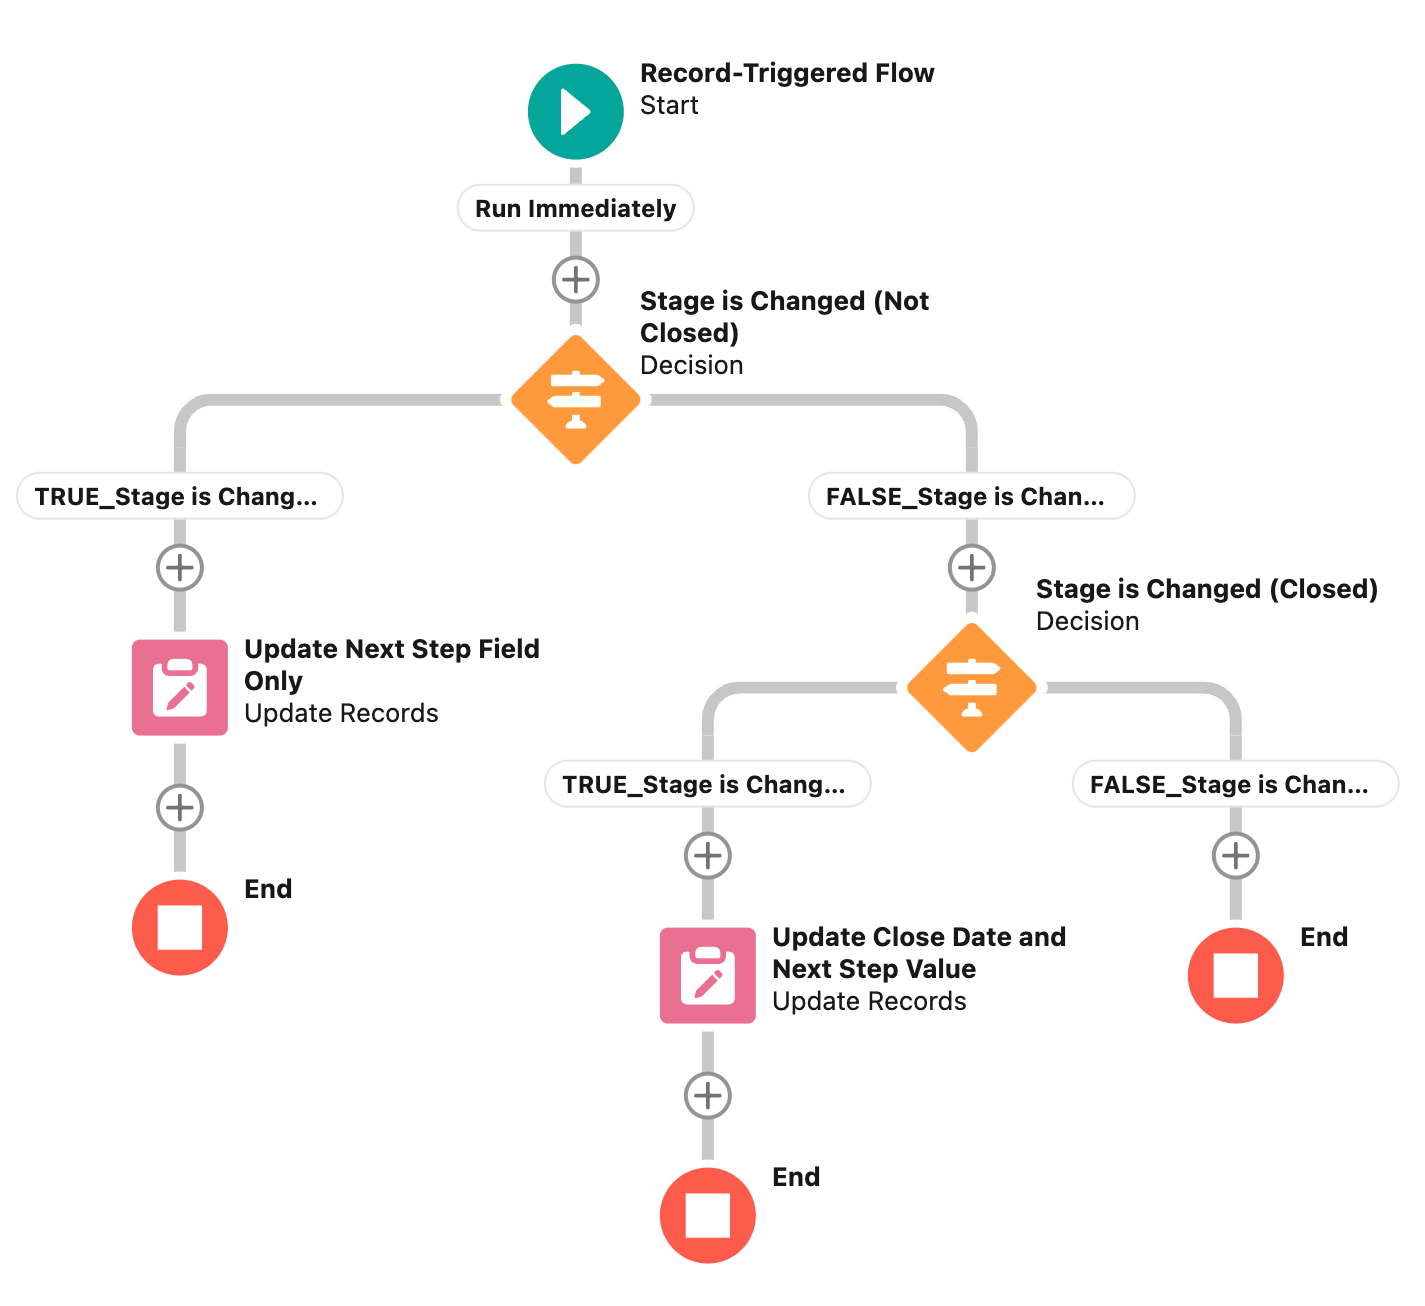
Going back to the Flow canvas shown above. You’ll notice that the outcome paths that were migrated tell you which result the path is related to, doing this with either a TRUE_Stage or a FALSE_Stage tag. In my review next week, you’ll go on about how much I don’t like the naming patterns that the Migrate to Flow opts to go with. This is an instance of this. Personally, I don’t like long labels in Flow anymore (this is largely because of Slack, I’ll detail that in a future post), my opinion currently is that labels should be short and to the point. Meaning that a good label should explain what the item (in this case a Decision outcome) is doing, but do it in a way that is short in character length. The PB migration does not do this at all seemingly, rather it seems to give you a lengthy label that copies the label of the decision node and simply adds a true or false in front of it to specify the path that it is taking. If you were to ask my advice on this, I would actually opt to rename the outcomes in this Flow, opting to give them an explanatory name.
I’ve talked a little too long there about the naming patterns again … sorry, but I just really don’t like this with the Migrate to Flow tool. Now, let’s move on to the Start Element.
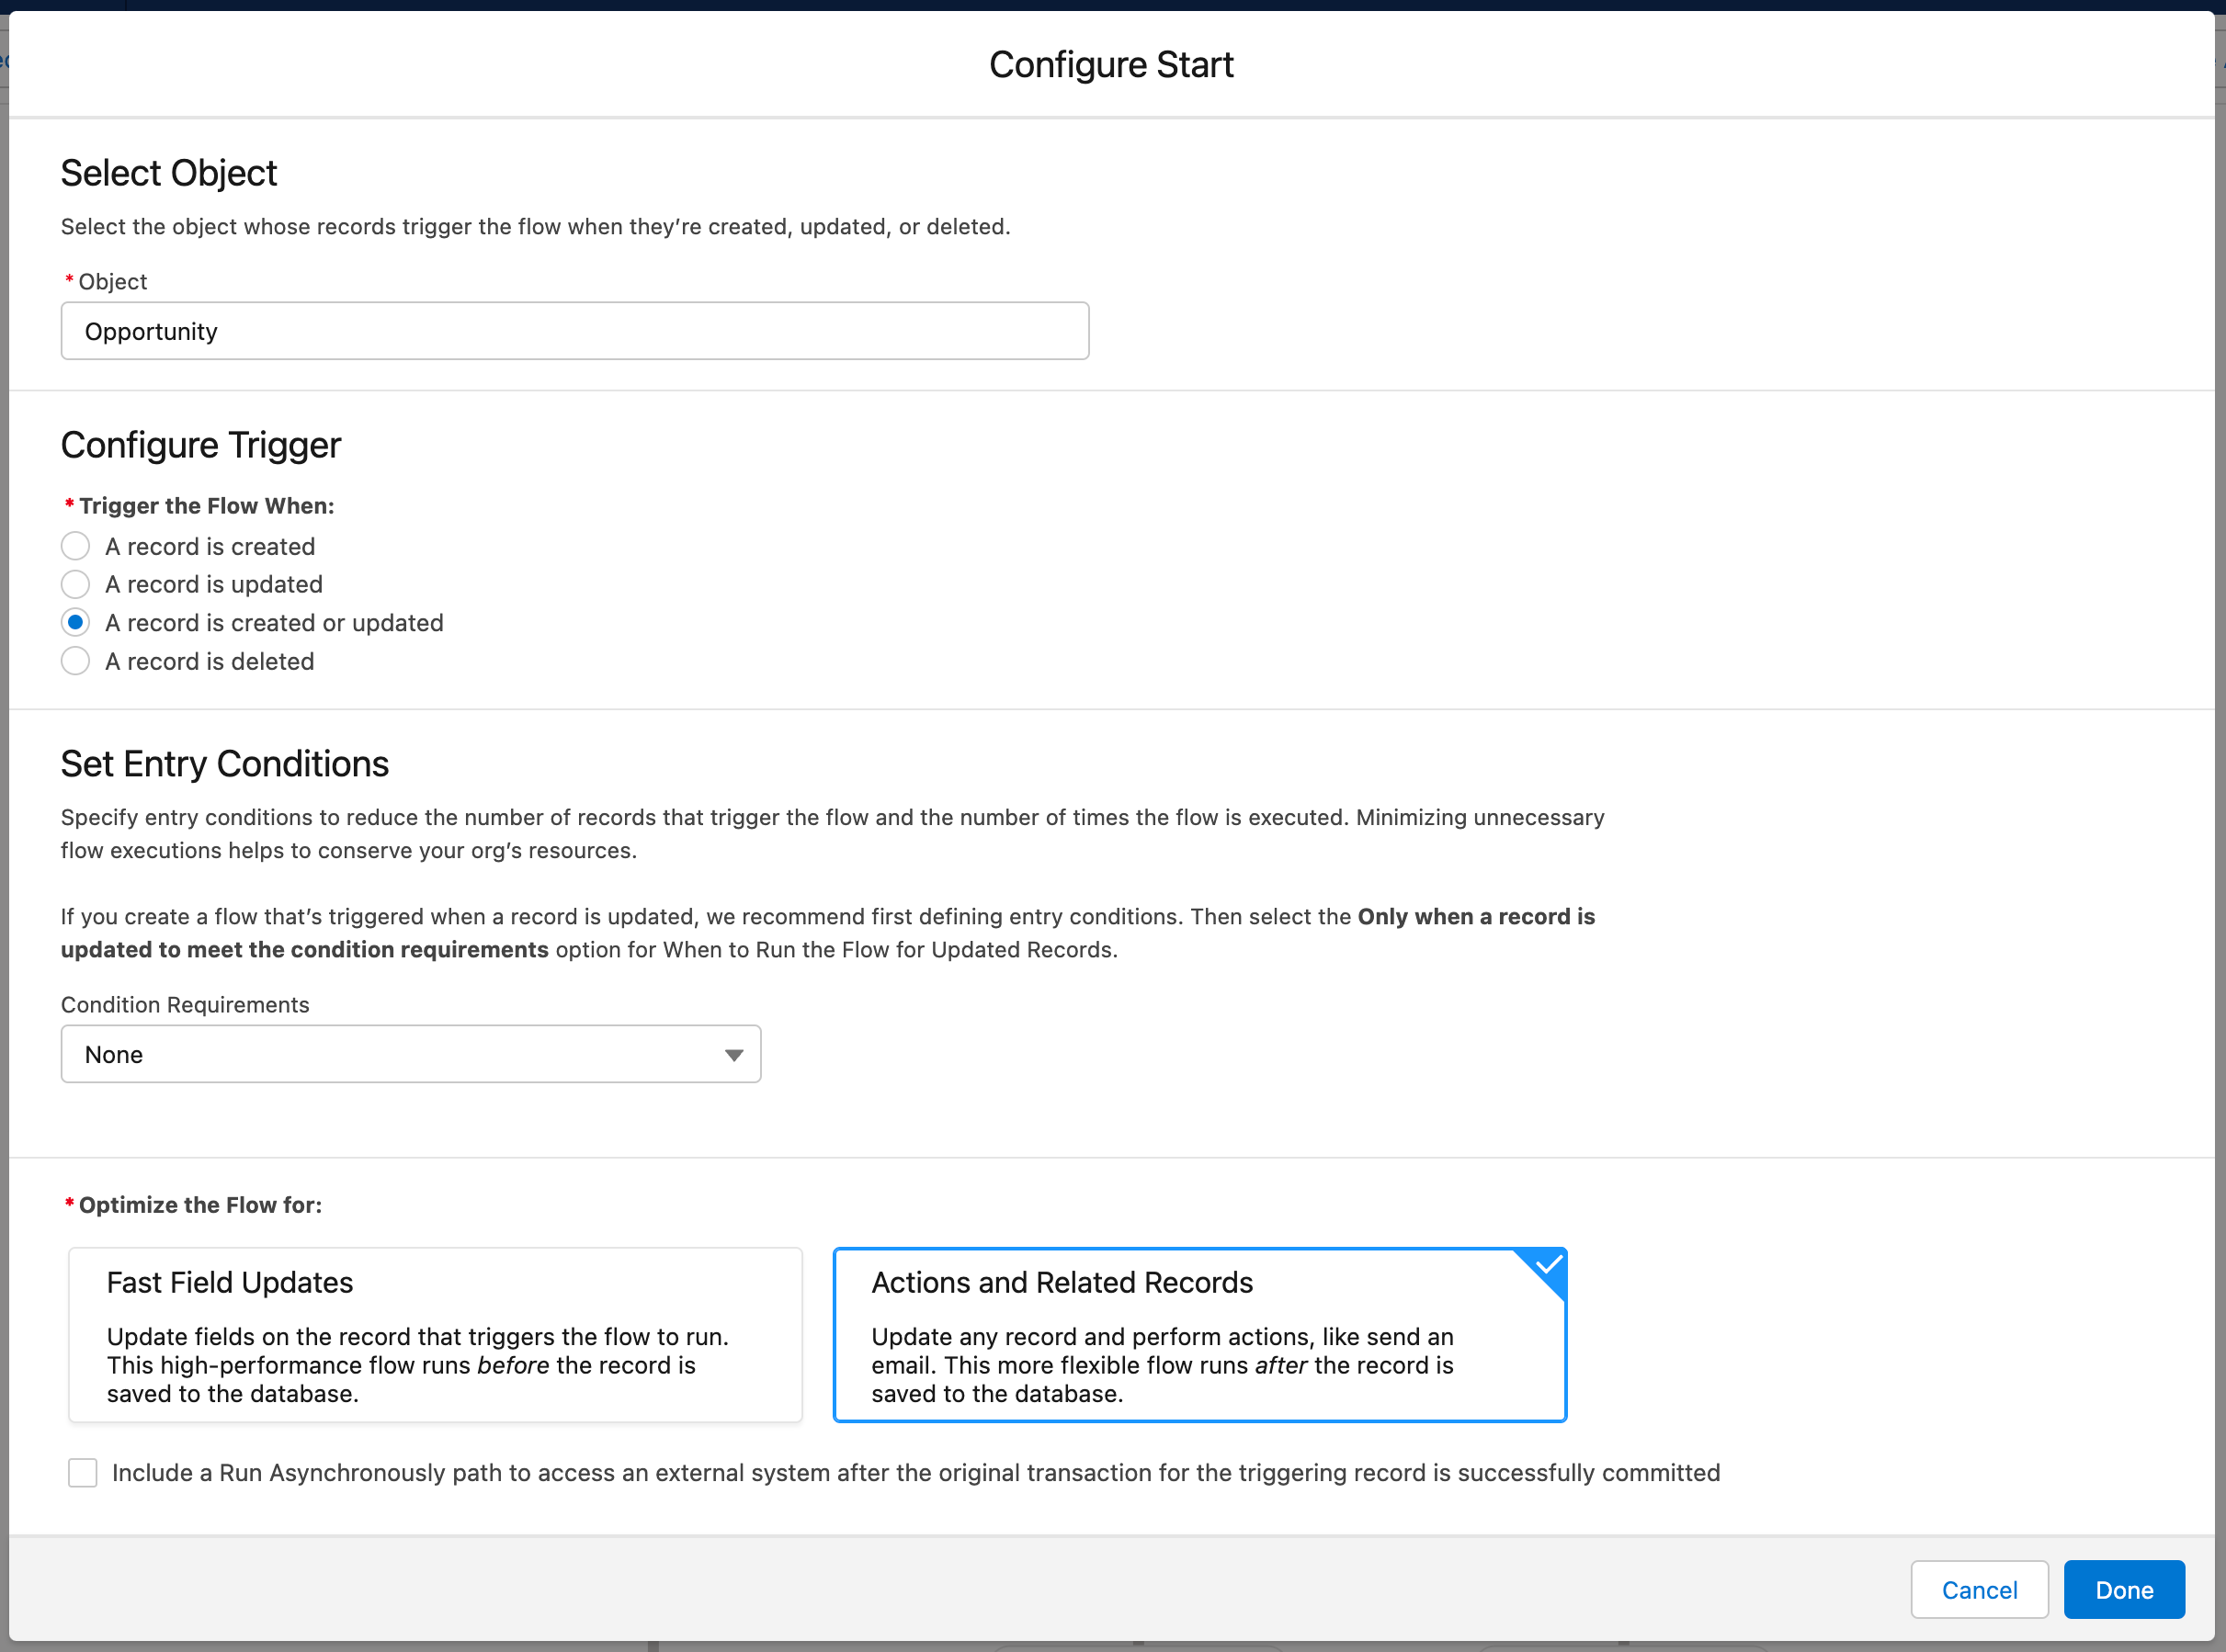
When you migrate a PB over to Flow, you will see that the Flow that gets created in this example doesn’t have any filter conditions and is set to be optimised for Actions and Related Records (e.g. an After-Save Flow). This is in part because the PB uses a formula to determine the update parameters (and formulas calculate after save, therefore this has to be after-save). In my opinion, you could actually make this into a before-save Flow, but more on that later on.
Based on the conventions of Process Builder, this would actually be the correct way to migrate this automation. However, if I am to be brutally honest here, I’m not a big fan of this either. I would much prefer to have an entry condition here to prevent the Flow from needlessly fire. You’ll see in the Decision elements here, that both Decision elements check to see if the value of the Stage field has been changed. Because both elements use this in their entry condition requirements, we could easily move that aspect out of the Decision elements and into the Start Element instead. That would actually be better than what we have here in this Flow.
Speaking of the decision elements, let’s check them out now shall we?
N.B. To make it easier on my part, we’ll review each Decision element side-by-side.
Decision Element 1: Stage is Changed but Not Yet Closed
Below is the first Decision element migrated to the newly created Flow during the migration from Process Builder.
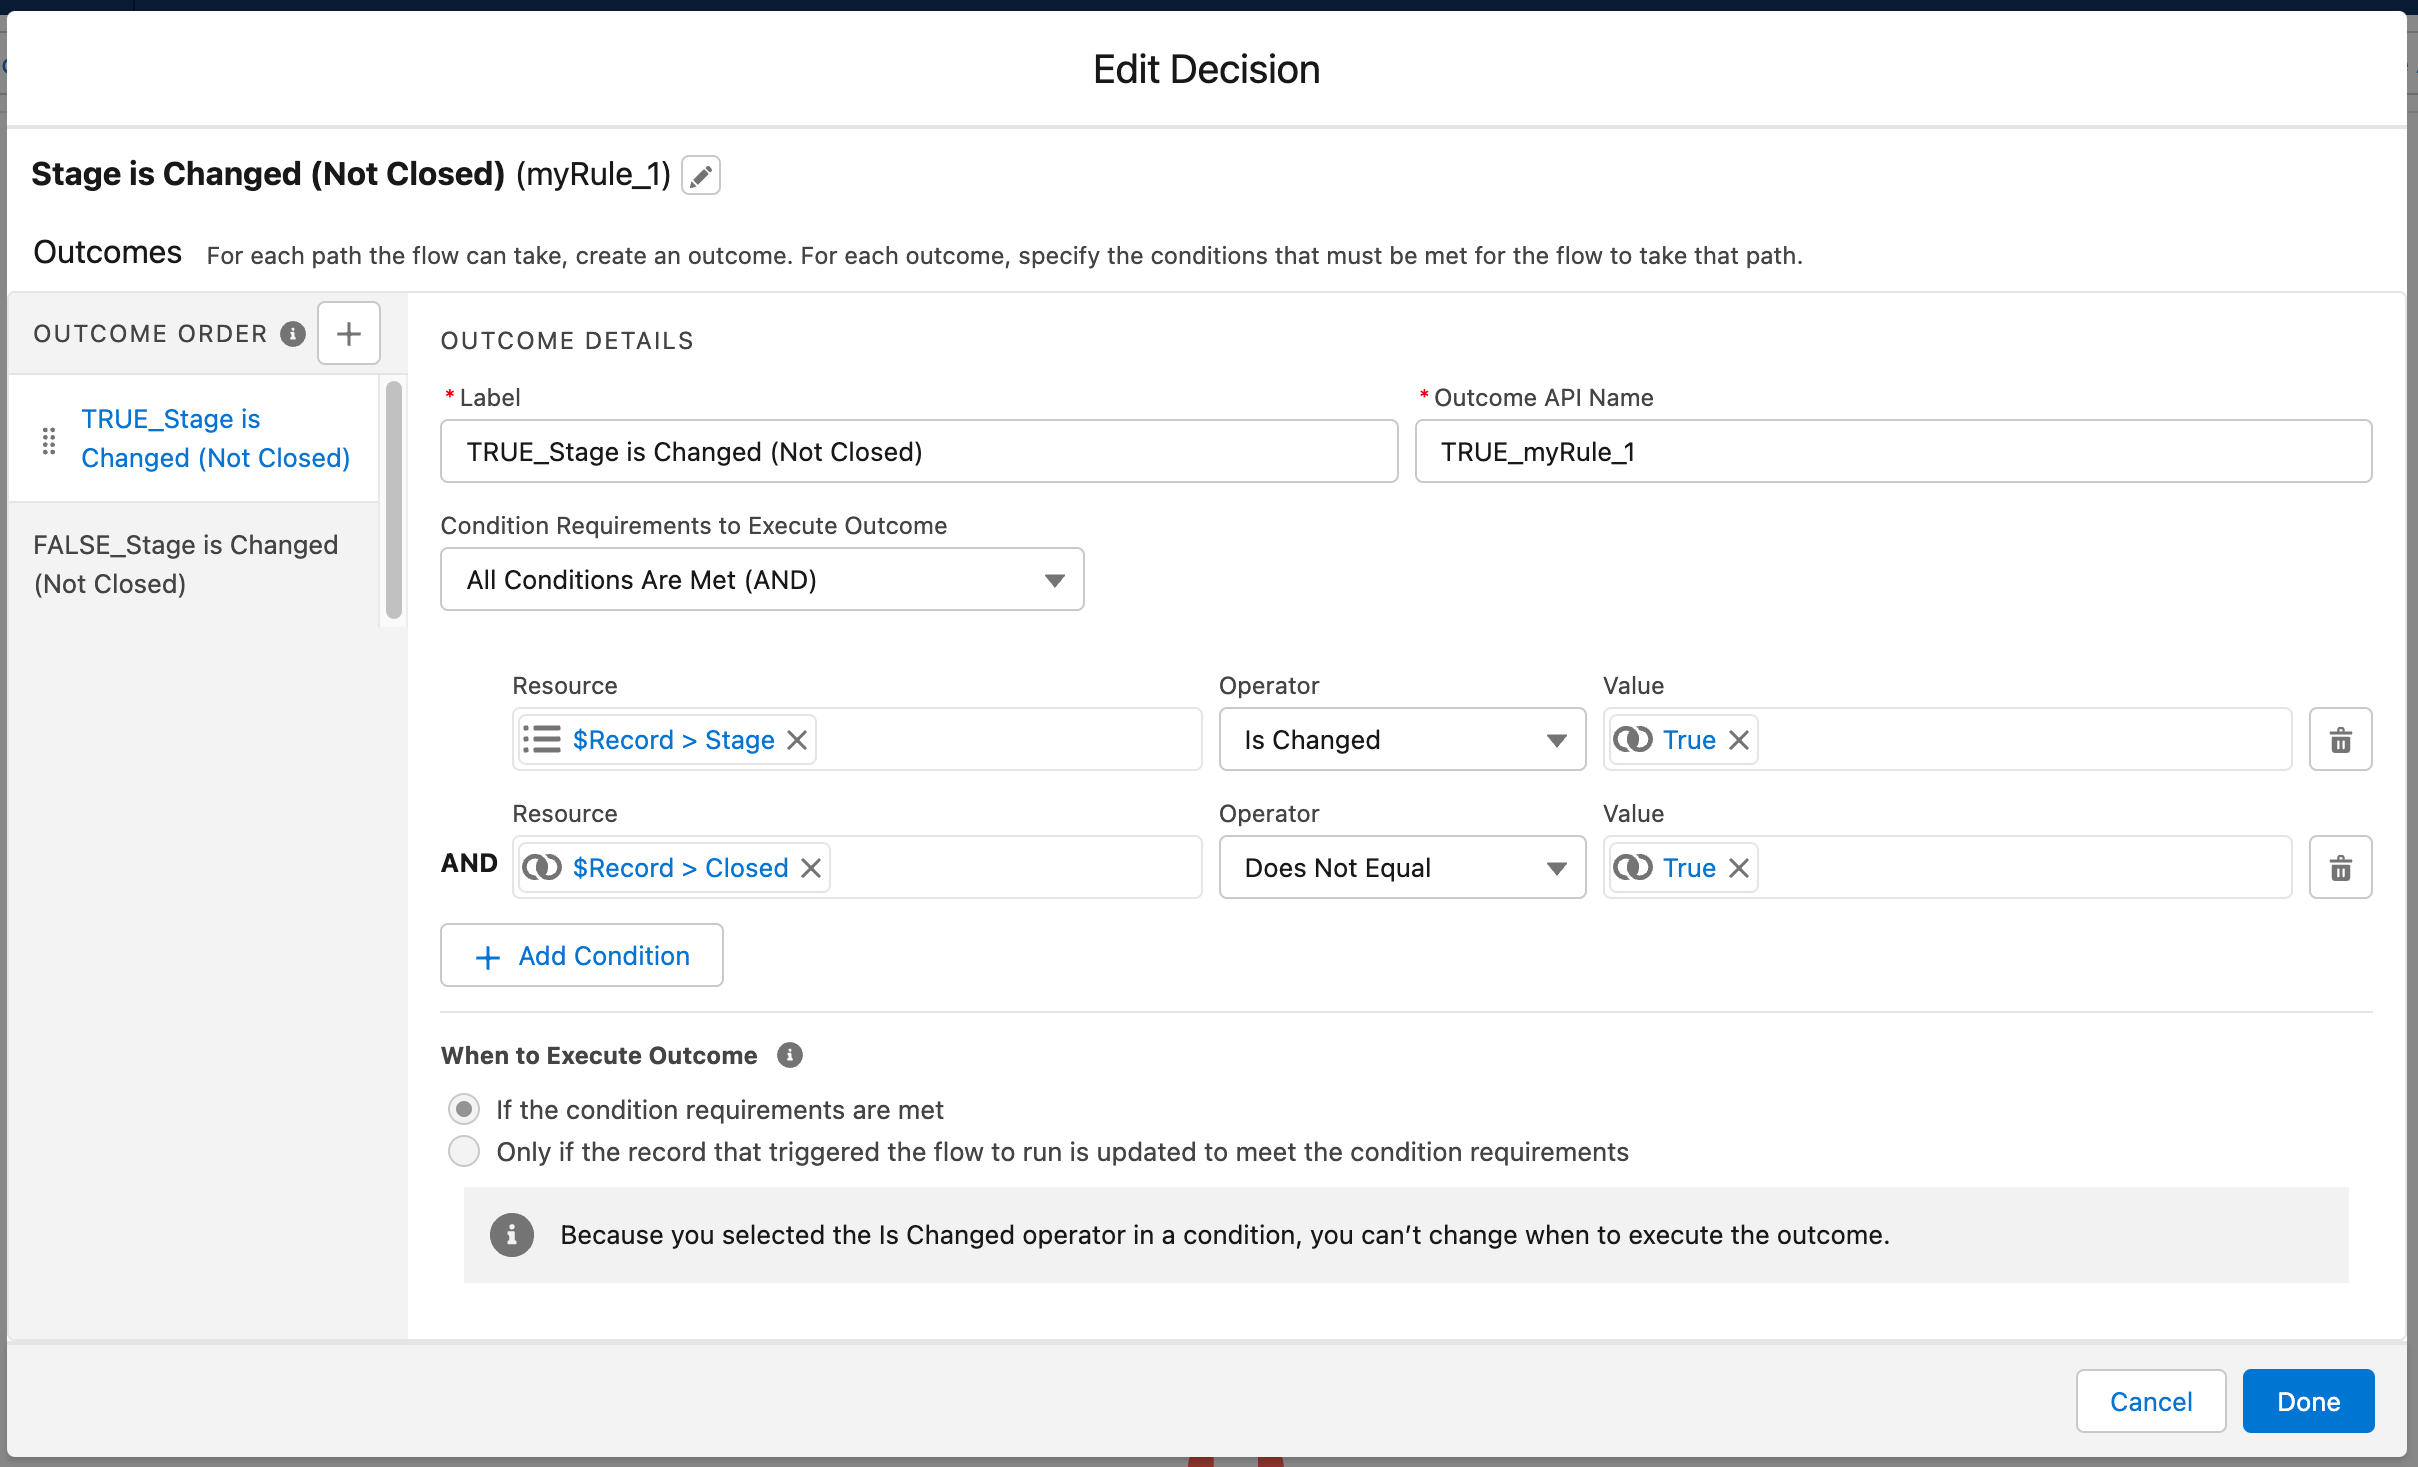
As you can see from the screenshot shown above, the new Decision element that was created includes one Outcome path, along with the default path (used as the false path).
The custom path checks to see if the value of the Stage field has changed and if the Opportunity isn’t closed. The default path will move onto the secondary Decision element shown in the screenshot on the right side of this content section.
As noted earlier on, the outcome labels include the label of the Decision element with a TRUE_ or FALSE_ prefixed to the label depending on the outcome. You will also be able to see that the API name for the element is equal to myRule_ with a correspending number depending on the element. I’ll include my views on the naming patterns at the end of this section.
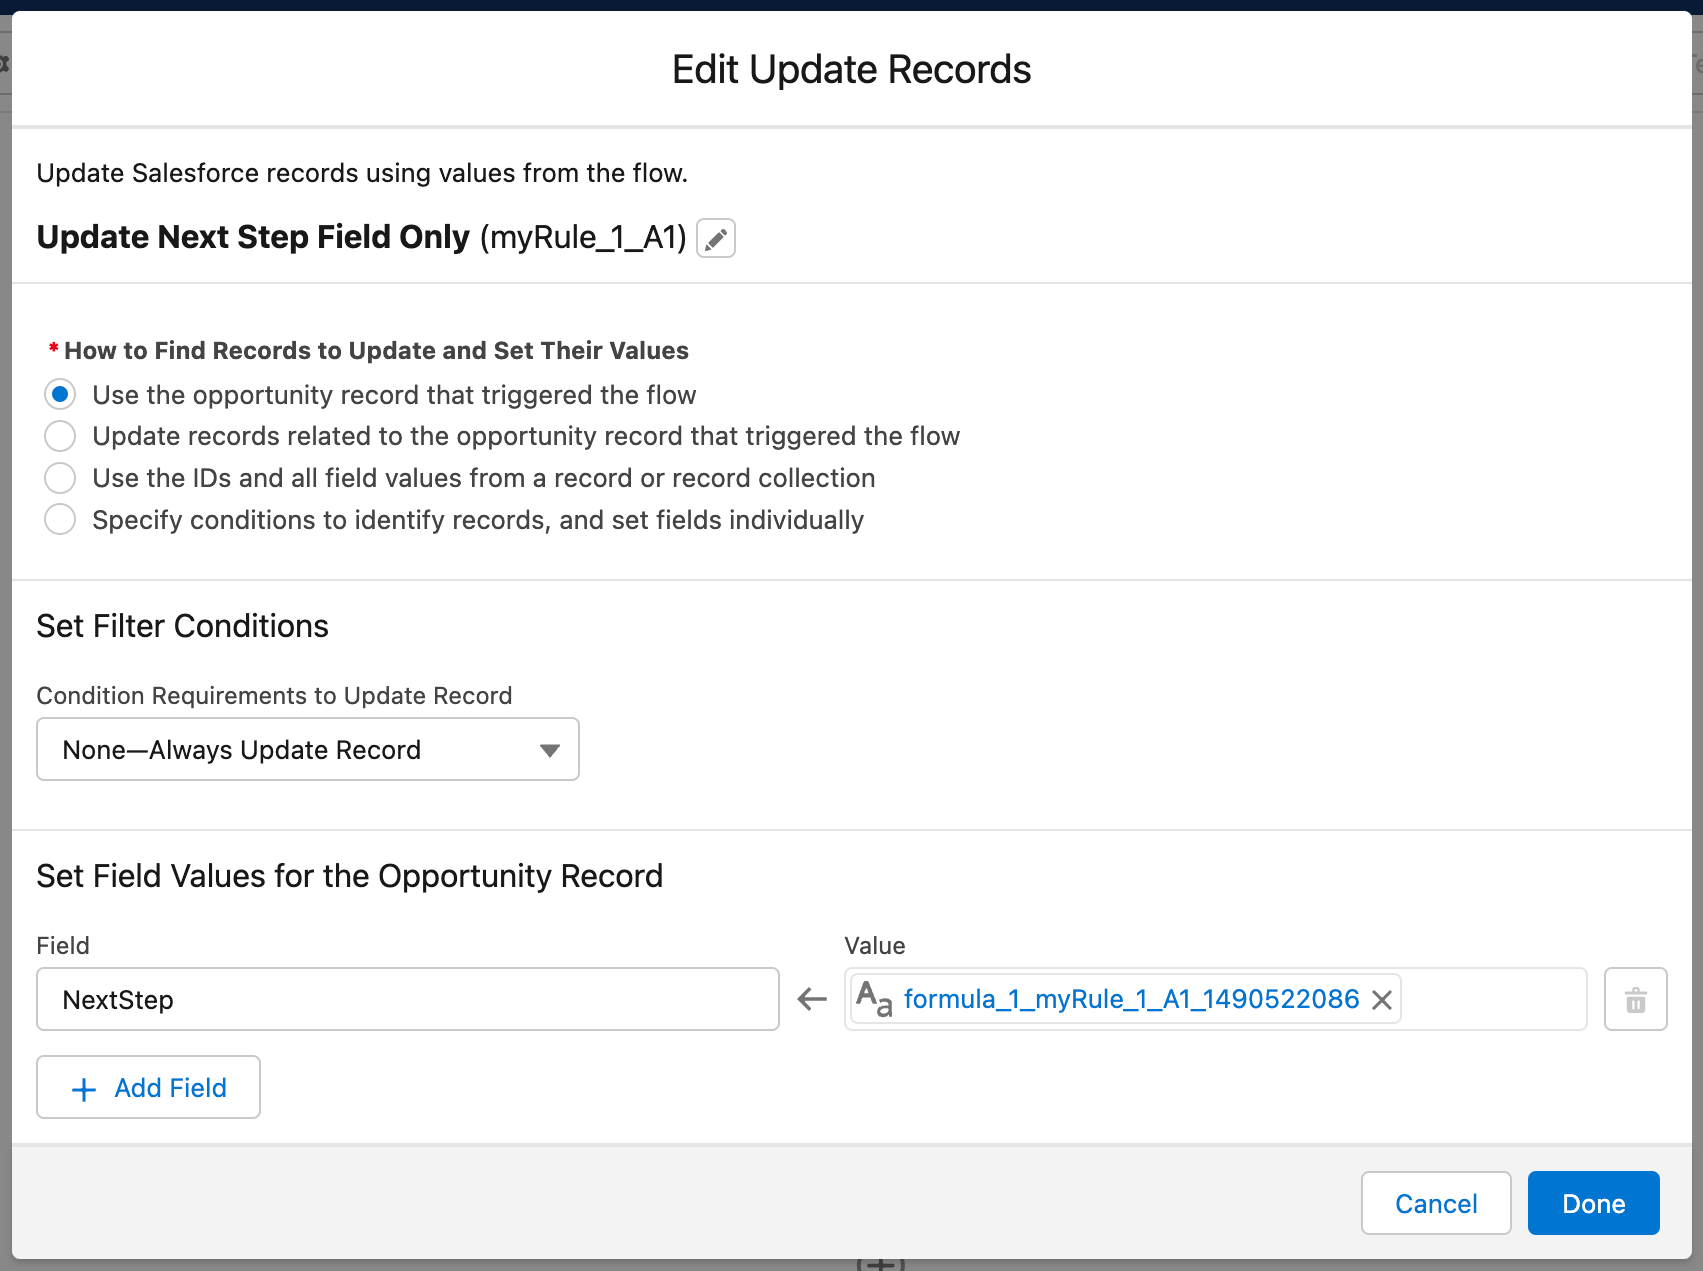
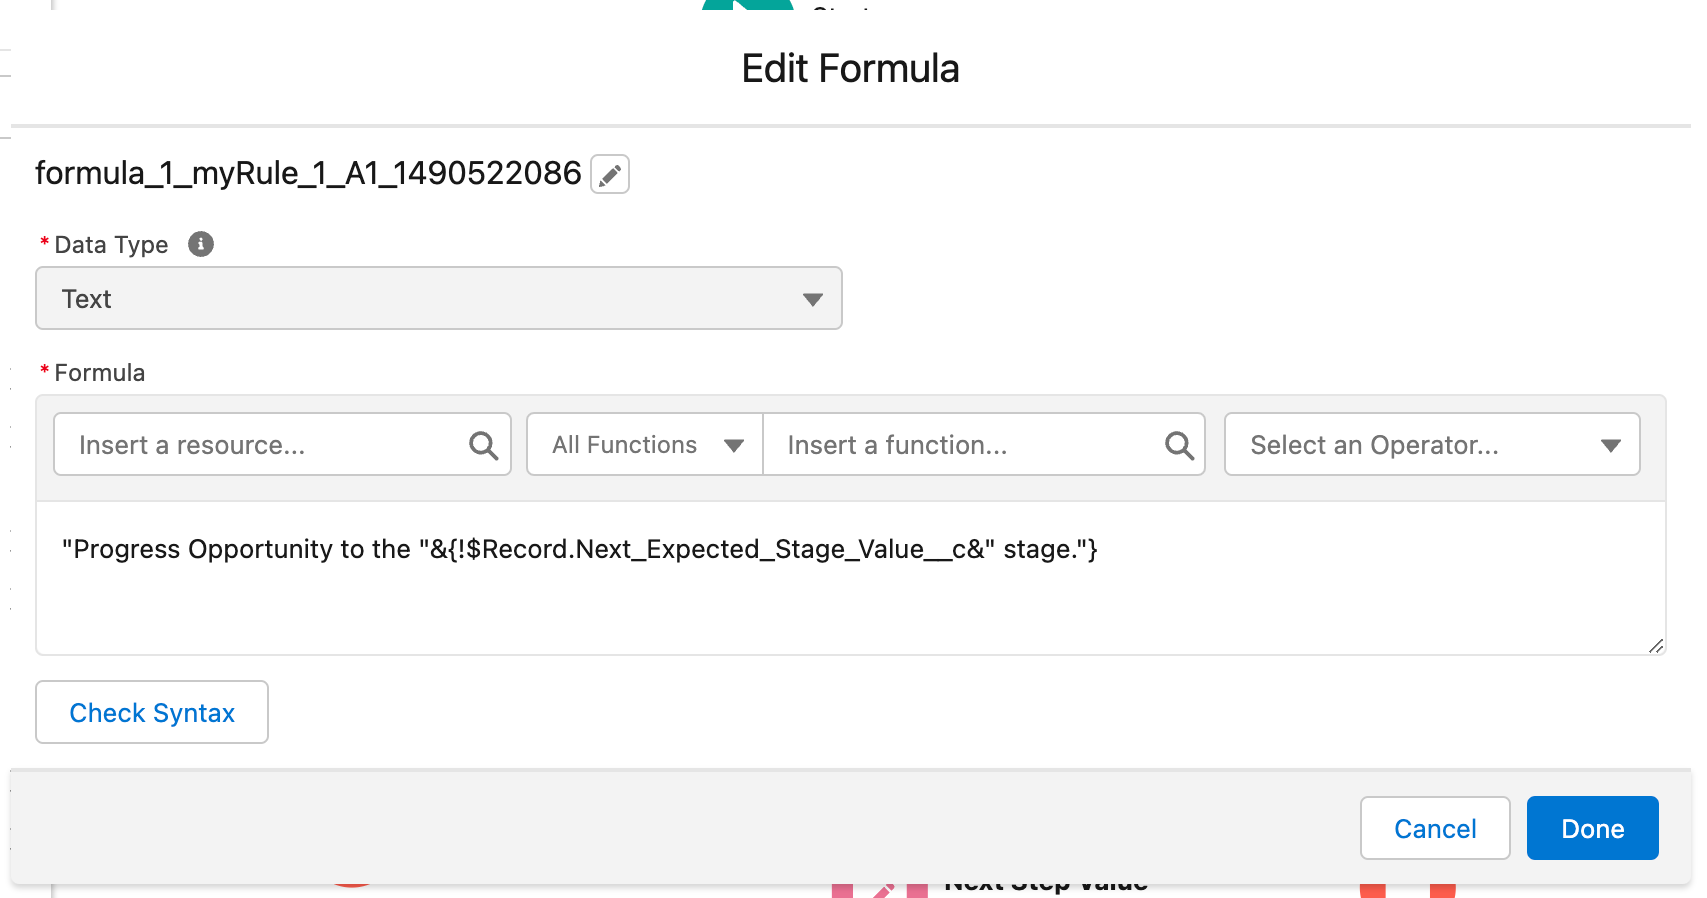
Above are two screenshots, the first shows the Update element that was created during the migration process. The API name of this update follows the same naming pattern as that of the Decision element, with this instance specifically being called myRule_1_A1 … my assumption is that A1 refers to an action and could thus be referred to as Action 1 (but I do not know this for certain, and therefore could be wrong).
The Update element uses a formula to update the Next Step field value. This is taken from the Process from PB and then updates the field with the anticipated value of the next Stage in the process. This is correct based on the configuration of the Process that was built in PB, not once again the naming pattern of the formula here is below par, unfortunately this bad pattern of naming API names in Flow via the migration tool is a common thread across the Migrate to Flow tool.
Decision Element 2: Stage is Changed and is Now Closed
Below is the second Decision element migrated to the newly created Flow during the migration from Process Builder.
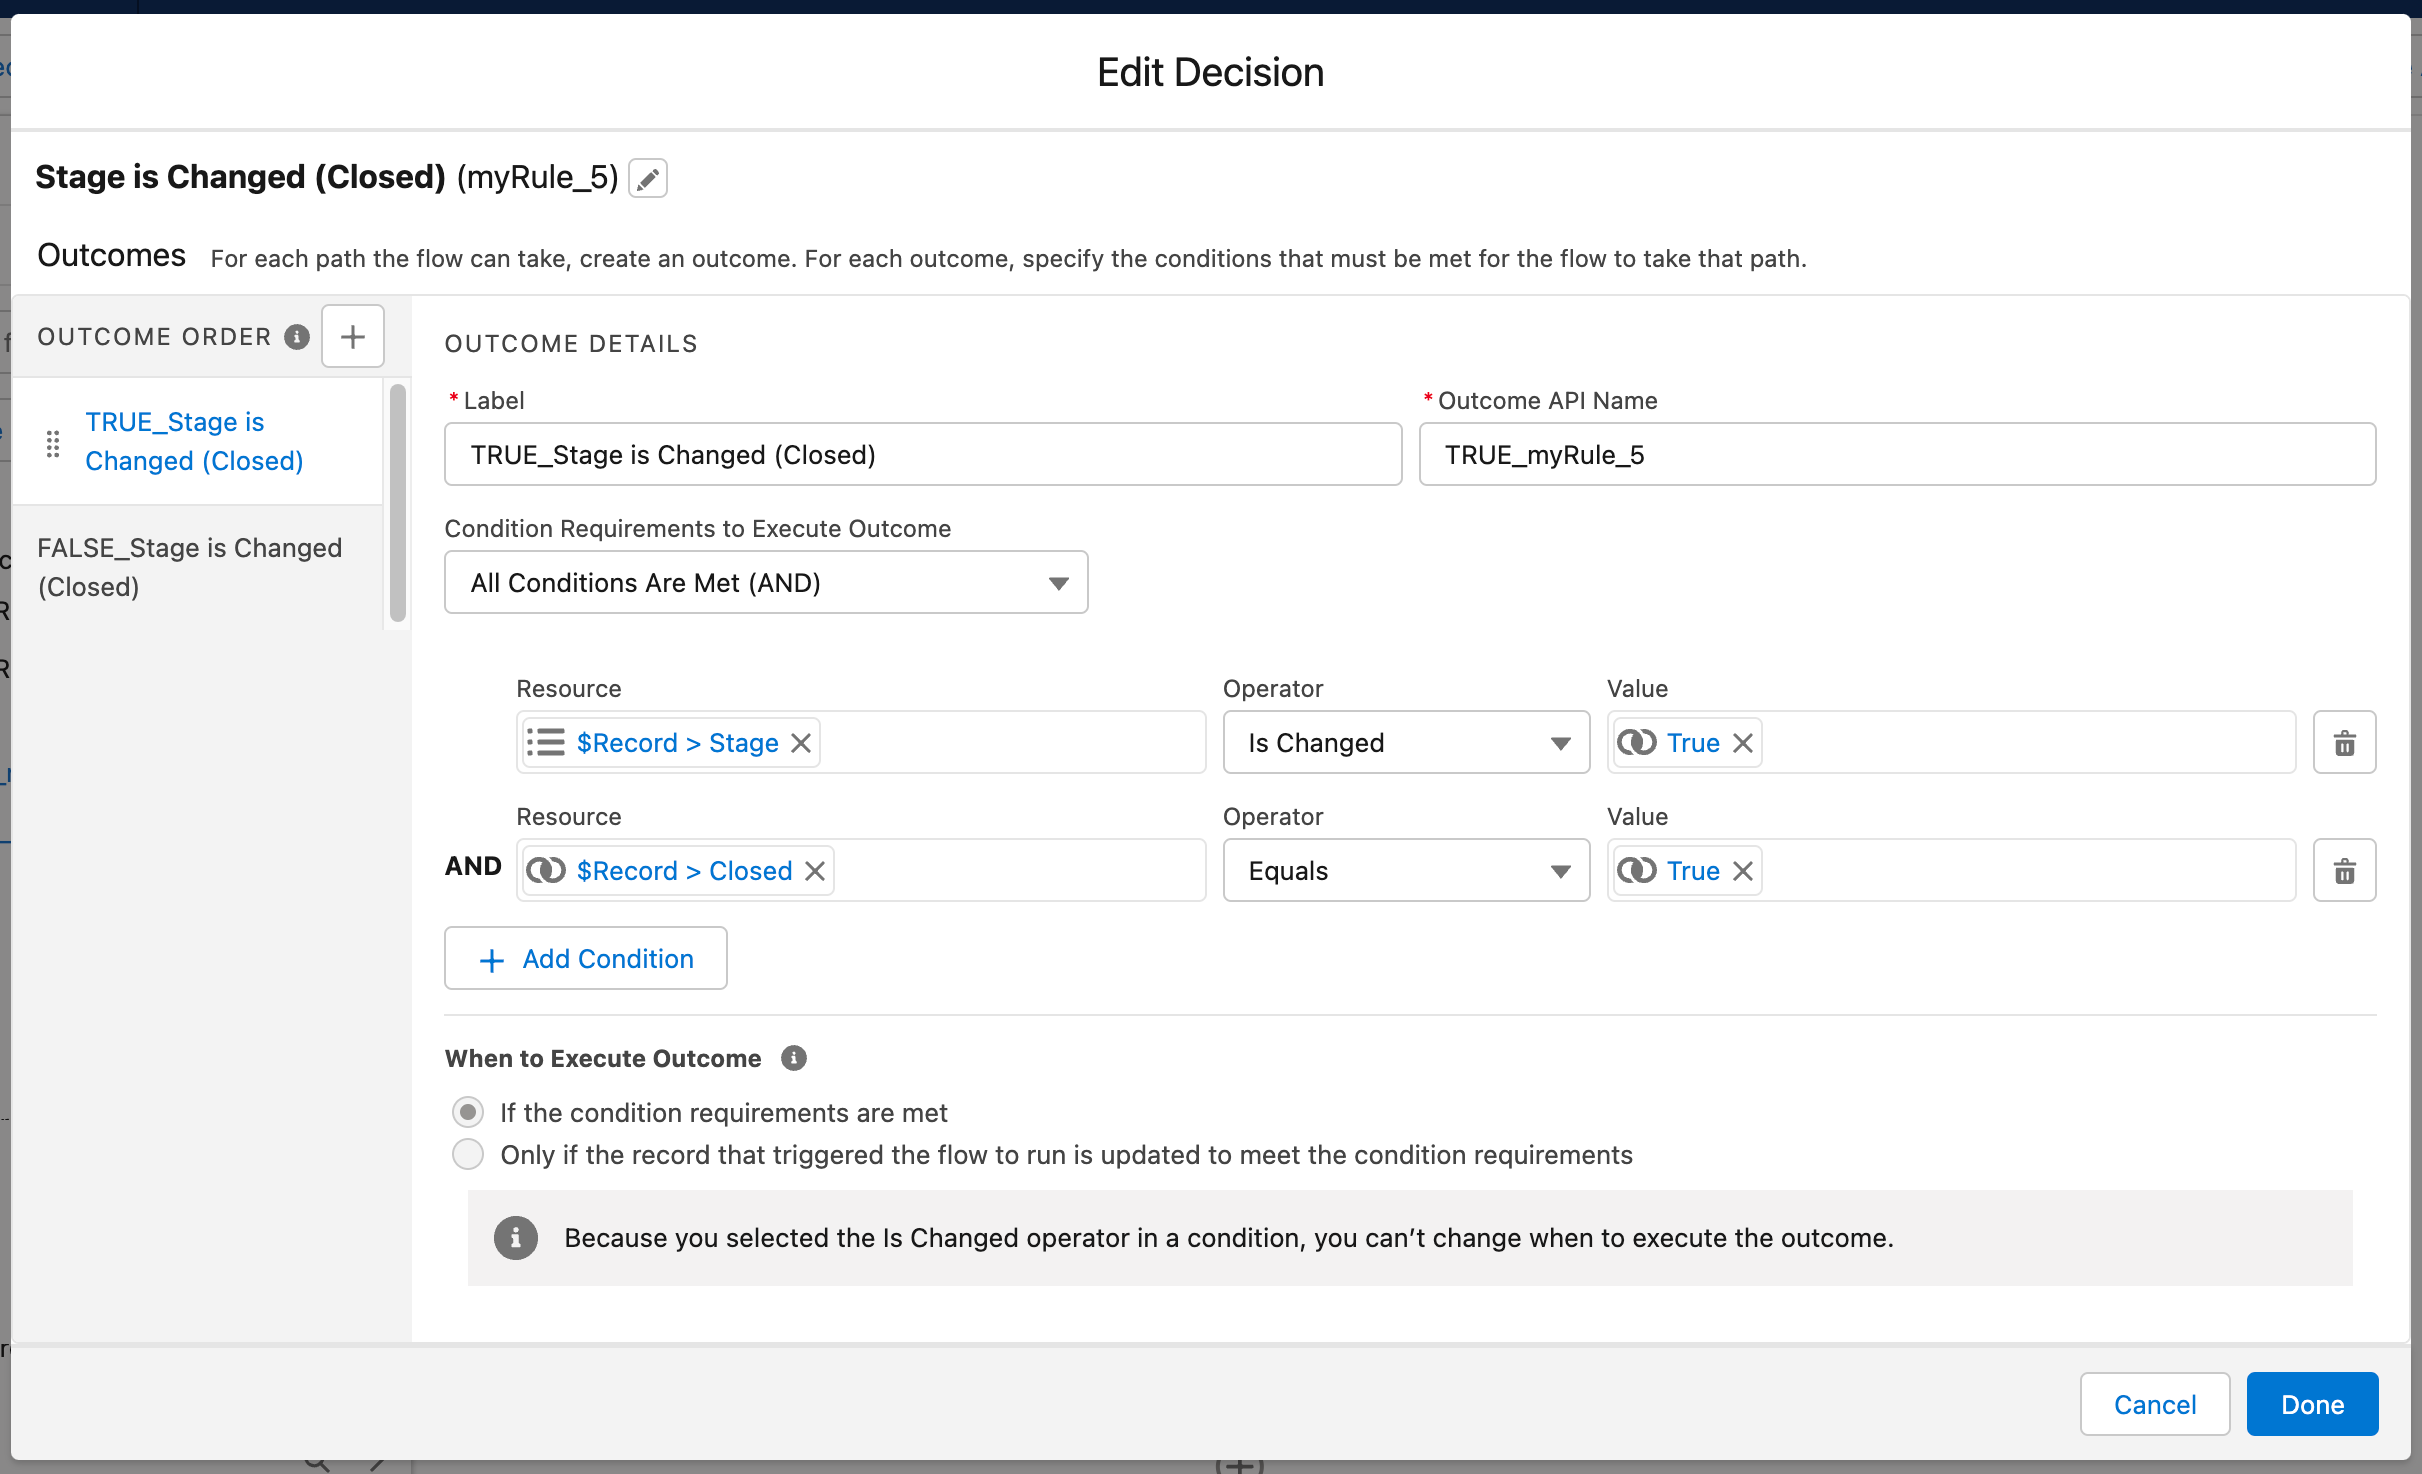
Like with the content section to the left of this particular section, you’ll see that this Decision element is compiled in a very similar way to that of the first Decision element. In this particular element, the Decision is trying to check if the value of the Stage field has been changed and if the Opportunity is now closed (aka set to either Closed Won or Closed Lost).
The label and API name values have been changed in the same way as that of the first Decision element. Wherein the Outcomes use the same label as the Decision Element but add a TRUE_ or FALES_ prefix to the Outcome label. The API name also follows the myRule_ format that is used in the first Decision element in this newly migrated Flow from PB.
I’ll talk about it a bit further shortly. But one other thing you’ll spot when looking at either of these Decision elements is the name for the formulas it uses to update the relevant fields. For this specific Decision, you can see that the update task as shown below uses a very badly named formula.
In this specific instance, the formula is named the following:
formula_2_myRule_5_A1_7033413432
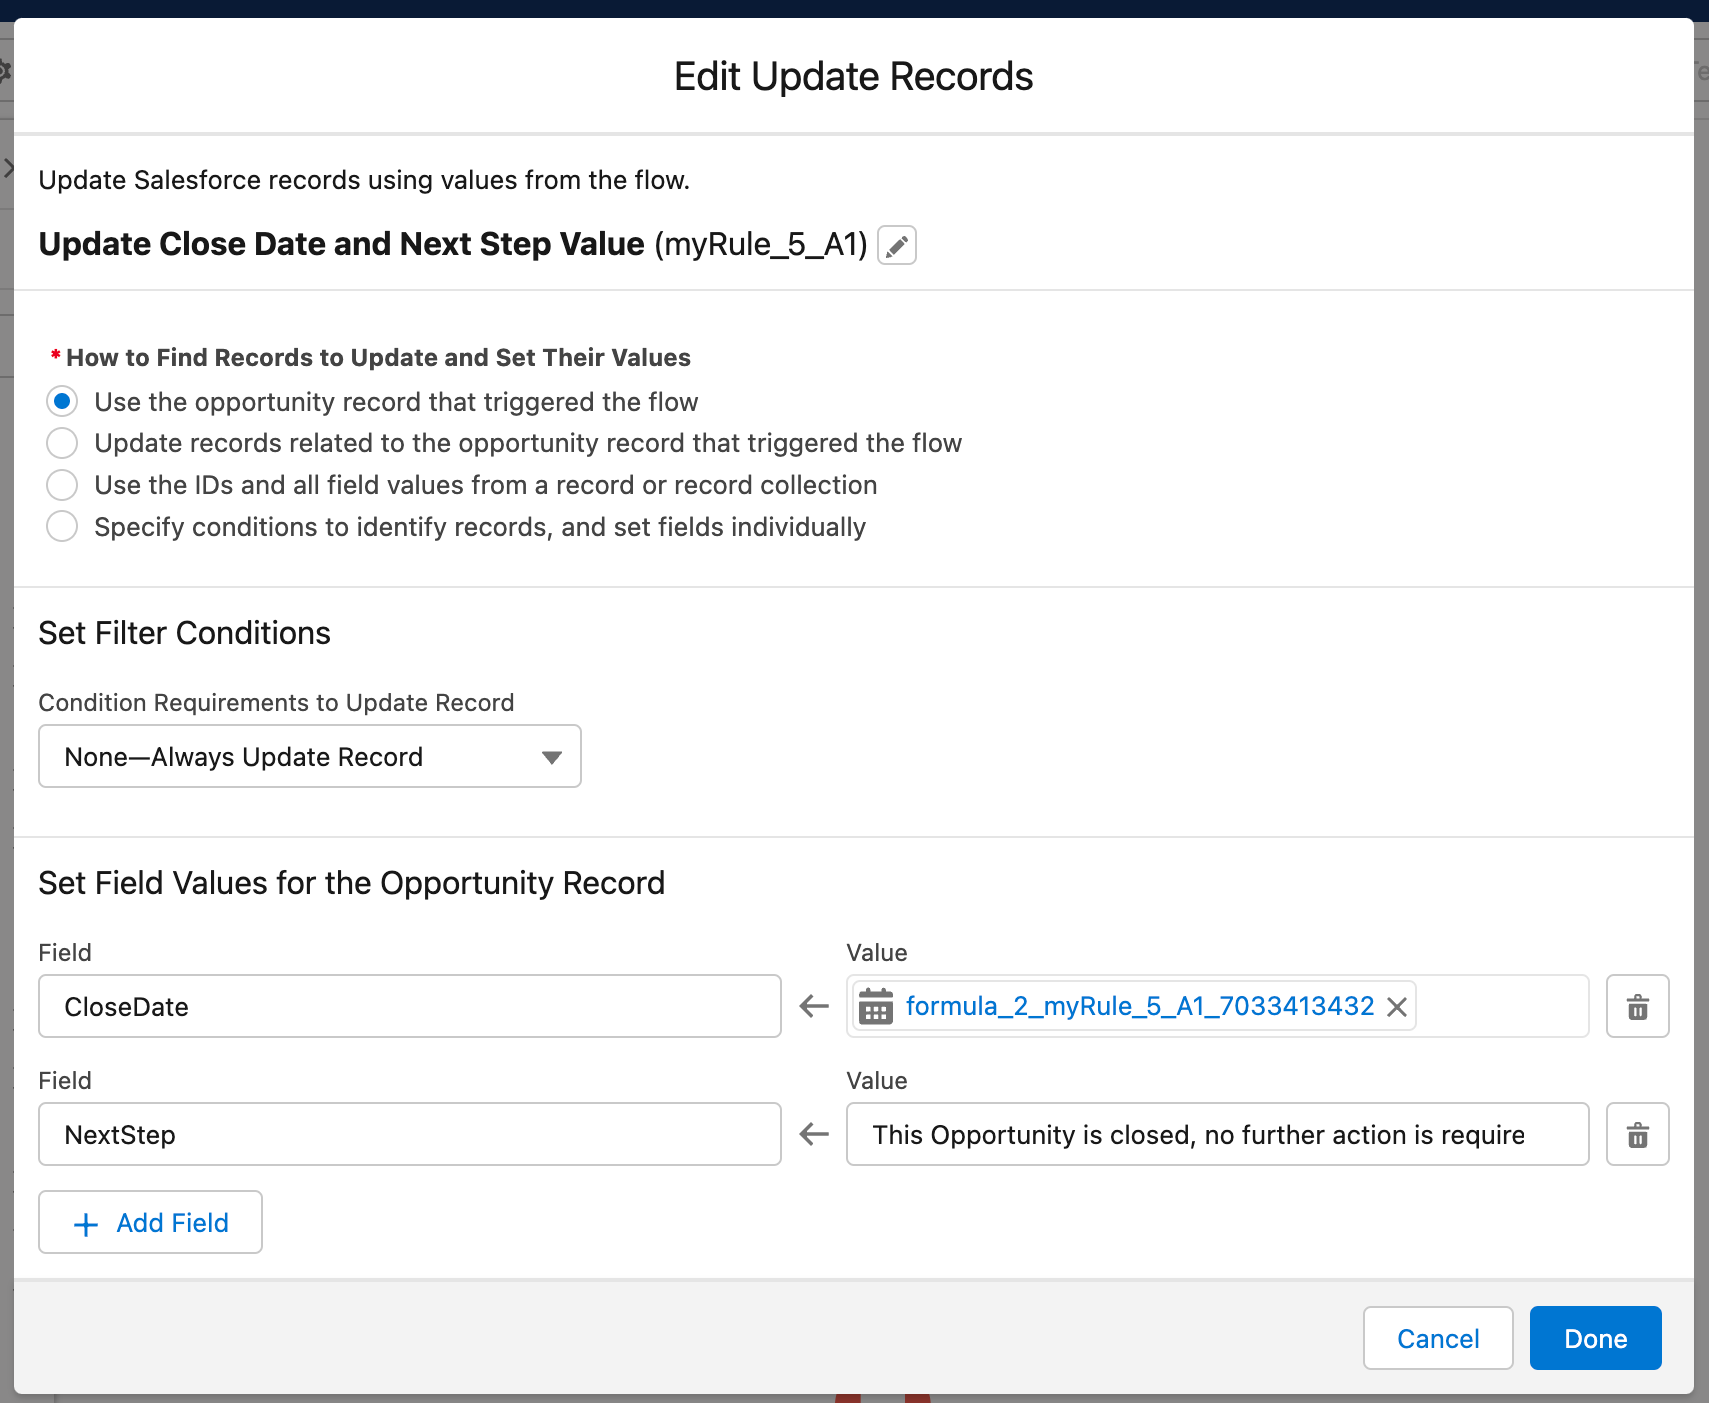
Above you can see the screenshot of the Update element for this Decision outcome path. If the Flow follows the true path of this Decision element, you will be moved to this Update element. In this element the Close Date field will be updated to hold the value of the current using a formula that uses the TODAY() formula syntax to handle the required update.
Like with the true path of the first Decision element, the true path of this Decision element will also make an update to the Next Step field. However, rather than expecting a subsequent stage, this update will say that no updates are required due to the fact that the Opportunity is now Closed. This Update element could easily be tweaked to avoid using a formula to update the value of the Close Date field, instead of using TODAY() we could simply update the field using the Global Variable of CurrentDate. In my opinion as well, I would actually leave the Next Step field update as it is here, we can simply just update this with a string text value. So it’s good.
Before I move on to show how I would build this Flow out if I was to build this from scratch. Let’s go a little deeper into the issues I have with the naming patterns implemented when migrating this Process from Process Builder into a newly created Flow.
So the main two problems I have with these naming patterns for the migrated Flows are as follows:
- The naming pattern is not consistent, one element can use Camel Case, another can use Snake Case … it’s not consistent!
- The mixing of naming patterns is sometimes combined in a single API name, mixing Camel and Snake Case in the same name.
While there are only two objections on this list, I can’t can’t say enough times how much I loathe this. I made my view known on this in the previous post, but I strongly feel that API names should follow a consistent pattern all across the Flow, and that said naming patten should be held to consistently across all declarative automation you build in your org. If you want to use Snake Case, then use Snake Case. If you want to use Camel Case, then use Camel Case. But, please, please never mix them! Of course I have my preferred naming pattern, but like I said in last week’s post, it is far more important to pick a naming convention and to be consistent with it than it is to pick and use the naming convention that I feel is personally the best. And that point goes for the recommendation from any Flownatic, we may have differing opinions on this across the community, but that’s what they are, opinions. The really important thing is to be consistent in whatever approach you decide to take. I can’t strees this point enough.
N.B. Apologies if I sound like a right snobby and picky person there, I just think this is a really big issue and feel like I should speak on it.
How Would I Have Built this Flow?
To avoid me ranting too much about naming conventions (I will be releasing a post about this topic most likely in March to coincide with my session at TDX), let’s move on and look at how I would have built this Flow out if I was tasked to do it from scratch.
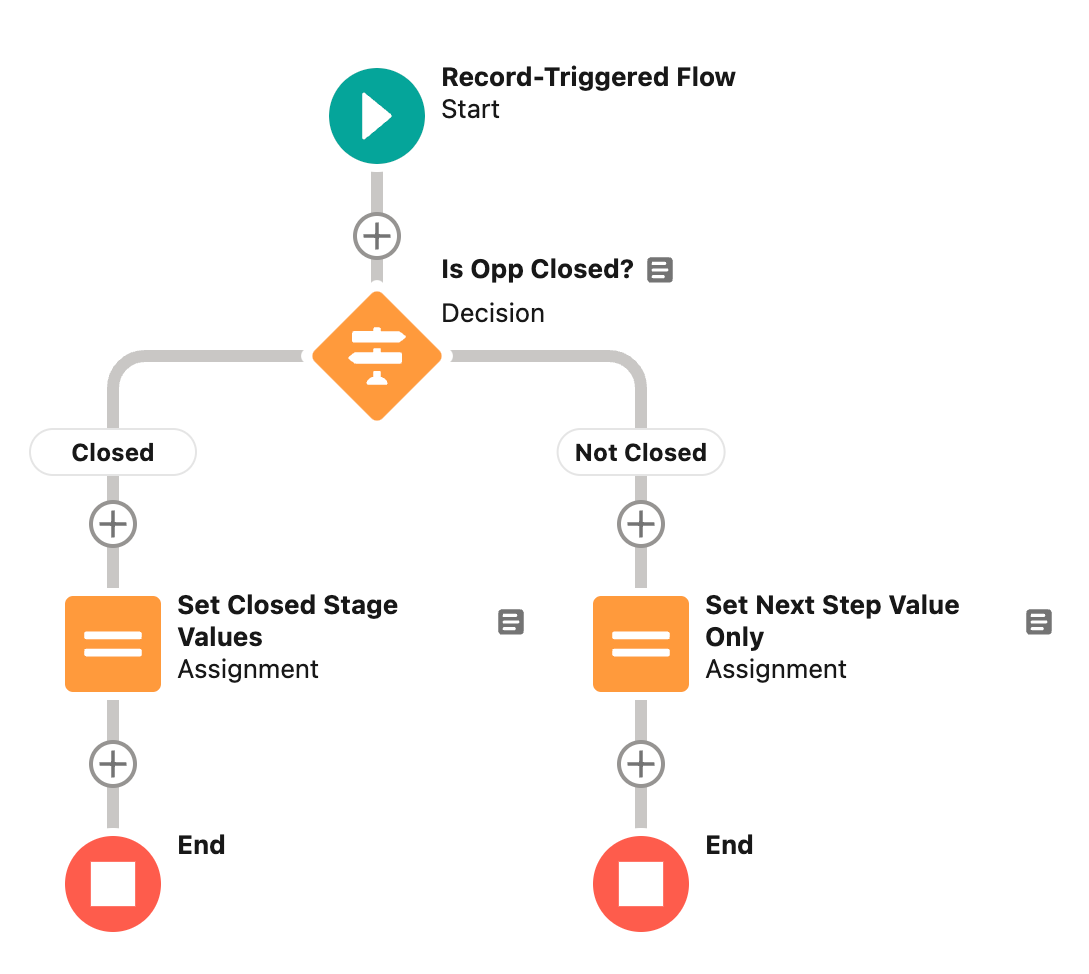
Like with the Flow that we migrated from PB into Flow, we’ll begin by looking at the canvas of the Flow I created to show how I’d build out a Flow to meet the requirements of this use case.
The first thing you should notice is the differnce between the number of elements included in this Flow in comparison to the one migrated from PB into Flow via the Migrate to Flow tool. The migrated Flow included four elements, two of them being Update elements. Whereas the Flow that I’ve built here only includes three elements. Those being a Decision element and two Assignment elements. That’s all we need.
The reason for opting for only using Assignment elements here is because technically the tasks we are carrying out don’t need Updates inside of a Before-Save Flow, which is what this now is.
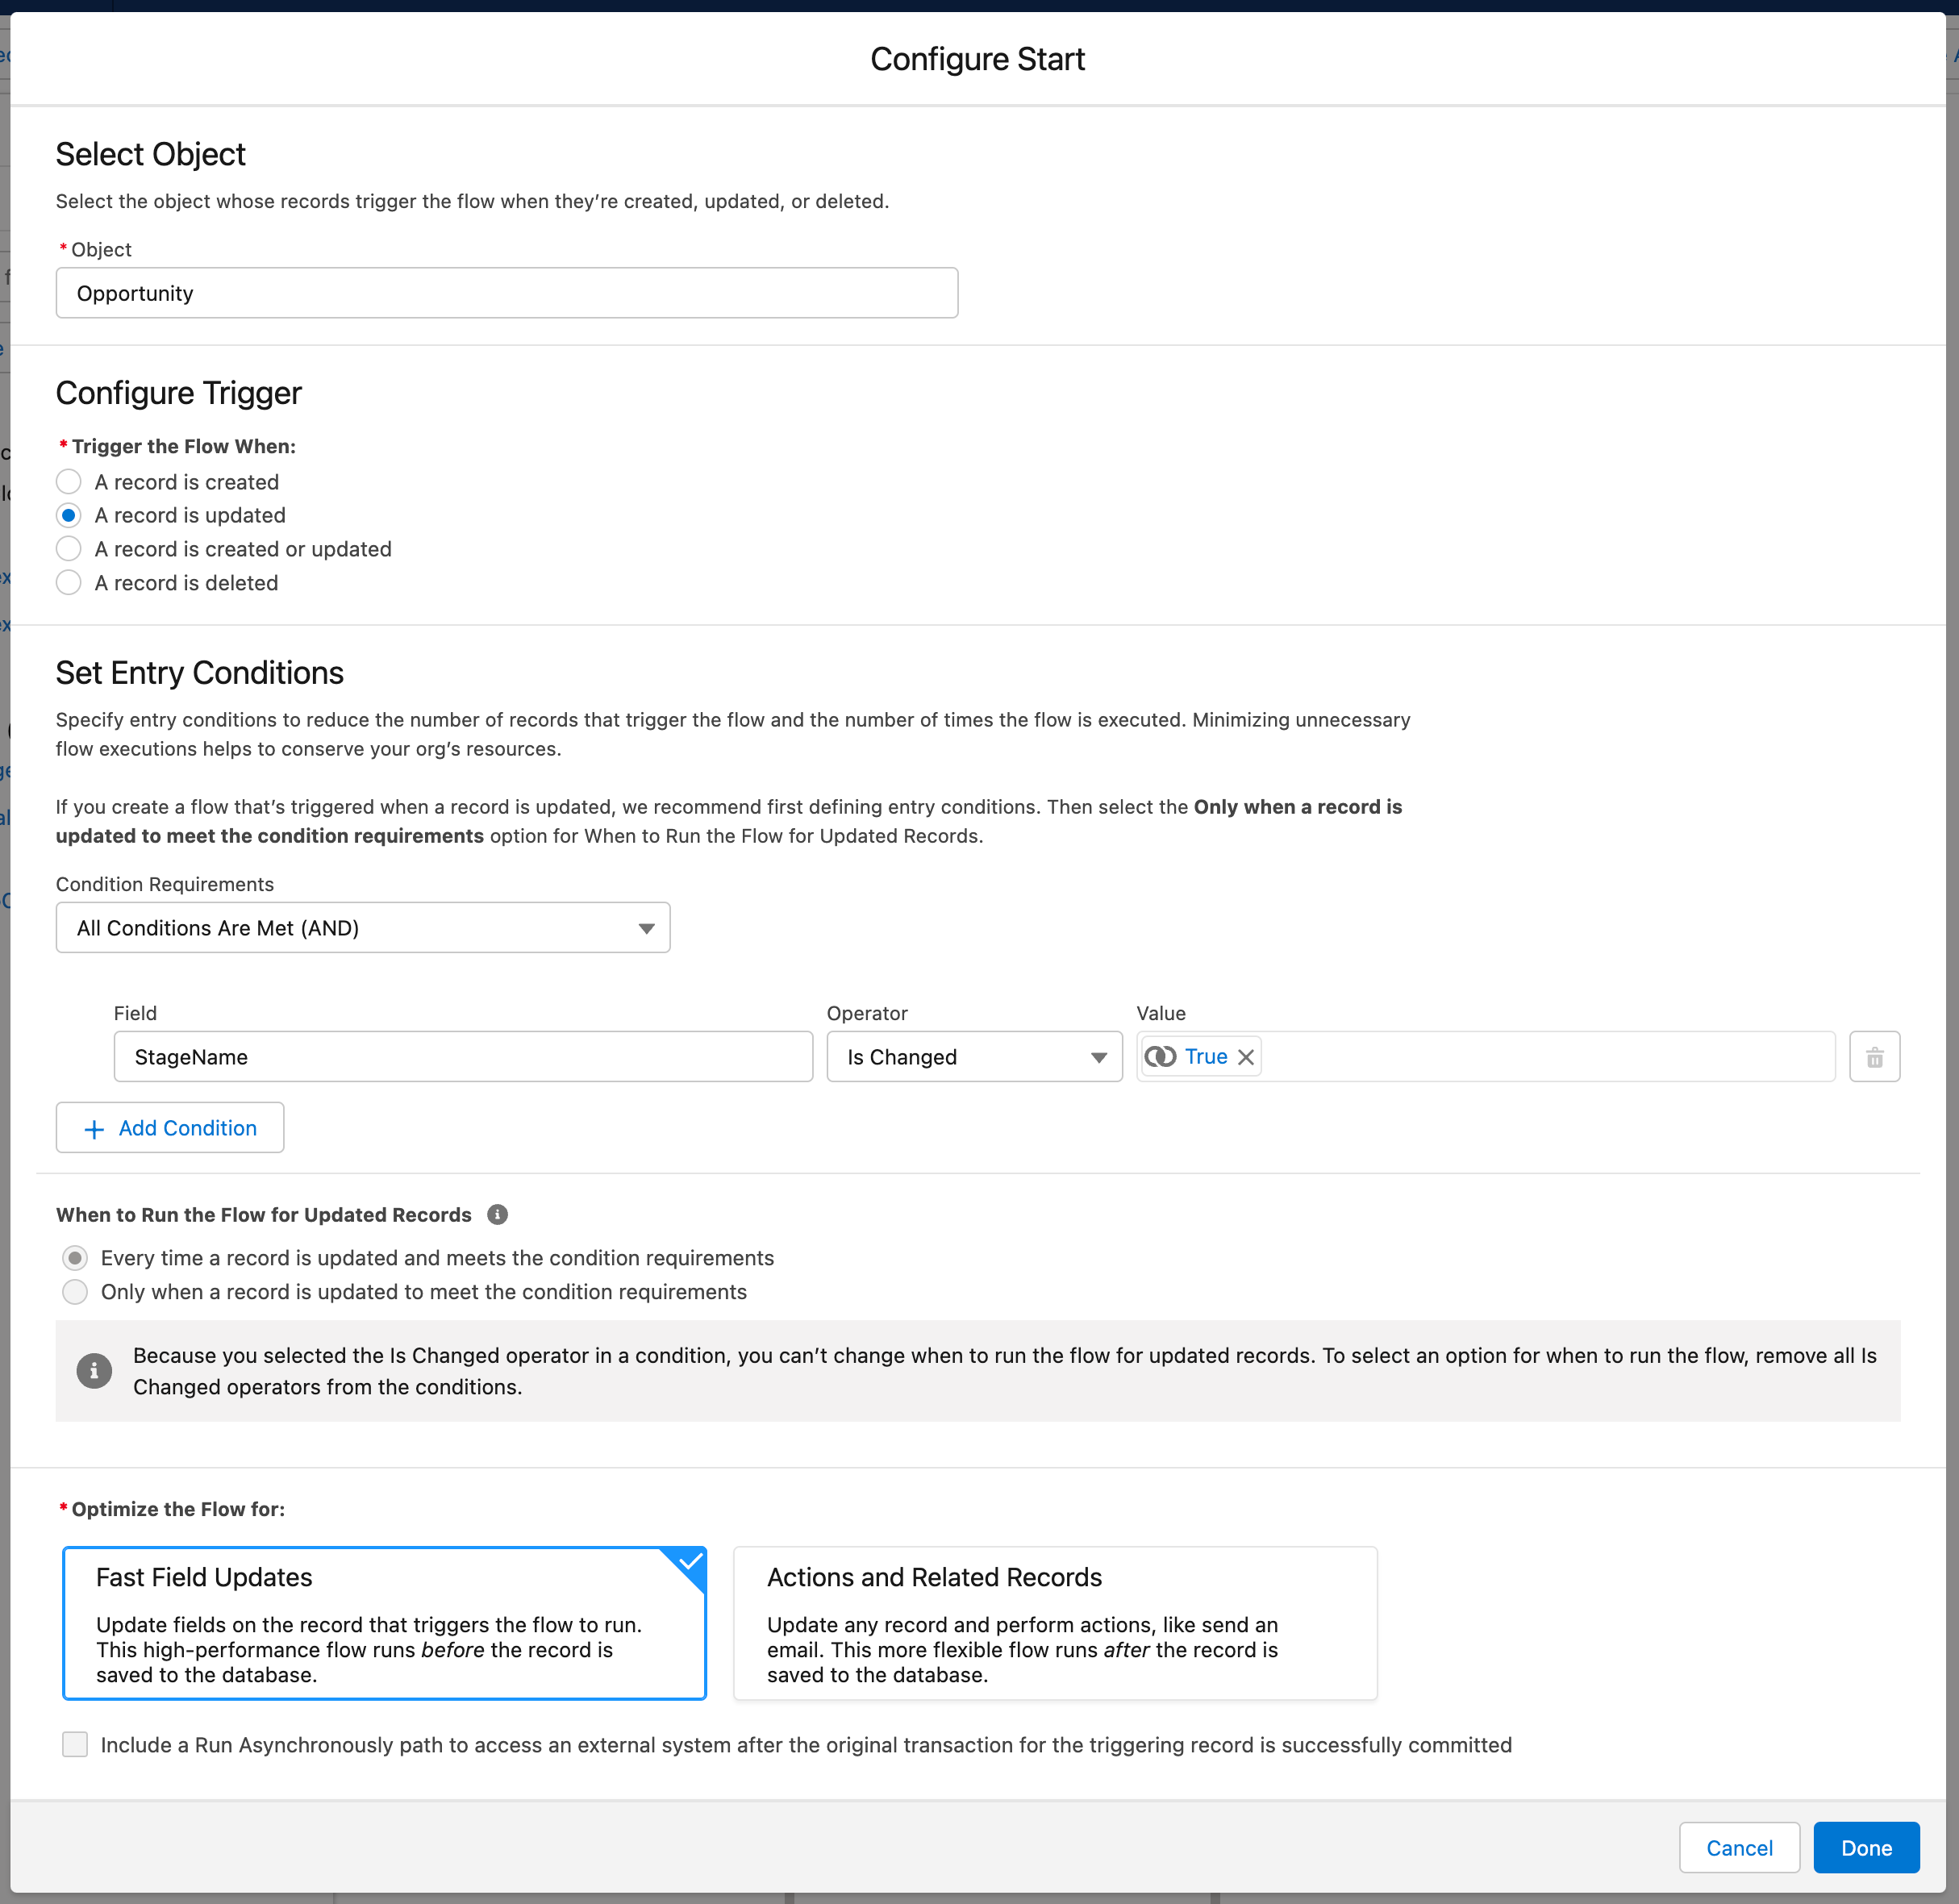
We now pivot over to the Start Element. For the purposes of this particular Flow I opted to only trigger this Flow when an Opportunity record is updated. Technically, I could also have this Flow run when an Opportunity is created, if I do that it would run the non-closed path upon record creation and thus update the Next Step field.
Outside of that, the main differences you will see here is that I’ve added a filtered item of entry criteria to ensure that the Flow will only trigger if the value of the Stage field is changed. Please be aware of the fact that because we are using an IsChanged as part of the entry criteria this Flow must run every time a record gets updated, however the IsChanged parameter only looks for changes on that particular field.
Finally, you should see that this Flow has now been optimised for Fast Field Updates, and as a result this Flow is now a Before-Save Flow.
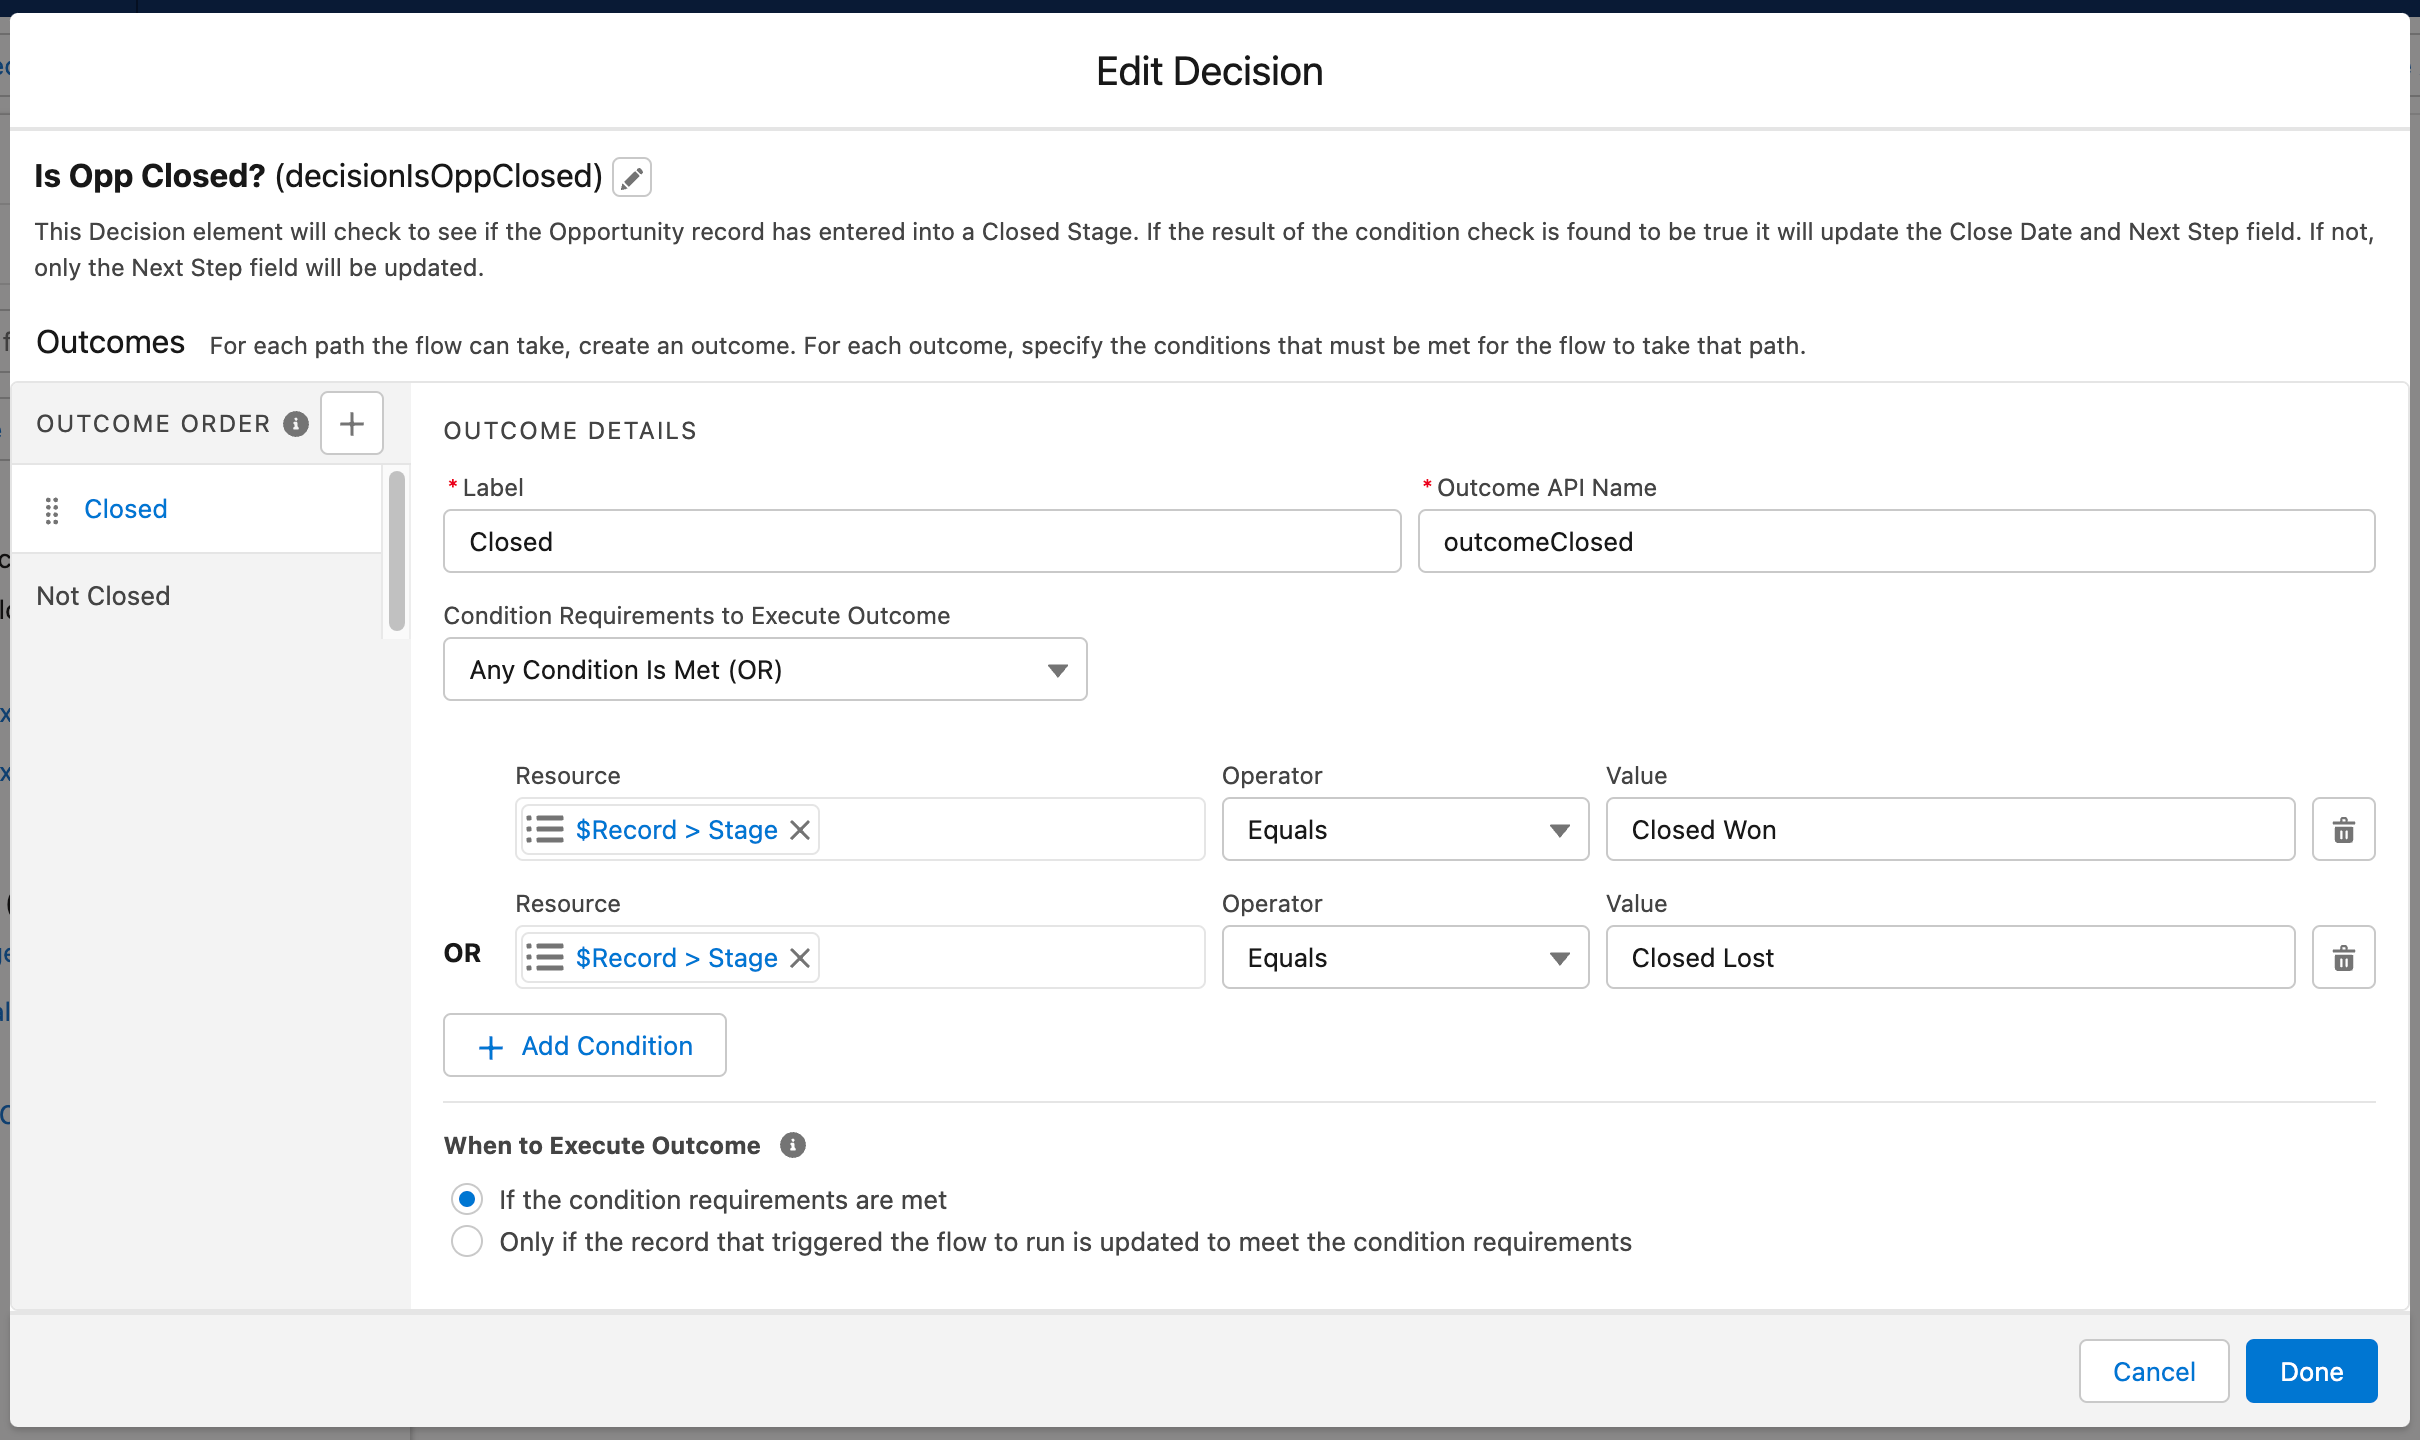
Next up is our Decision element. This change to the Flow is actually really simple. Rather than using the IsClosed field and checking if that is valued as True, I have opted to include an OR filter criteria on the Stage field to check if that now holds a value of either Closed Won or Closed Lost. This change is simply because the IsClosed field is a formula field and as a result this Flow would not perform properly as a Before-Save Flow due to the nature of how Salesforce calculates updated formula values. This approach makes things much easier for all.
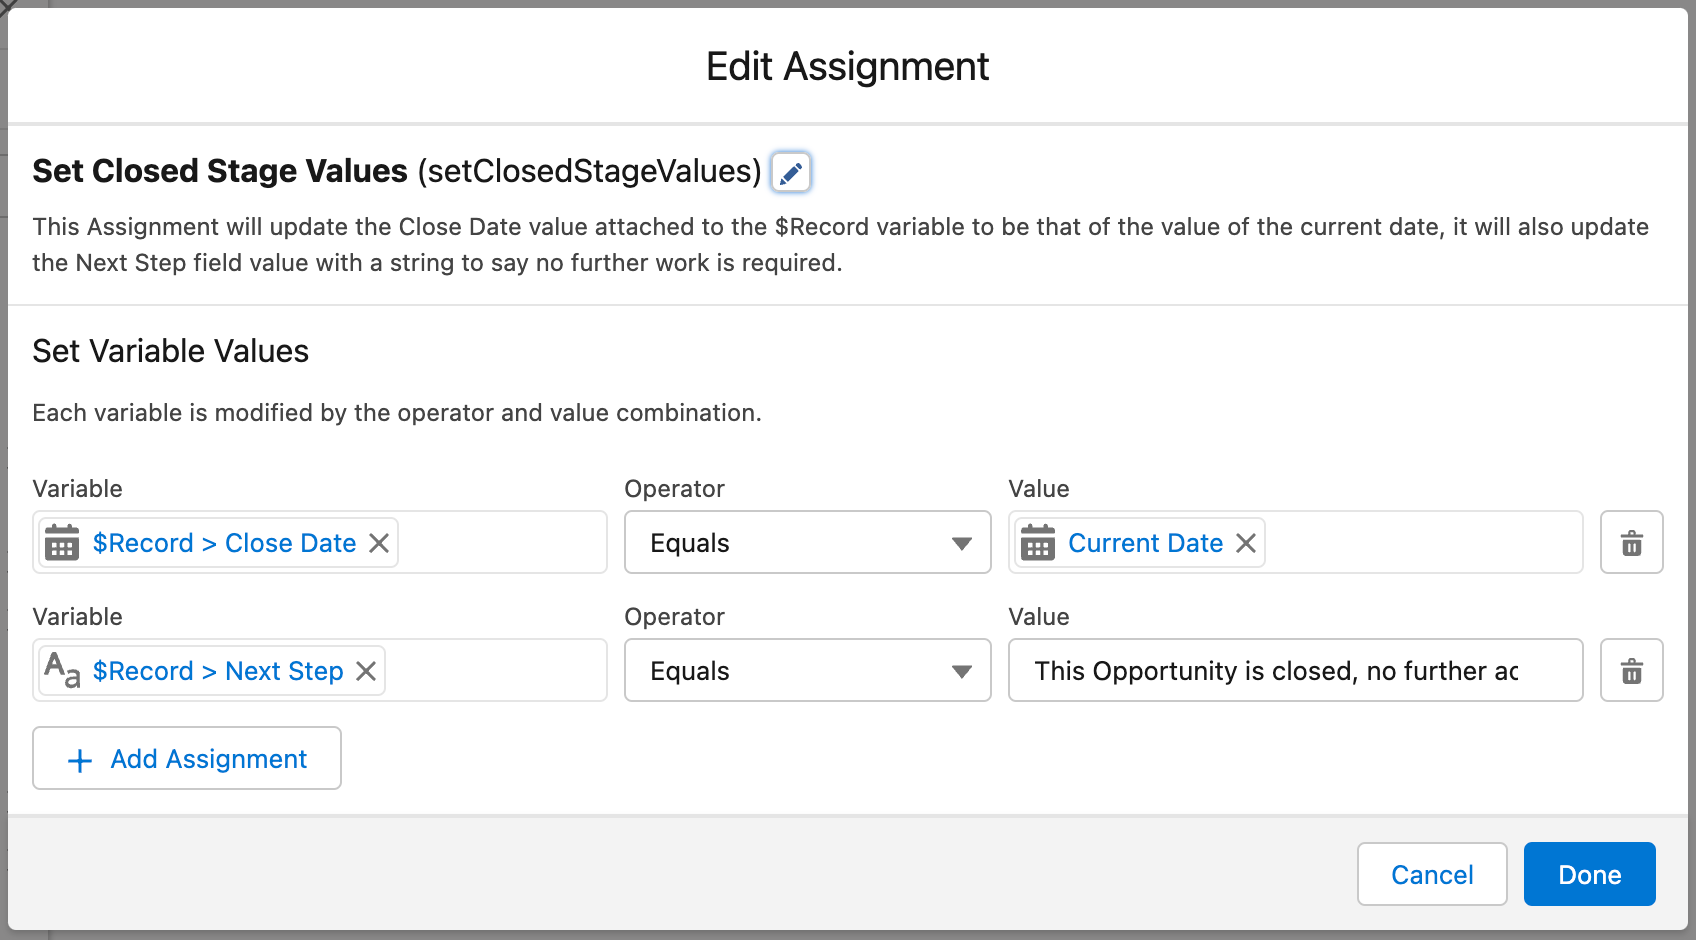
The first Assignment element of this Flow. This element will make a change to the Close Date and Next Step field values of the Opp.
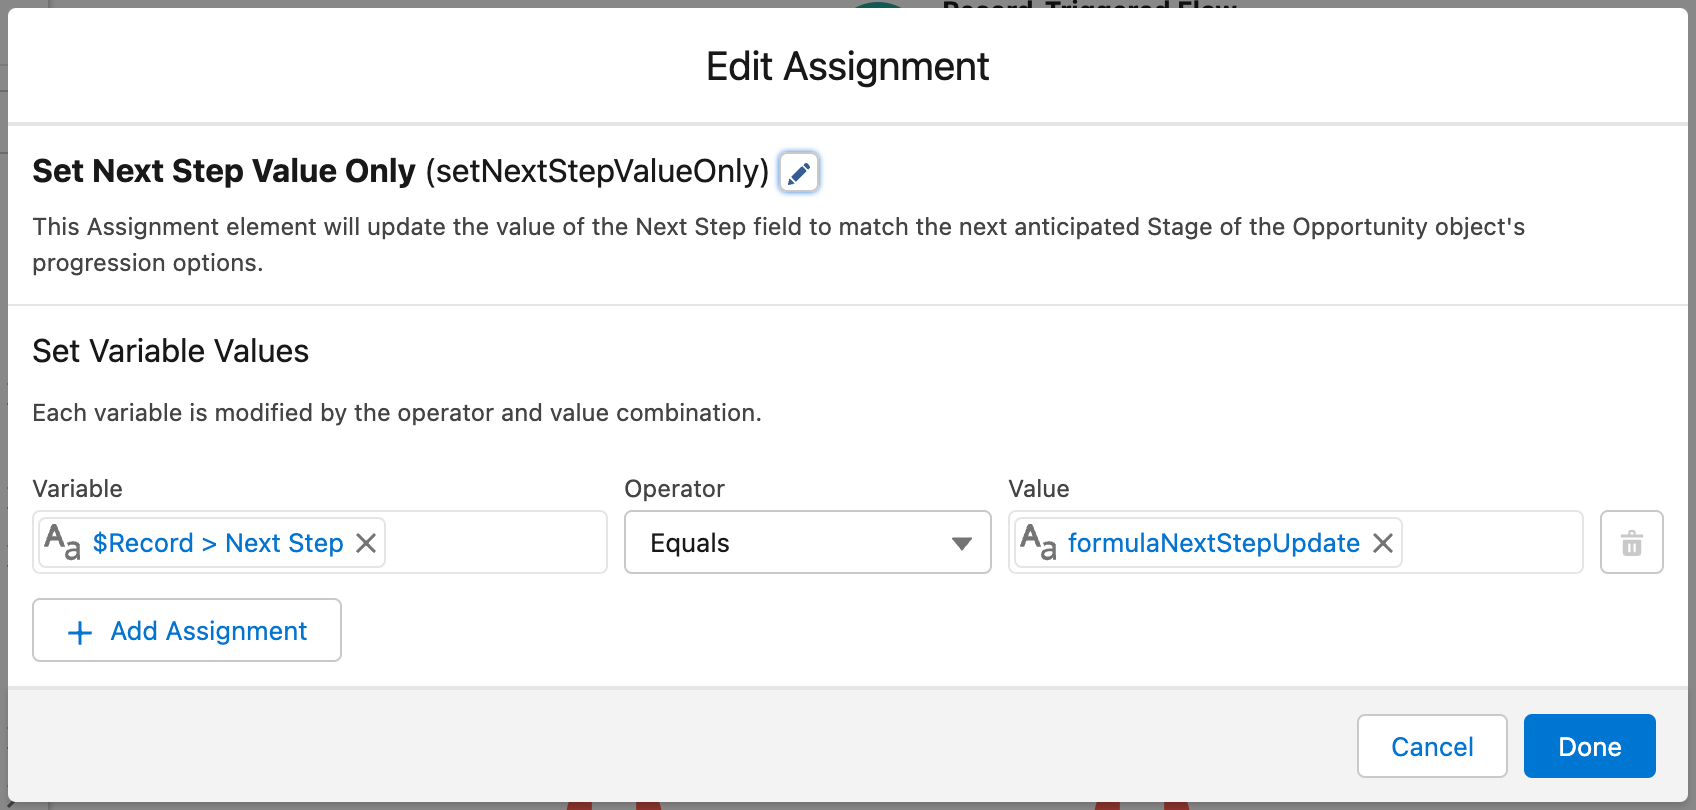
The second Assignment element of this Flow. This Assignment will simply update the Next Step field based upon the calculation of two formula’s built inside the Flow you will see later in this post.
Depending on the results of the Decision calculation, the Flow will move on to one of two Assignment elements. To make things slightly easier, I have displayed both Assignment elements next to each other. To help with understanding these paths, let’s refer to the created Outcome as the Closed path, and the Default Outcome as the Non-Closed path. Hopefully that will prove beneficial in making what these paths are each doing clearer to you as the reader of this post. In brief, the Closed path will make a change to the values of the Close Date and Next Step fields, the Non-Closed path will only make an field value update to the Next Step field.
We don’t really need to dig into the updates included in the Closed path. All those changes do is set the value of the Close Date field to be that of the Current Date, and to update the Next Step field with a text string confirming that no further work on the Opp is required because of the fact that it is now in a Closed stage.
The same cannot be said of the Non-Closed path. Here there are two relevant formulas to bear in mind. What I did was add the formula that was added to the Opportunity object for the benefit of the Process built in PB into the Flow itself. I did this to showcase that you can easily just have the formula exist within this Flow and the tasks that are due to be carried out will work absolutely fine, they would not be need to be included within the Opp Object.
The second formula included is the one that determines what the value of the Next Step field would become. This has been slightly ammended to include the formula that I built in this Flow to anticipate what the next Stage in the progression of this Opportunity should be.
These changes aren’t 100% necessary in a Flow like this, but it can free up some field space.
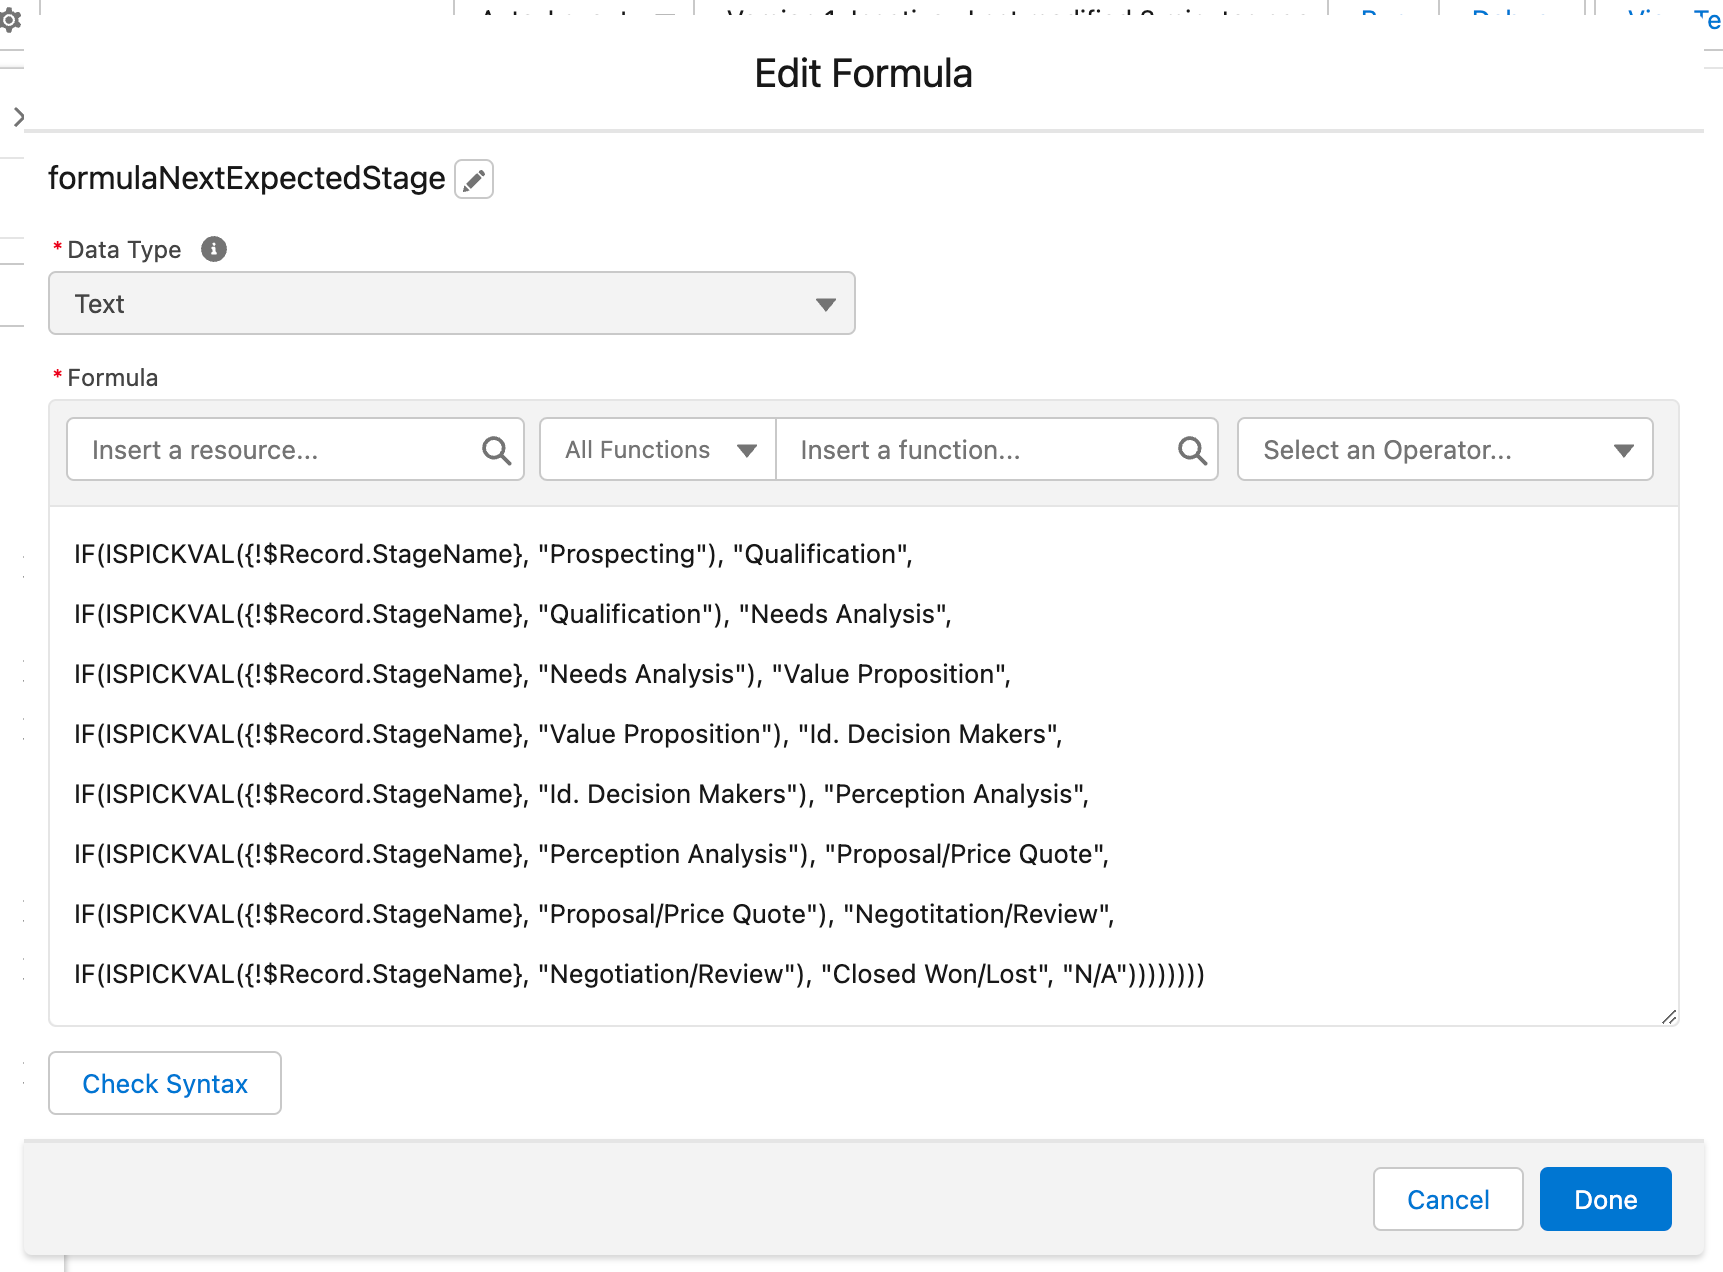
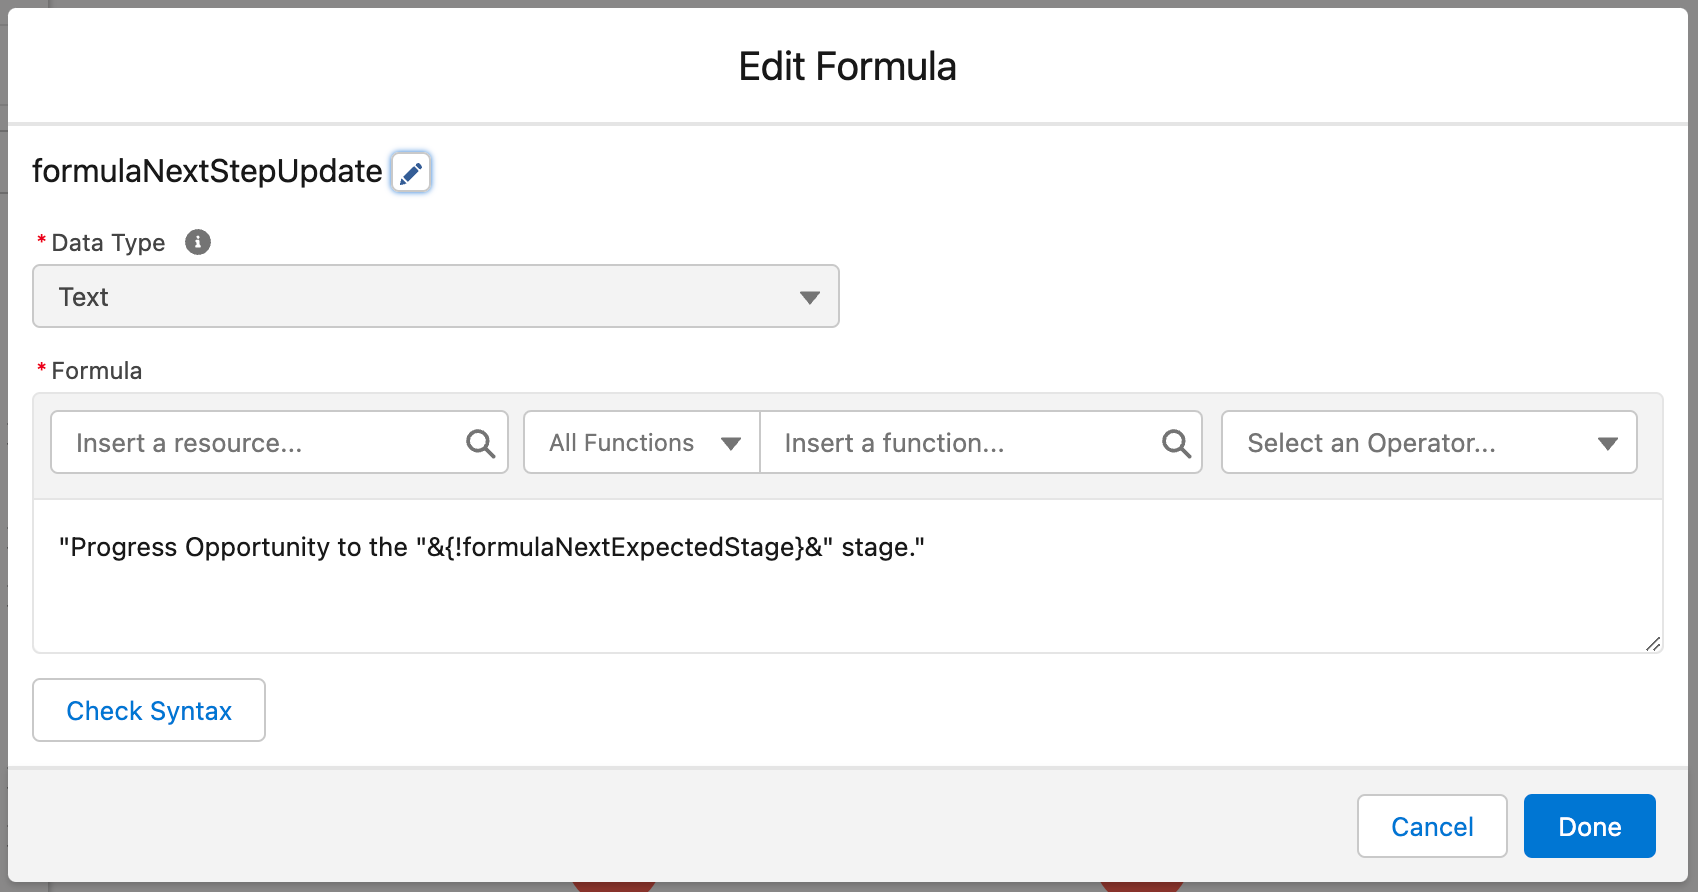
So that is how I would build out this type of Flow if I was to do this from scratch myself. You should be able to see from this the different approach that I would take in designing a Flow like this in comparison to how the Migrate to Flow tool performs the same task. You might have different ideas for how you would build out a Flow like this yourself. If you do, I’d love to hear more on that.
Closing Remarks
But that brings a close to this week’s blog post on the Migrate to Flow tool. So that’s two down, one to go. The next post in this series will wrap up my coverage of the Migrate to Flow tool. That post will be where I give my overall opinion of the tool and seek to validate that opinion with (what will hopefully be) good insights on the topic. My hope is to close off the series in a very good way.
If you’ve found this post helpful, I’d love to hear your thoughts in the comments below. Alternatively, you can share your thoughts in the comments on Social Media when I share this post after publishing it. I would really love to hear your views on this topics.
Resources
We have three resources to link to this awesome post … all of the resources provided for this post focus on principles around migrating existing declarative automation into Flow. All of these resources offer some really good insight into the principles behind automation migration. When reading though, please do bear in mind that there are many different views on this subject, so some of the points raised may not fall in line with official recommendations from Salesforce (so please do bear that in mind).
Automate This: Migrate Workflow Rules and Processes to Flow
In this episode of Automate This, Jen Lee and Aleksandra Radovanovic talk about migrating Workflow Rules and Processes to Flow. If you want some good quality tips to get you started on the journey of migrating existing declarative automation into Flow, then give this video a watch. You will gain a great deal of high-quality insight from it, it’s totally worth the watch.
Migrate Salesforce Workflow Rules & Process Builder to Flow
The team at Salesforce Ben put a brief article in 2022 covering their thoughts on the process of migrating existing declarative automation into Flow. This article written by Tim Combridge highlights those thoughts, along with providing a review of the Migrate to Flow tool that we are covering in this three-part blog series. It’s worth a look as you think about a migration plan.
ConvertToFlow App Migrates Process Builder Processes and Workflow Rules to Flow
In 2021, the team at UnofficialSF created a migration tool of their own to convert Processes and Workflow Rules into Flows. In all honesty I haven’t used it myself, but I can say that the team at UnofficialSF are great. So this alternative to the Migrate to Flow tool may prove to be a viable tool and worth some investigation for sure.

