The Summer ’24 release is fast approaching. At the time of writing, the next Salesforce seasonal release is due to be rolled out across the majority of orgs in early to mid-June. With this release comes a number of great updates to Flow Builder. Over the coming days, I will be releasing a series of posts on some of the biggest and best updates for Flow in this release. In this first post of the Summer ’24 Preview Series, we’ll be covering the new Lightning Automation App. The Lightning Automation App allows Admins to access data about their Flows directly from the front end of Salesforce (outside of setup). It comes with options for categorisation, along with a couple of other interesting features. In this post, I will provide an overview of the app in its current state. I’ll also provide some commentary on things you can implement to enhance the app and make it even more worthwhile to you and your company.
So with that in mind, let’s dive in and discuss the new Lightning Automation App.
What is the Lightning Automation App?
In a nutshell, the Lightning Automation App is Salesforce’s front-end solution to managing and (in part) documenting the Flows in your org. The app comes with two distinct areas to note: the Automation App Home, and a new visible standard object called FlowRecord (in the UI this can be accessed via the Flows tab). Before we talk about ways to improve the offering, we’ll first look at each of these two sections, covering what is included in each. We’ll also briefly talk about things to be aware of in the app.
An Overview of the Lighting Automation App Home Page
The Home Page for the Lightning Automation App is a reasonable start, in my opinion. There are more features I would consider adding (more on that later), but in terms of what it sets out to achieve, I think it’s a reasonable beginning. Let’s take a look at the Home Page below.
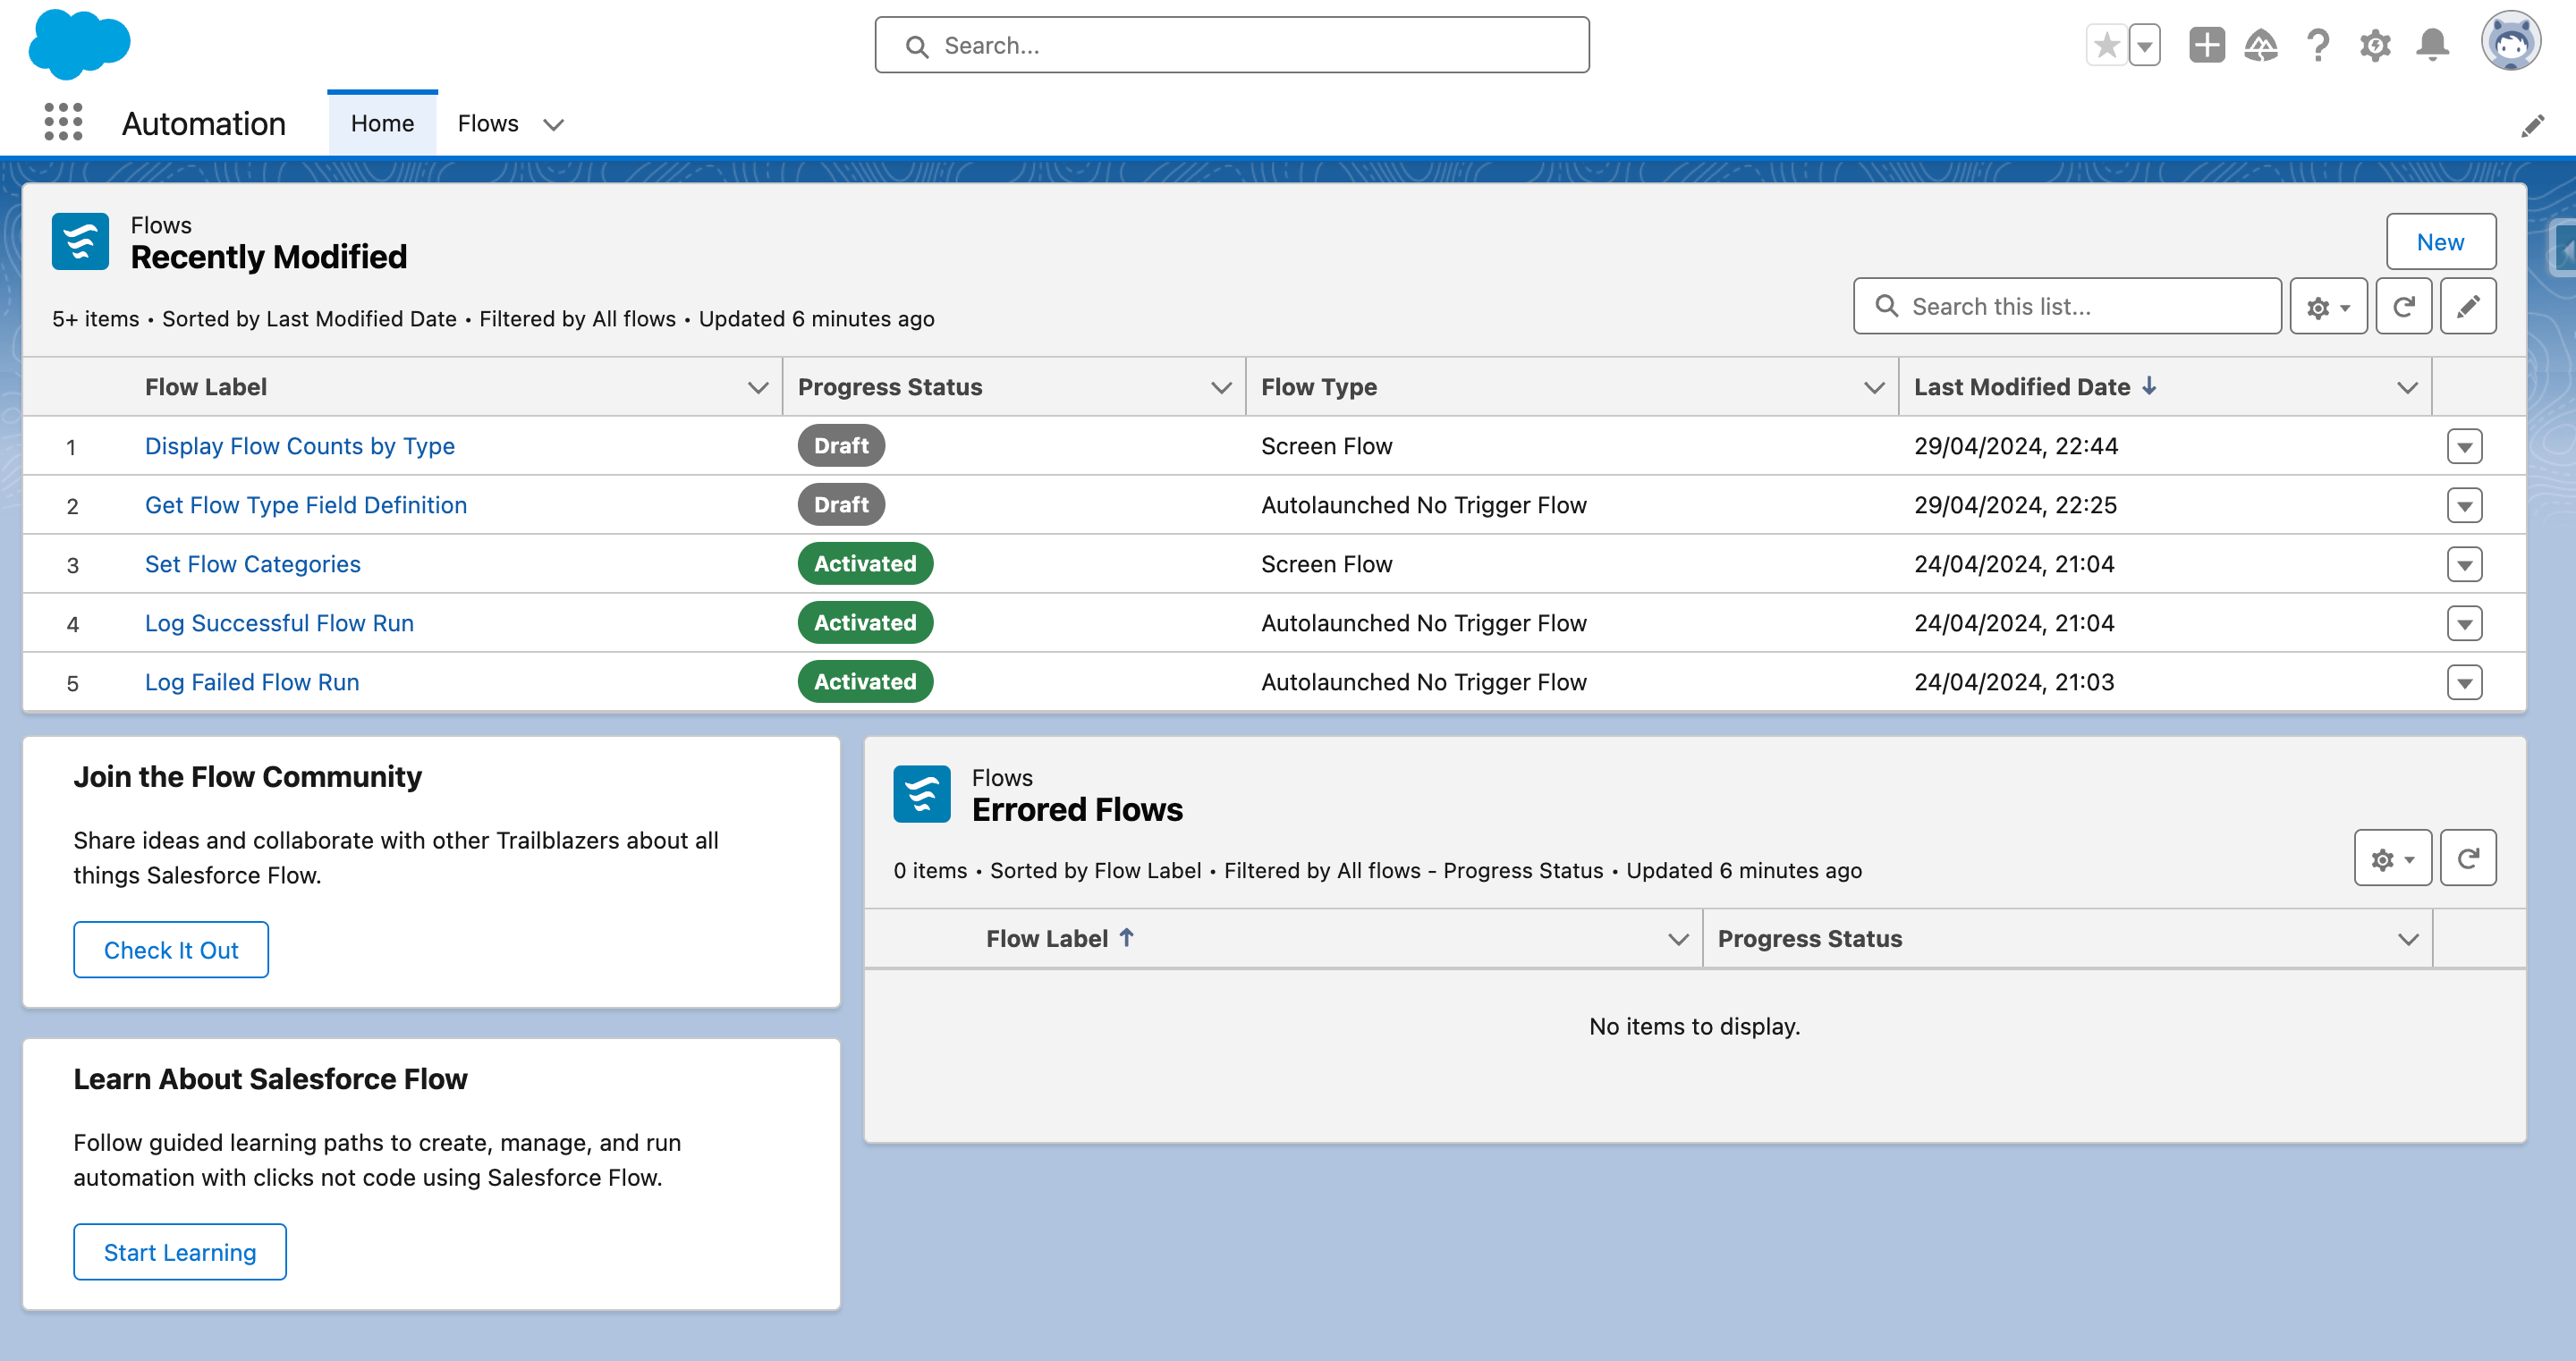
As you can see from the image above, the base version of the Home Page in the Automation App includes three base components:
- A Recently Modified List View including records from the FlowRecord object, sorted by the Last Modified Date.
- A component including links to resources on Trailhead for Flow, this is called the Flow App Home cards component.
- A List View showing any Flows that have errored out in your org, sorted by the Label of the Flow.
As you can see, the front page is currently a little bare, so while it is a good start, there is more that can be done to get the most out of it. We’ll cover that a little more later in this post, but for now, let’s move on to the Flow Record object.
What’s Included in the Flow Record Object?
The Flow Record object is quite basic currently; it is essentially a record detailing the Flows that you have built in your org. This record includes a number of different fields (the majority of which are read-only), the object also comes with a basic means of categorising your Flows to allow you to group them together in a meaningful and understandable way for you and your org.
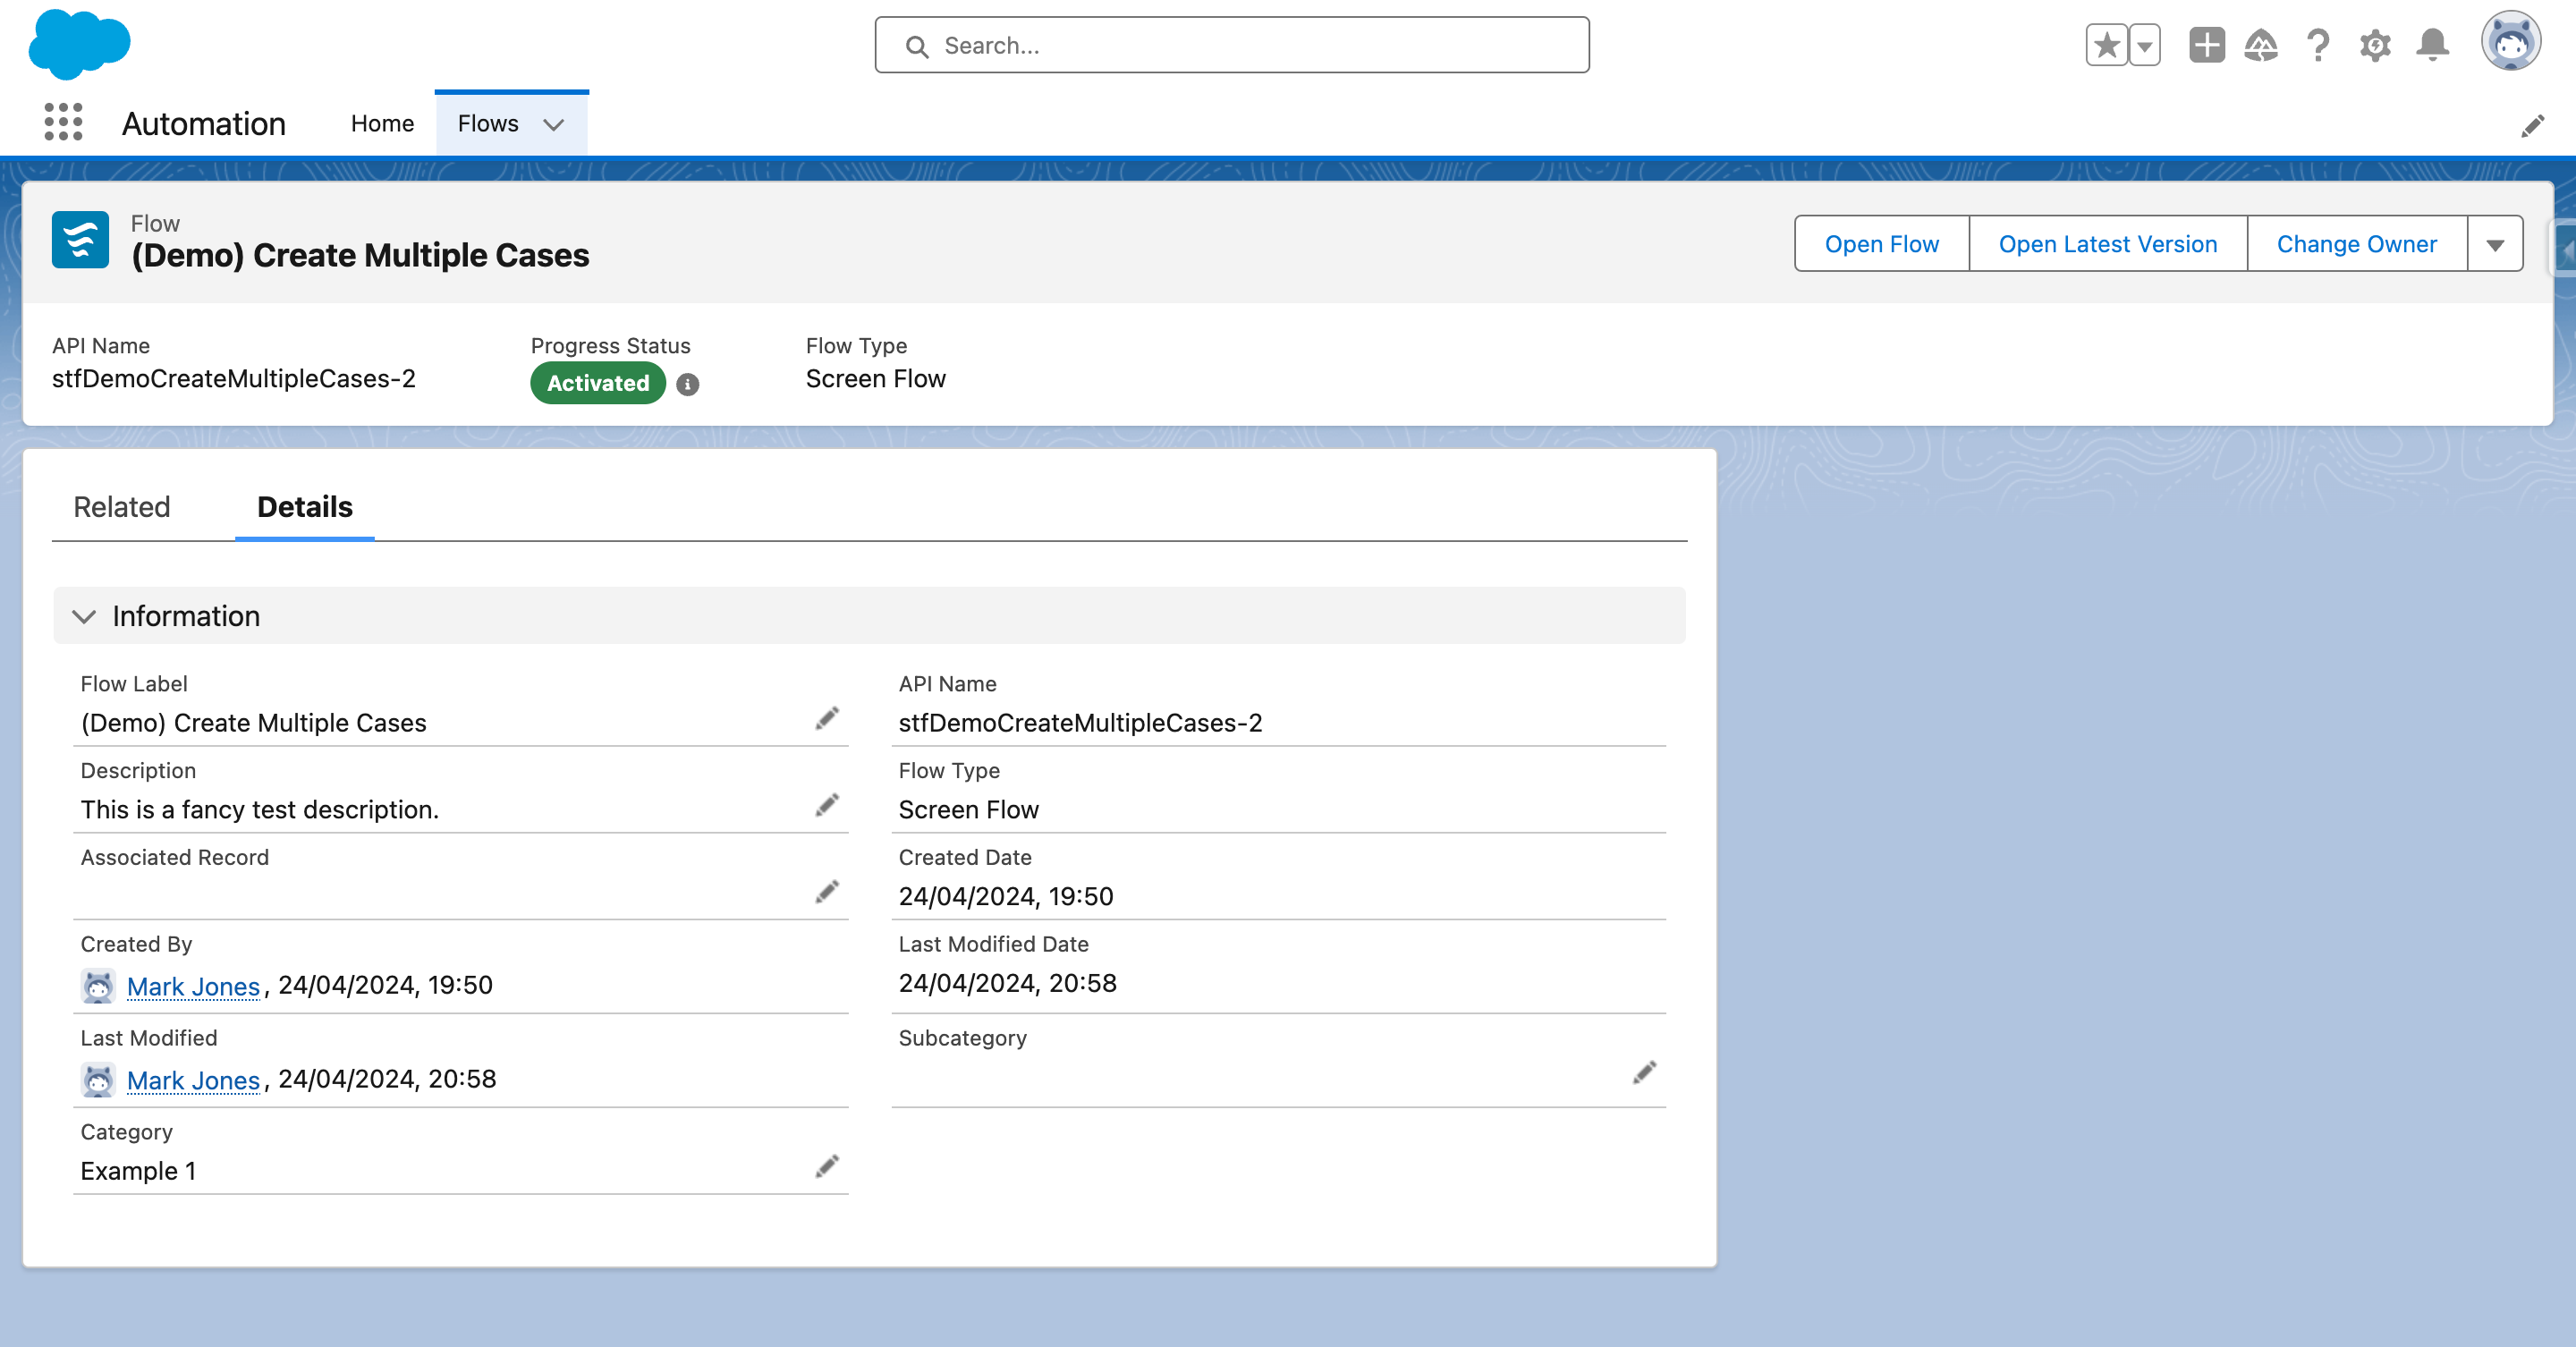
As you can see from the screenshot, the list of fields included on the Flow Record object in the UI’s front-end view are as follows:
- Flow Label (Text)
- API Name (Text, Read Only)
- Description (Long Text Area)
- Flow Type (Picklist, Read Only)
- Progress Status (Picklist, Read Only)
- Associated Record (Lookup Relationship)
- Category (Text)
- Subcategory (Text)
- Created By (System Concatenated Field)
- Created Date (DateTime, Read Only)
- Last Modified By (System Concatenated Field)
- Last Modified Date (DateTime, Read Only)
Alongside these fields, there are several new Action Buttons in the record page which allow you to open up your Flow.
These buttons include:
- Open Flow: This opens up the currently active version of the Flow. If there is only one version of the Flow, that will be opened.
- Open Latest Version: This opens the latest version of the Flow. This will be handy if you are working on updating an active Flow.
- Edit Access: This takes you to the Edit Access page for that specific Flow. Here you can customise who can access the Flow.
- View Details: Presumably, this will take you to the View Details and Version Page. This button is currently hidden.
As you can see, the setup for the Flow Record is relatively basic. However, there are a few key things to bear in mind right now:
- Custom Fields cannot be added to this object. If you try to add one, you will be met with an access error message.
- Changes to the Label and Description sync only between the record page, and the page shown in View Details and Versions.
- Changes to the Label and Description in the Flow (in Flow Builder) sync to the record page, not to View Details and Versions.
- N.B. Please note this sync ONLY occurs if the Description is blank at the time of the change in Flow Builder.
- The Associated Record page is currently defaulted to be linked to Campaigns; it cannot be currently attached to other objects.
- There is no validation attached to the Category and Subcategory to prevent cross-duplication.
- In many instances, your Flow Record’s API Name will be appended with additional characters at the end of the name (e.g., -2).
- If you customise the page in App Builder, the API name will disappear from the page layout but not in the Highlights Panel.
- Previous versions of the Flow are listed as Cancelled rather than Deactivated as will be shown in Flow Builder.
Before we move on to some of my thoughts on how you as an Admin can take some small steps to improving the App, let’s look at the additional object that is linked to the Flow Record object, this being Flow Versions. Let’s unpack this additional Flow object now.
What’s Included in the Flow Versions Object?
The Flow Versions object is related to the Flow Record object; it details the number of versions linked to a particular Flow.
Included in the Flow Versions object are the following fields:
- Flow (Lookup Relationship)
- Flow Version Name (Text, Read Only – this is the API Name of the Flow)
- Version Number (Number, Read Only)
- Flow Type (Picklist, Read Only)
- Progress Status (Picklist, Read Only)
- Last Modified By (System Concatenated Field)
- Last Modified Date (DateTime, Read Only)
- Activated By (Lookup Relationship)
- Activated Date (DateTime, Read Only)
Once again, this object is fairly minimal in what it contains. Like with the Flow Record object, you can’t add custom fields to this object. So, in terms of customisation, the most you will be able to do is edit the page layout or Lightning Record Page.
Now that we have covered the three core parts of the Lightning Automation App, let’s talk about the ways you can improve it.
Three Ways to Improve the Lightning Automation App
In my estimation, there are three key ways right now that we as Salesforce Admins can enhance the Lightning Automation App. These three updates will allow us to get much more benefit from this tool, and it will also allow us to track our Flows better.
The three improvements I think we can make are as follows:
- Replace the standard page layout with a custom Lightning Record Page.
- Manage Flow Categories with Custom Metadata and a Screen Flow.
- Create a Custom Object to Log Flow Runs and Use Flow to Tally the Runs.
We’ll cover each of those updates briefly. However, in full transparency, my list may grow as I begin to use the App more.
Replace the Standard Page Layout with a Custom Lightning Record Page
The first item on my list of updates you can do to make the Automation App better for you is to replace the standard Page Layout with a custom Lightning Record Page. I have done this in my preview org and the results are quite good as you can see below.

As you will see from the screenshot, I have broken down the Lightning Record Page into three key areas. Those areas being Basic Details, Key Flow Details, and System Information. Alongside this I have removed the Associated Record field (honestly, I don’t see the benefit of using it if it only links to Campaigns), I have also made the Category and Subcategory fields read only to End Users on the page level (they can only be edited by a System Admin). This is a very easy change you can implement to make the app even better.
Manage Flow Categories with Custom Metadata and a Screen Flow
The second item on my list is to create a Screen Flow and a Custom Metadata object to control the categorisations of your Flows. Admittedly, I like that we have these fields, but I don’t necessarily like that they are both Text Fields. In one sense I’d almost prefer these to be picklists. However, I understand that because of the fact that we can’t edit fields on the object, that this would be difficult to achieve. This is where Custom Metadata comes into play. In recent months, I’ve become a bit of a fan of Custom Metadata, and when it comes to managing the Flow category and subcategory, Custom Metadata can really be a big benefit.
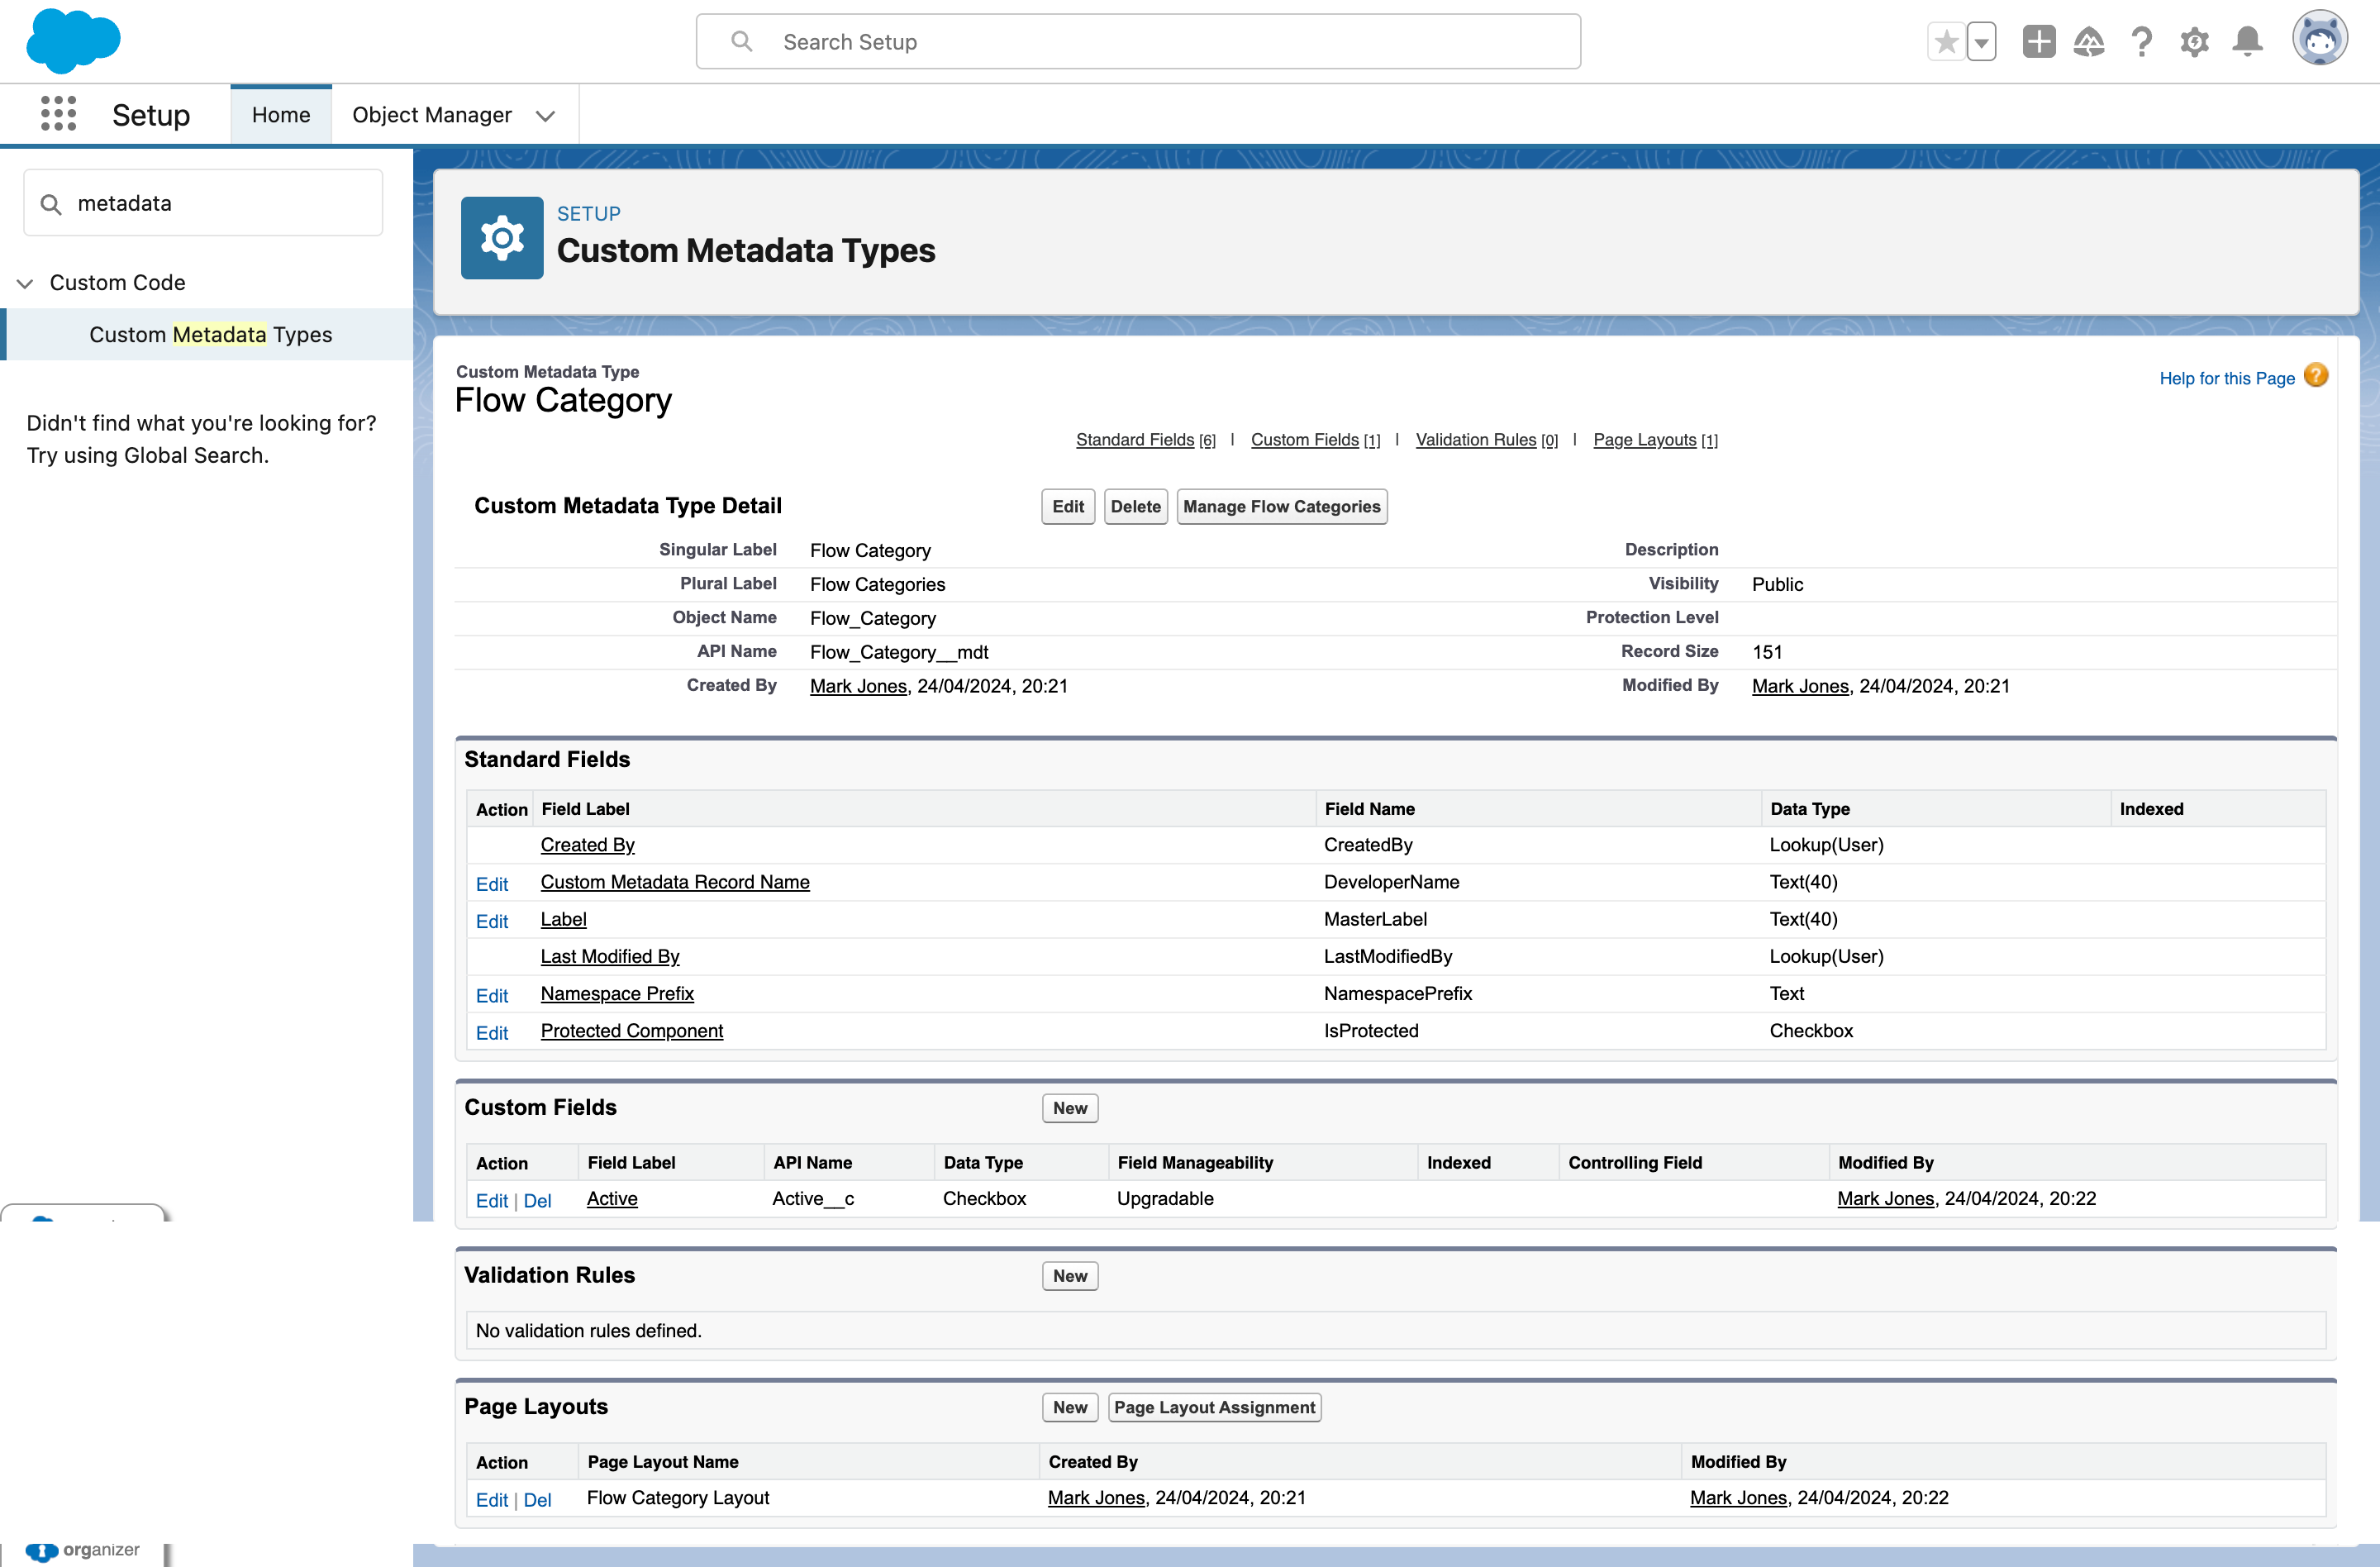

In this area in managing the categories for the Automation App, the Custom Metadata Object I created is ironically enough called Flow Category. The only custom field I added to the object was a checkbox called Active. This checkbox was then added to the layout before moving on to building my example Flow categories. The Screen Flow you will see shortly returns a list of the Active Flow Categories to provide a list of specific categories that can be linked to the Flow you are updating.
In terms of the categories, I simply started with Examples 1-4. However, if I was to give my advice here, I would spend some time thinking through the kinds of categories you want to list and then create Custom Metadata Records for them on a CMDT object.
Once you have your CMDT object and records in place, you will be ready to build out your Screen Flow to control which categories can be linked to the Flow Record. Let’s take a look at the Flow I built to show how you could build something similar in your org.
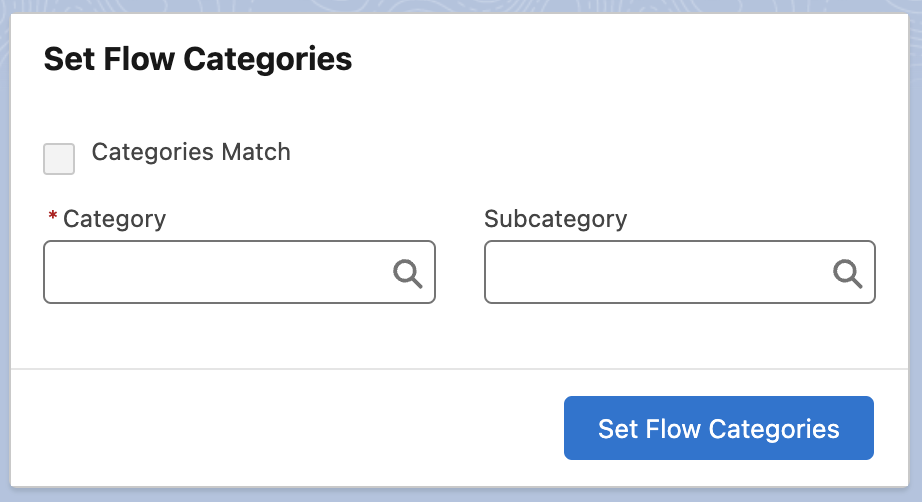
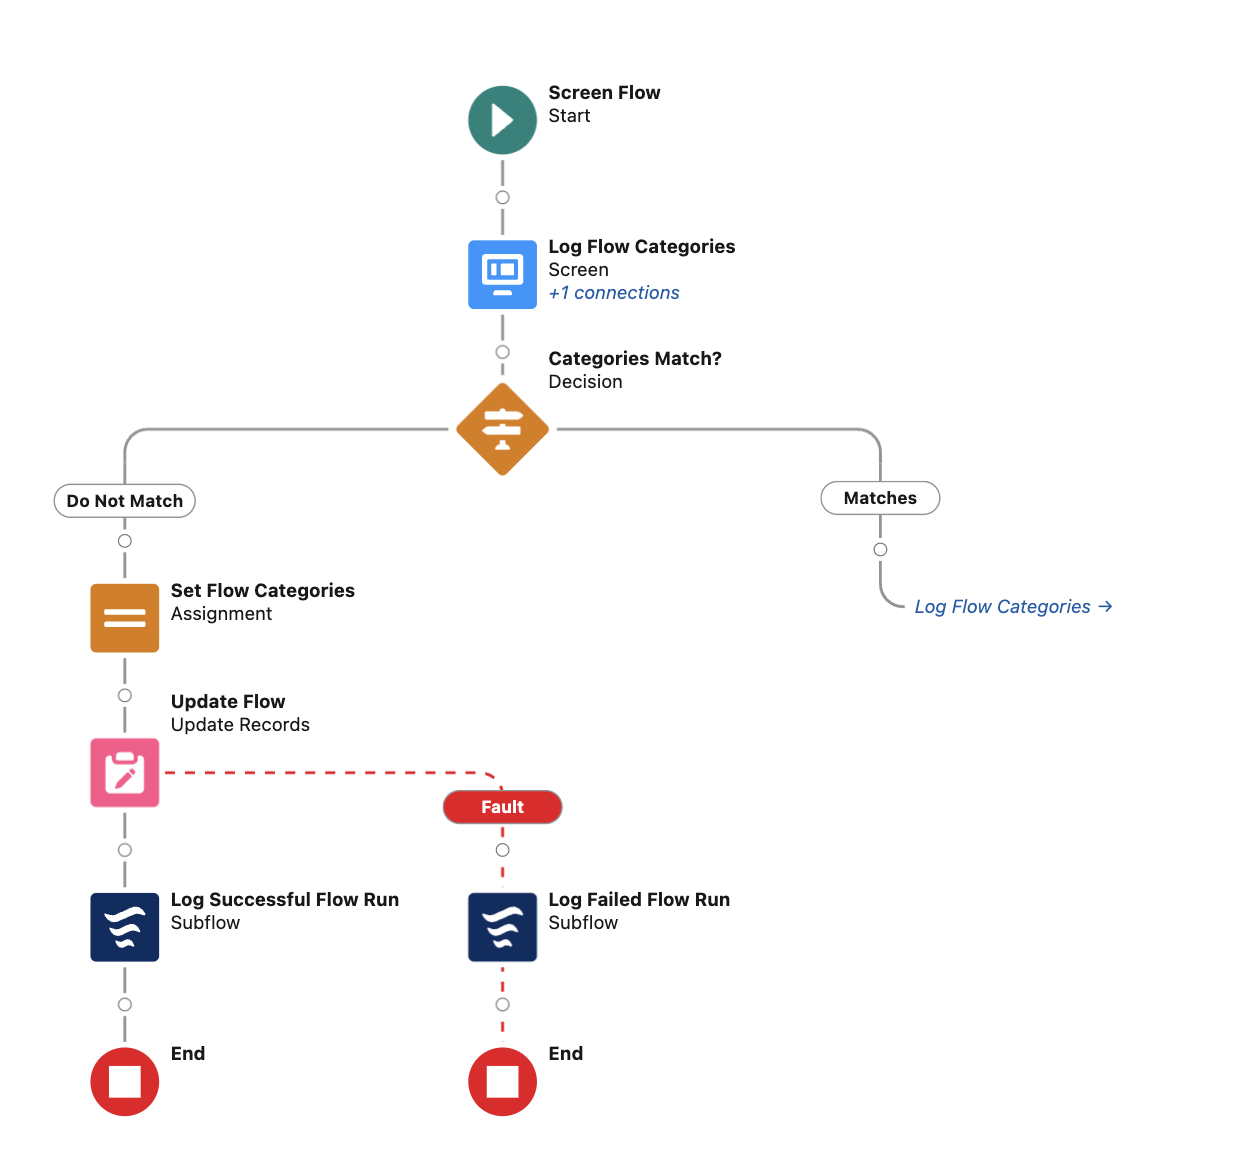
As you will see from the screenshot provided, the Screen element displayed (which is the only Screen in this Flow) shows three fields. These fields being Category, Subcategory, and Categories Match. The Category and Subcategory fields are Choice Lookup components which is tied to a Record Choice Set variable which returns a list of the Active Flow Category CMDT records. Selecting one of the categories stores the label value of the selected CMDT record. The Categories Match field is a read only checkbox which will reactively mark itself as TRUE if the Category and Subcategory fields are not blank and are an exact match.
Once you have chosen your category or categories, the Flow will check to see if the values are an exact match. If they are a match, the Flow will send you back to the Screen element. If they aren’t an exact match, the Flow will assign the categories via an Assignment element before updating the Flow Record. Once the Update tasks has ran or failed, a subflow is called creating a Flow Run record. If the update is successful, the Log Successful Flow Run Subflow element is executed, if not then the Subflow named Log Failed Flow Run is executed.
Outside of that, there isn’t much to go over. It’s a very simple Screen Flow. The Flow simply allows you to select a category from the list of active categories and updates the Flow record. With the Flow providing the result depending on it’s success.
Create a Custom Object to Log Flow Runs and Use Flow to Tally the Runs
The last item on my list is to create an object to log when your Flow runs and whether or not that run was successful. The object I have built is relatively simple, it is basically a custom object that links to the Flow Record and logs the Date/Time of the run and if it was successful or not. If the run was not successful, a field conditionally appears which captures the Flow Error Message.
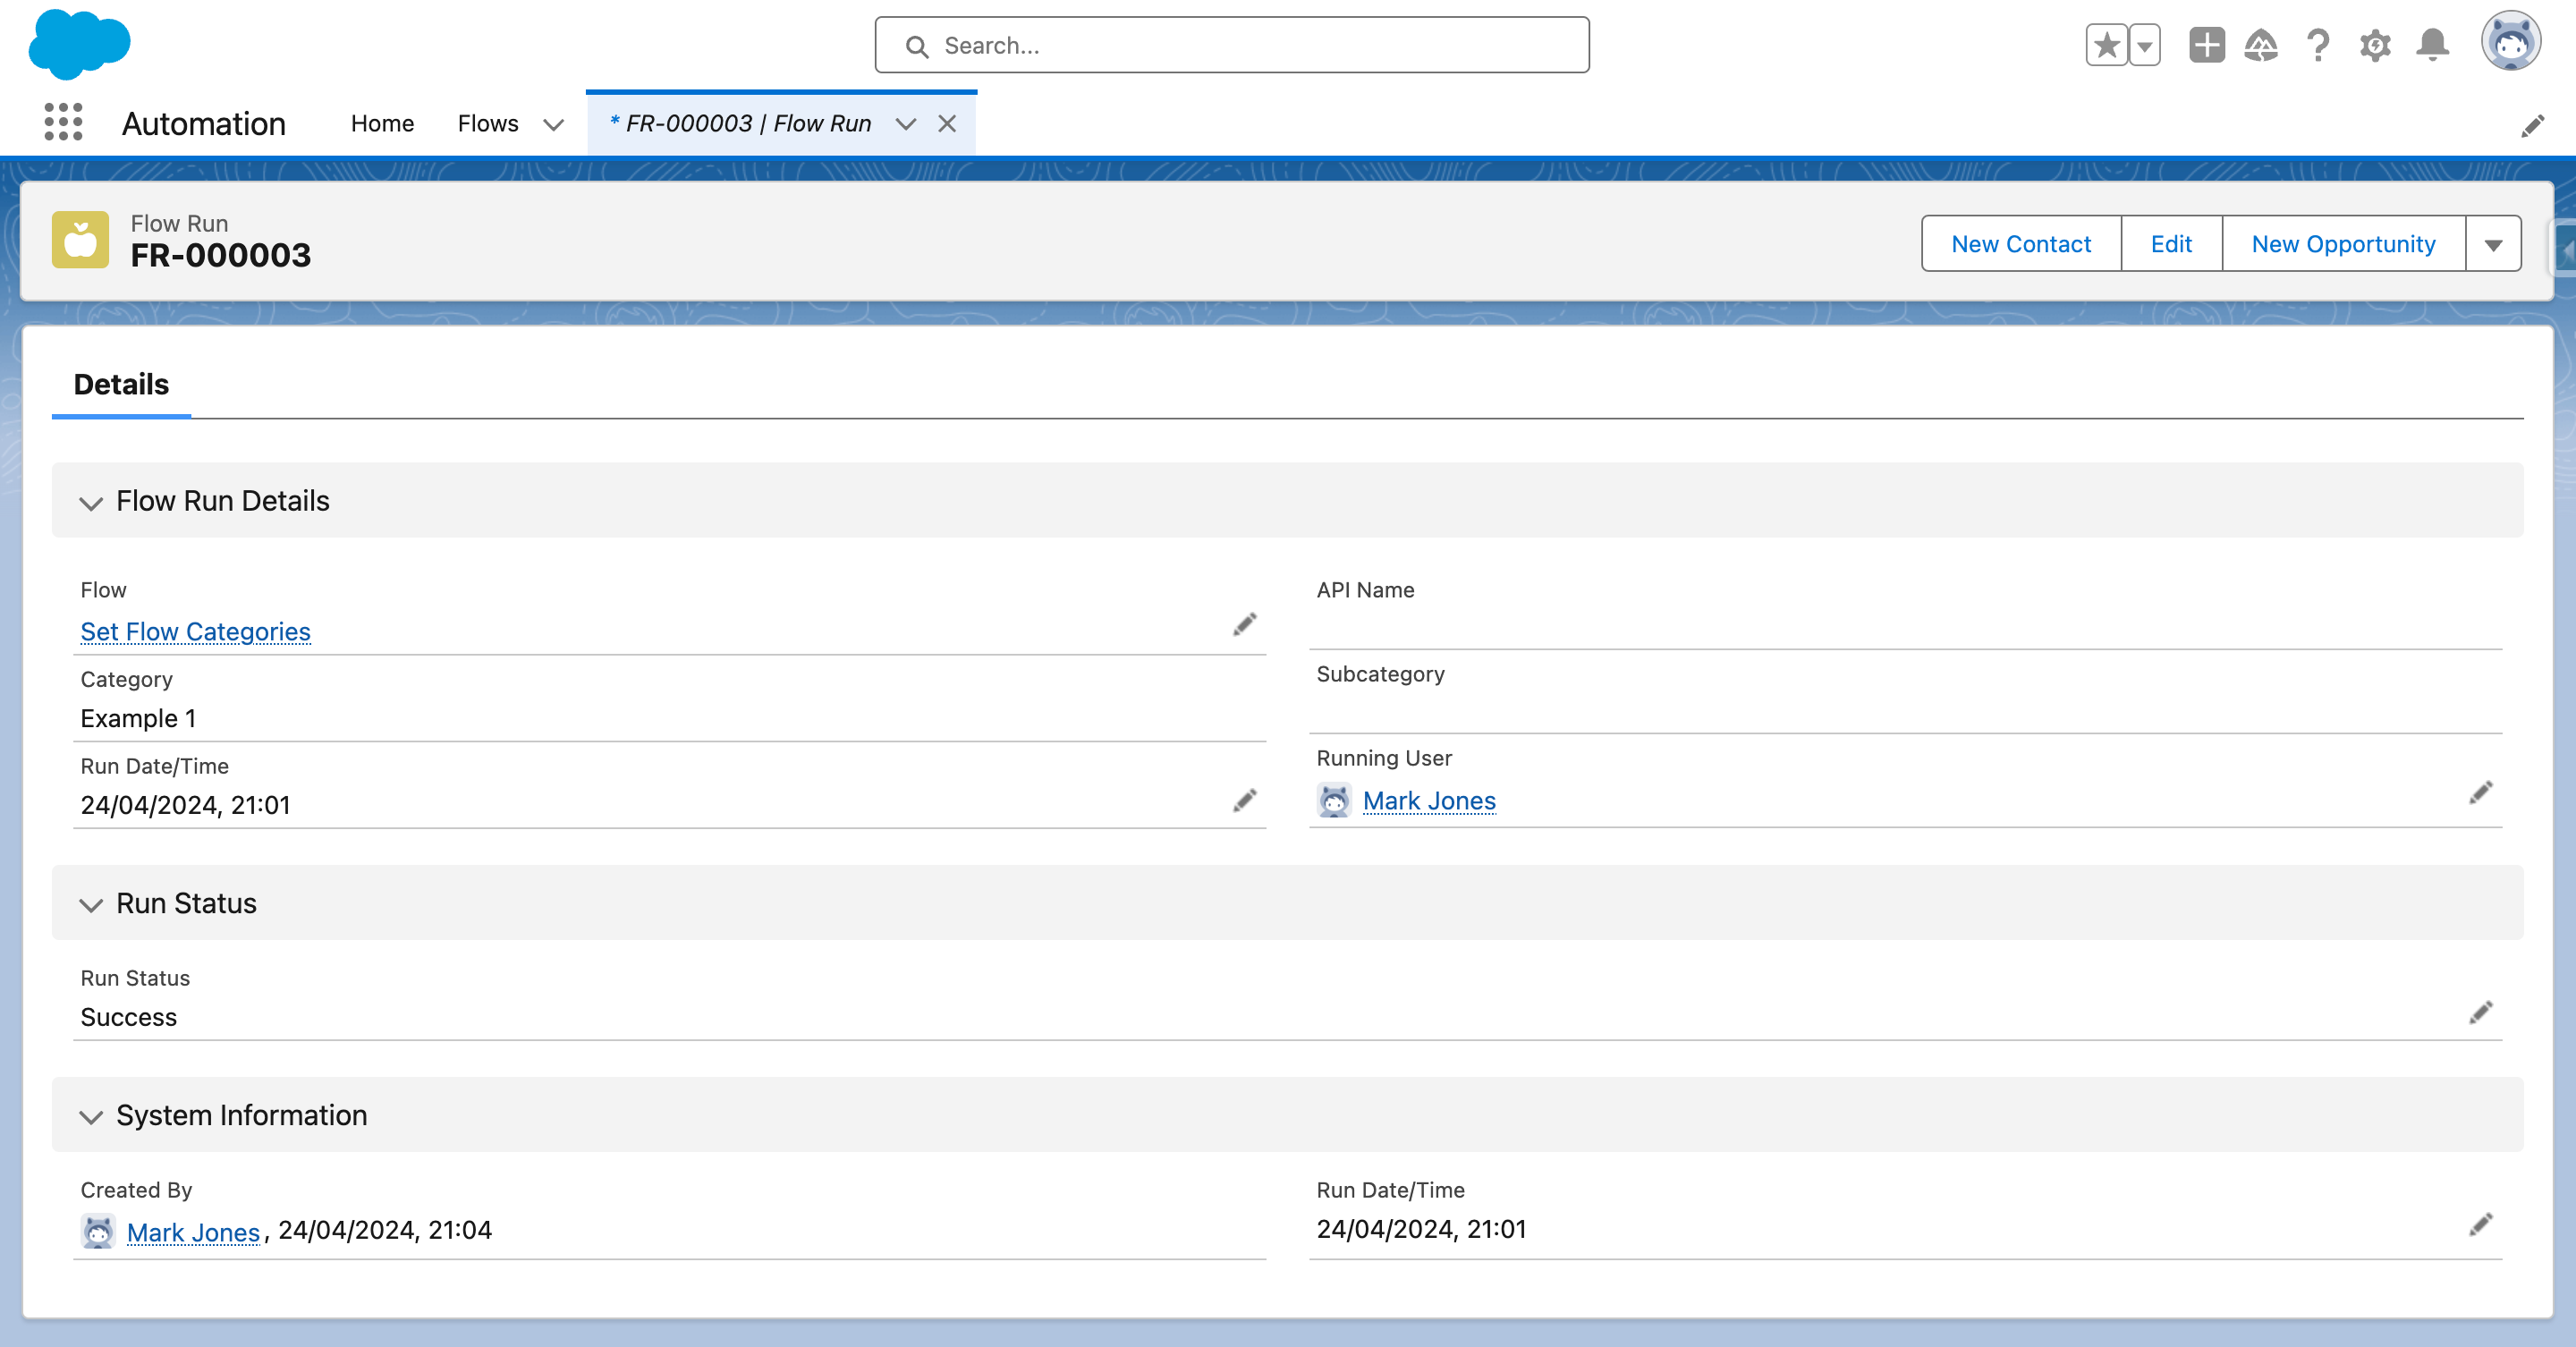
As you will see from the screenshot provided, the Flow Runs object includes 4 or 5 fields which get populated by an Autolaunched Flow that is attached to the Flows I have been trying out this framework with.
It is worth noting that the API Name, Category and Subcategory are Cross-Object Fields. So these are not set at all on the Flow Runs object, these can only be edited on the Flow Record.
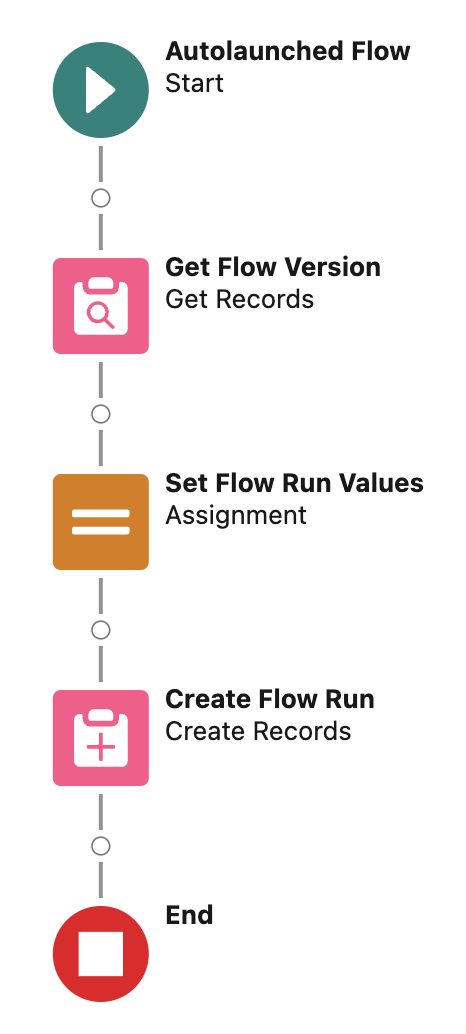
Attached to this object are two Autolaunched Flows. The first is called Log Successful Flow Run and the second, Log Failed Flow Run. The Flow for successful runs will run at the end of each Flow if no faults are encountered. If a fault path is followed, the Flow for failed runs is used.
In the case of both Flows I have three input variables which are populated via the Flow that triggers the Autolaunched Flows. These values are used during the course of the Flow and help to create the Flow Run record.
The three input variables are as follows:
- varFlowAPIName: The API name of the Flow that triggered the Subflow.
- varRunDateTime: The date/time the Flow interview started.
- varRunningUserId: The Id of the User that triggered the Flow.
Before setting the Flow Run values, the Flow retrieves the Flow Version record that matches the API name. We do this because of the issue I previously mentioned in this post where the APIName field value on the Flow Record often includes additional characters which don’t match the API name stored in the Flow canvas. In my testing, the Flow Version record always includes the correct API name. So that is the logic behind my decision. After retrieving the Flow Version, the values for the Flow are set in an Assignment Element before using a Create Records Element to create the record using the recFlowRun record variable. The only real difference between these Flows is that if the Flow has failed, the Error Message is included in the Set Flow Run Values Assignment Element.
Upon review when writing this post, I am considering pivoting slightly to just having one Autolaunched Flow to log the Flow run, rather than separating them into two Flows as I have done. If I was to do that, then I would include another input variable to log the Flow Run Status. This will work if I ensure the value sent in via the input was correct (ideally matching the picklist on the object).
Closing Comments
So, that provides an initial introduction to the Lightning Automation App coming in the Summer ’24 release. What do you think? Do you like what you’ve seen so far? Do you think my suggestions for improvements are good ideas? Would you add anything else?
If I was to think of one additional item, I would possibly look to add another custom object that relates to the Flow Record object which details the reason why the Flow you built was created in the first place. I haven’t thought too deeply about that just yet, but I think it makes sense to know things like who requested the Flow (if it was requested), why it is being created, and what its purpose is. Outside of that, I might also consider yet another custom object that can serve to link Flows together if you’re opting to use a Governing Flow model. That object would be a junction object, of course, to allow you to link multiple Flows to each other.
As I spend more time in the Automation App, I imagine that there will be ideas that spring forward. No doubt I’ll be pitching some session ideas or running a Workflow Wednesday session on this topic sometime soon. For now, let me know what you think of the App and what ideas you would implement to make it better. I’d be very interested to hear your views on the subject.
I’ll be back very soon with another blog on the Summer ’24 Release. I’m planning on doing a post on some of the UI updates, as well as a post on Action Buttons. I’ll also be doing a post covering Release Readiness Live for Flow Builder after the session airs.
Until then, I hope you find this post insightful and helpful as you prepare for the launch of the Lightning Automation App.


